
Native extraction, original washer clamp and isolated acceptance
Three panels show unplugged switch-down assembly, the original pad/washer/screw/key with camber upward, and a flat sanding pass with separate cable and extraction routes.
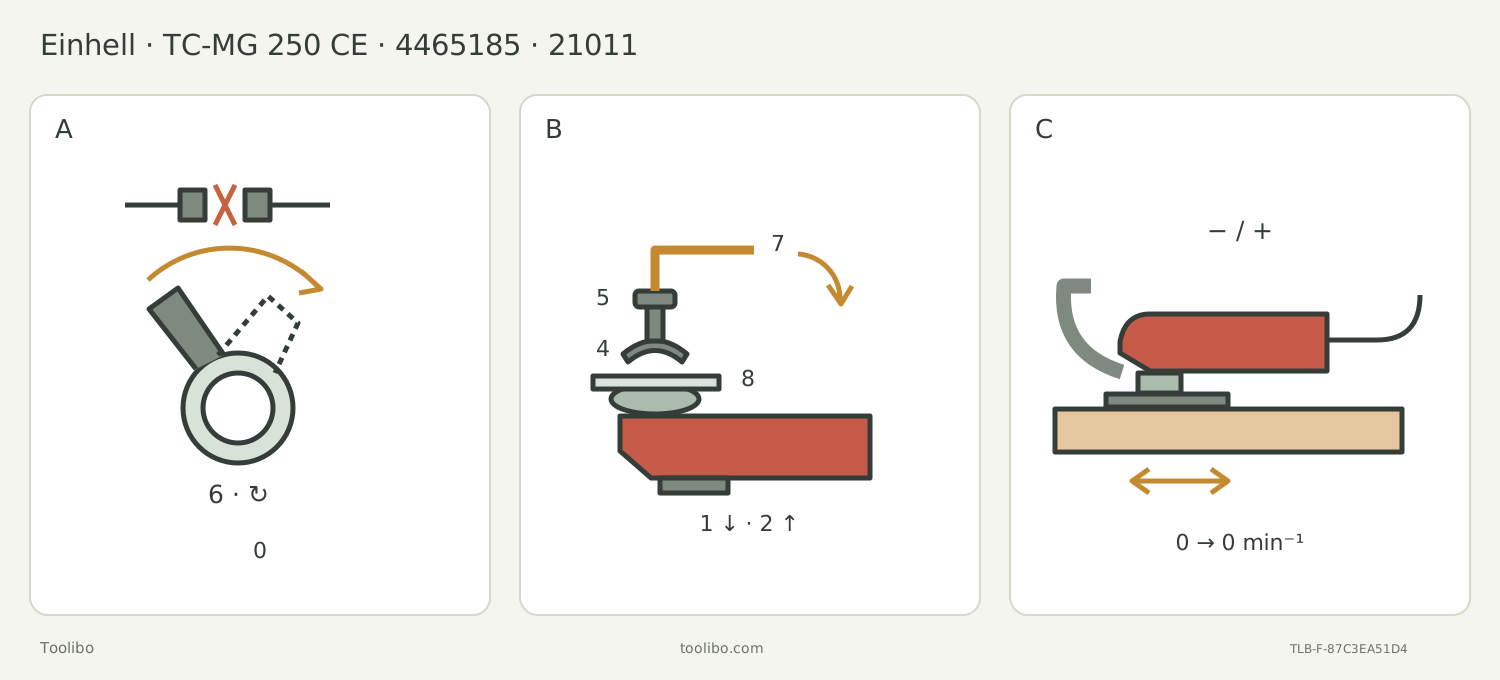
A · Unplug and latch the native extraction
Match the body and supply, select OFF and unplug. Fit attachment 6 at the nose, rotate in the actual illustrated direction until latched and check retention.
B · Complete the original mechanical clamp
With switch down and holder up, engage pad 8 on the pins, fit washer 4 camber upward and tighten screw 5 with key 7. Check security and remove the key before power.
C · Dry trial and isolated acceptance
Align actual paper holes, qualify the vacuum and support the sample. Choose a controlled setting, sand the small flat area lightly, then stop and unplug before checking finish and attachment security.
Original schematic with neutral uncounted engagement. A uses the actual rotate-to-latch extraction route, not a generic hood or included vacuum. B shows the switch-down assembly orientation; washer 4 camber faces upward, away from the holder, under screw 5. The magnet only positions. C requires suitable actual extraction, clear routing and complete stop/unplug before inspection.
Match article 4465185 and I-Nr. 21011
This guide uses the UK-linked Einhell TC-MG 250 CE operating instructions for article 44.651.85, I-Nr. 21011, with layout dated 25 August 2022 and back-cover marking EH 08/2022 (02). Read them with the linked safety booklet dated 14 May 2025 and your actual supplied instructions. Match the physical model, article and identification number before using this workflow. A similar TC or TE name, another identification number or a different regional plug is not established by these documents.
The complete project is dry sanding a small flat area of known new, uncoated loose softwood with the actual native triangular pad, correctly matched paper and suitable extraction. Its goal is a more even intended surface without gouging, rounding the intended edge or moving the support. This is a documentation-based owner exercise, not a measured finish or removal-rate test.
The operating manual also describes sawing and scraping, while the general safety booklet restricts its wording to dry grinding/sanding. This task stays within the shared dry-sanding scope. It does not resolve that broader difference into permission for installed cuts, unknown coatings, asbestos, solvent-wet material or adhesive removal.
Confirm the corded supply and isolate before setup
The exact table gives 220–240 V AC, 50 Hz, 250 W and protection class II. Check those values against the actual nameplate and supply. Inspect the original plug, cord, strain-relief area, housing and switch. Damage, a switch that cannot reliably control the tool or an uncertain supply is a stop condition. Do not alter the plug, improvise a transformer or borrow an extension-cord gauge table from another model.
Use a safe matching supply for this dry bench task. Keep the cable clear of heat, oil, sharp edges and moving parts; route it away from the back of the tool and outside the planned sanding area. Do not let the hose or cord pull the tool off balance or trap a foot. Disconnect by gripping the plug, never by tugging the cable.
Select OFF, wait for complete stop and unplug before adjustment, changing the pad or paper, inspection and cleaning. Keep the plug under your control while assembling. Switching OFF alone is not the power isolation required for touching the mounting system. Do not leave a connected tool where it could start accidentally.
Account for the original clamp parts
The magnetic holder helps position the accessory. It is not the finished mechanical clamp. The native pad still needs the original washer 4, installation screw 5 and hexagon key 7, with the mounting pins properly engaged. Do not substitute VARRITO’s release lever, TE-MG 300 EQ’s quick-release sequence, a Starlock snap-in method or a magnet-only hold test.
Inspect the pad, mounting surface, washer, screw and key while unplugged. Missing, distorted, cracked or unidentified parts mean pause for exact replacement evidence or qualified service. Use suitable handling gloves when necessary for sharp or hot parts and allow cooling; keep fingers away from pinch points. No extra washer, guessed screw length or numerical torque is specified here.
For the installation orientation, hold the unplugged tool with the ON/OFF switch facing down and the mounting holder facing up. Seat the accessory so all relevant holder pins enter its recesses. In that stated switch-down orientation, the washer’s camber faces upward. Fit the original screw through the original washer and tighten it securely with the hex key. Check that the accessory is secure without energizing the motor. Remove the key before any later connection or start.
The direction is tied to this actual assembly orientation, not a generic “camber toward the tool” rule copied from another brand. A magnet that holds the pad during positioning does not prove that the screw, washer or pin engagement is correct.
Install the native extraction before the sanding plate
For this sanding project, use the exact extraction attachment 6 rather than mounting the pad first and then forcing a hood around it. With OFF selected and the plug removed, place the tool stably in the specified assembly orientation. Fit the attachment at the nose/holder area as shown in Figure 3, rotate it in the illustrated direction of Figure 4 until it latches as in Figure 5, and check the attachment is retained.
Place triangular plate 8 on the attachment and holder so the mounting pins engage the plate recesses. Complete the original washer-4/screw-5/key-7 clamp, with the washer camber upward in the switch-down orientation, and check secure seating. The dust attachment’s tool-free latch does not make the pad clamp tool-free.
Connect a suitable extraction unit or vacuum through the actual appropriate connection. The attachment is not itself a vacuum cleaner; no included extractor or universal hose adapter is promised. Before use, satisfy the actual vacuum, hose and material instructions, including its required configuration and operating checks. A hose that fits is not evidence of adequate dust control. If the actual extraction system cannot be qualified, leave the sanding task on hold rather than relying on visible dust or suction felt by hand.
Any extractor adjustment or blockage inspection requires its own safe shutdown and isolation as well as the tool’s. Do not open an extractor motor, bypass a filter or infer a numerical airflow threshold not provided by these documents.
Match the sheet and define the trial surface
Use an intact sheet actually matched to the native pad and appropriate for wood. For a conservative first trial, the historical exact product sheet lists P80 among the original papers; use it only when your actual sheet is identified, fits correctly and suits the sample. This is an example, not a universal grit progression or a promise about current box contents.
Press the hook-and-loop sheet onto the pad and align every extraction hole. Do not use torn, worn-out, loose or incorrectly sized paper. The manual’s sanding-area figure of 90 × 90 × 90 mm and the product sheet’s paper-size figure of 93 × 93 × 93 mm are differently labelled dimensions; they do not authorize an arbitrary oversized replacement.
Clamp the dry sample to a stable platform so it cannot slide, rock or flex under ordinary pressure. Leave clear access for the pad without hitting clamps or bench metal. Define a small visible flat target area; this guide supplies no made-up stock dimension, flatness tolerance or structural requirement. Keep hands away from the work area and arrange the task to work away from your body without overreaching.
Wear safety goggles, hearing protection and appropriate dust/respiratory protection. Wood dust is not harmless, and extraction does not remove the need for personal protection, ventilation and a clean work area. Keep bystanders and children away. Keep the handle dry and clean and the vents unobstructed; loose clothing and hair must stay clear of moving parts.
Select speed without inventing a conversion
Turning the controller toward plus increases speed; toward minus lowers it. The manual does not provide a universal starting number for wood sanding or an exact numeric speed for each dial setting. Choose a controlled setting suitable for the actual sheet and sample, and assess a small trial rather than immediately attacking the finished work.
Keep the document labels distinct. The manual calls 11,000–20,000 “idling speed” in rpm; the product sheet separately lists 11,000–20,000 no-load speed and 22,000–40,000 oscillating speed. This guide does not relabel those values as another brand’s OPM or invent an engineering conversion. Constant-electronics wording is not permission to overload the motor or a guarantee of the finish.
Make the initial adjustment unplugged. Check the pad, clamp, sheet, extraction and cable route again, remove the key, verify the slide is OFF and only then connect the tool. Set up and operate the qualified extractor according to its own instructions. Slide the tool switch forward to run; slide it rearward to stop. This is a maintained slide control, not a trigger that stops when your hand relaxes.
Sand lightly and inspect after isolation
Start clear of the sample and bring the pad onto the intended area under controlled grip and stable footing. Keep broad, even pad contact and use light, controlled movement across the small flat area. Do not dwell on the tip or deliberately dig an edge into this flat-surface trial. The manual’s tip/edge guidance for profiles and channels is not a reason to gouge this sample.
The chosen sheet and applied pressure influence removal. Do not compensate for a clogged, detached or worn sheet by pushing harder. Stop if the stock shifts, the pad catches, the sheet moves, extraction is lost or vibration/heat changes abnormally. Move the switch rearward OFF, wait for complete stop, unplug the tool and isolate the extractor before a physical inspection under their actual instructions.
At the end of a pass, remove contact with the wood, select OFF, wait for standstill and unplug before setting the tool aside for inspection. Inspect the cool sample in good light. Accept only if the intended area is evenly smoothed without unwanted edge rounding, grooves, scorching, torn fibers or evidence of shifted support. Also check that the sheet and pad remain secure. There is no acceptance based merely on elapsed time or the sound of the motor.
If a simple documented setup problem is found, correct it unplugged and try on appropriate scrap again. Damaged parts, repeated slipping, a bad cord or excessive sparking are service holds, not reasons for an energized test or more clamp force. The manual assigns carbon-brush examination and replacement to a qualified electrician; the owner must not open the housing to investigate sparks.
Leave a clean, identifiable system
Unplug before cleaning. Keep housing, safety devices and vents free of dust using the documented clean-cloth method; avoid solvents or cleaning agents that attack plastic and never allow water into the tool. The manual provides no additional internal owner-maintenance task. A damaged power cable must be replaced by the manufacturer, its service organization or similarly qualified personnel.
Store the dry tool and accessories in a dark place above freezing; the stated ideal range is 5–30°C. Keep the exact washer, screw and key with the tool and preserve the original instructions. For parts or service, record the type, article number, I-Nr., required part and observed failure history. Describe what happened without reproducing a suspected fault under power.
The complete outcome is an accepted small dry-sanding sample and a stopped, unplugged system—or an explicit identity, extraction, parts or service hold. Neither outcome depends on assuming that magnetic positioning or a dust attachment makes an incomplete tool ready.
Models referenced