
Isolation, engagement and a supported complete cut
A shows a disconnected cord and release cue. B shows a downward press onto a neutral wood blade. C shows I/0 and two grip-planning highlights. D shows a retained clamp, separate waste support and blade reaching into clear space below the stock.
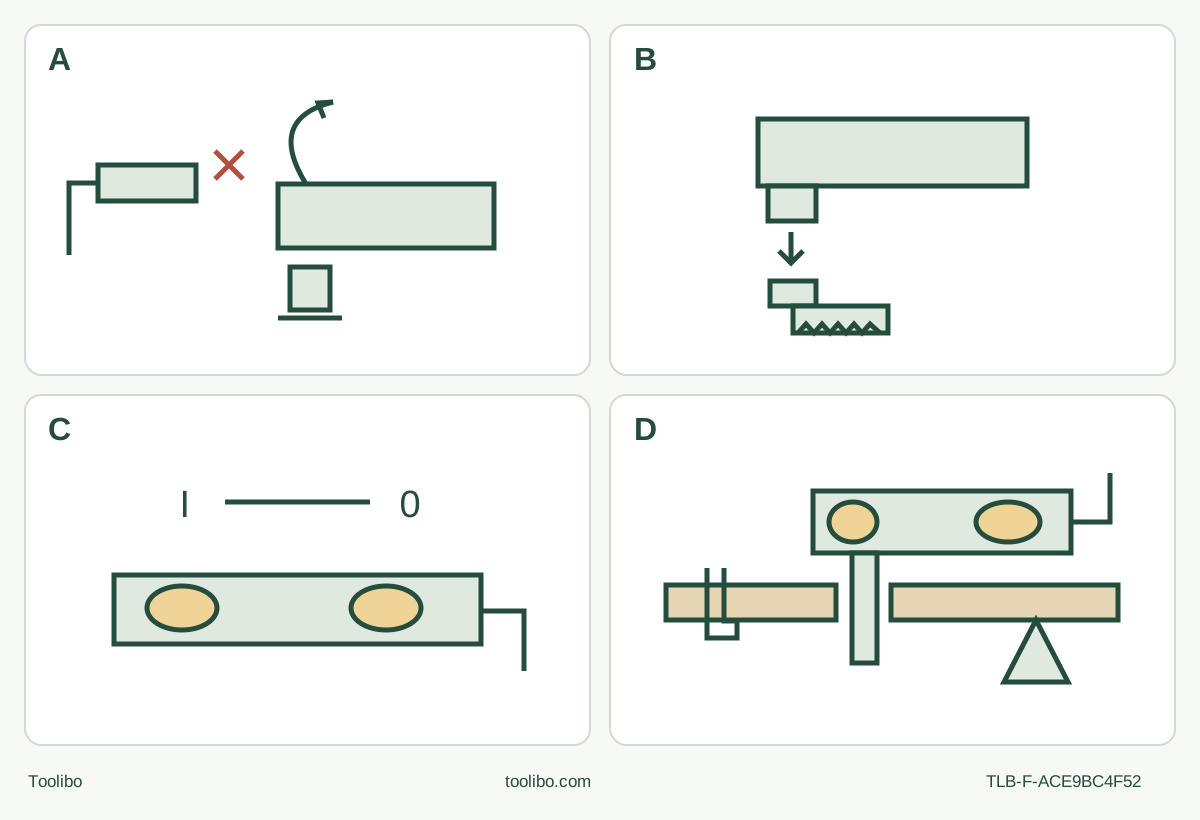
A · Isolate before release
Switch 0, wait for standstill and unplug; cool the old accessory and use protective gloves before fully opening AutoClic to eject it.
B · Press, then verify seating
Place the original compatible blade flat, depressed centre down/text up; press until audible engagement and check while isolated.
C · Keep control with both hands
Forward I starts; rear 0 stops. Keep two insulated grips, clear vents and a reachable switch, with the lead outside the cut.
D · Separate and accept
Clamp the retained stock and independently support waste. After full separation switch 0, wait, withdraw, unplug and inspect the whole edge.
Original conceptual schematic. A and B do not specify holder pin count or an added lever-closing step. C is not an exact hand-position drawing or speed calibration. D distinguishes clamping from independent support; it gives no cutting depth or finish guarantee.
Match the UK body before preparing the cut
This project is for the Bosch PMF 250 CES associated with UK order 0603102170 and type 3 603 A02 170, using the currently linked 1 609 92A 84G instructions dated 8 July 2022. Match the actual nameplate, supplied instructions and controls. The SystemBox wording in the download filename does not create another tool or establish what is in your case. Do not substitute another PMF model’s mounting or electrical instructions.
The outcome is a complete short separating cut in a dry, untreated, uncoated softwood sample that has already been removed from any installation. Both faces and the full blade exit must remain visible. It is not a door-frame undercut, an installed-panel opening or a concealed-service investigation. You will either accept the isolated finished sample or stop and correct the setup before cutting another piece.
Use a positively identified original AIZ 32 EPC, 2 609 256 947, which the exact UK product lists as a wood plunge blade. The operating manual’s HCS wood-blade row supports separating and plunge cuts in wood; it restricts plunge cutting to soft materials. This is not permission to cut hidden nails or to assume every blade that clicks into the holder is suitable. If the actual blade identity, intended material, condition or usable reach cannot be established, hold the project. No sample dimension here is a manufacturer cutting-capacity rating.
Establish a safe supply and visible work route
The manual gives a 250 W input and 15,000–20,000 no-load oscillations per minute on a 230 V rating basis. The actual tool nameplate must agree with the available supply. This is a corded tool: a familiar battery system is irrelevant. Inspect the isolated cord, plug, housing, handle, switch and holder for damage, looseness or an unexplained condition. Do not run a damaged tool to see whether it still works. A switch that cannot reliably control the tool requires qualified service.
The GB instructions describe a BS 1363/A plug with an approved internal fuse. An unsuitable plug or damaged supply cord is a service matter, not an invitation to cut off the plug, rewire it or use an improvised travel adapter. Keep the lead away from the cutting route, sharp edges, heat and moving parts. Arrange it so it cannot pull the tool sideways, snag the sample or create a trip hazard. Use a dry, well-lit, stable workplace with bystanders clear and no explosive or flammable atmosphere; follow the actual supply and extension equipment instructions rather than inventing a cable rating.
Inspect the stock and entire cut route for nails, screws, staples, embedded grit and other foreign material. Reject unknown coatings, treated wood, damp stock and material that may present an unidentified dust hazard. Mark the intended cut and retained side. Clamp the retained stock to a stable bench, with a separate support for the waste that permits separation without closing the cut on the blade. Neither support nor clamp may occupy the full oscillating envelope, the space beneath the wood or the eventual withdrawal path. Do not hold the sample by hand or against your body.
Wear eye and hearing protection and the other protection required by the actual task. Provide ventilation and a dust-control system suitable for the material wherever possible; the manual advises a P2-class breathing mask. Some wood dusts, including oak and beech, are carcinogenic. If extracting dry dust that is especially harmful to health or carcinogenic, use a special extractor suitable for that duty. Follow its own instructions, including correct connection, operation and checks before cutting. An unknown dust-control arrangement is not a reason to improvise a trial. The PMF sanding hood is not a saw-blade capture attachment.
Unplug, eject and engage the original blade
Slide the switch back to 0, wait for complete standstill, and pull the plug out before handling the accessory or changing the setup. Keep the disconnected plug under your control. Allow a used blade to cool and wear protective gloves when changing it; its cutting edges remain sharp when stationary.
The actual holder accepts Starlock only. The manual crosses out StarlockPlus and StarlockMax. AutoClic describes the mounting action, not permission to use either larger tier. There is no transplanted magnetic bolt, loose washer or adapter procedure in this project.
If an accessory is fitted, open the AutoClic lever all the way to eject it, controlling the isolated work area so the hot or sharp accessory cannot injure someone. Remove the old accessory from the setup. Put the replacement on a level surface with its depressed centre facing down and its lettering readable from above. Turn it to the useful working orientation. Press the tool onto the accessory at that angle until it audibly engages. Check that it is securely seated before reconnecting power. Do not add an unlisted lever-lowering step, extra fastener or guessed torque. If engagement is uncertain, stop for correct identification or qualified help rather than running a seating test.
Inspect the installed blade for damage, cracks, bending and dullness. Check the isolated blade’s actual useful reach through the proposed wood and the complete clearance around it. Its teeth must not be aimed toward a clamp, bench surface, your body or the lead. A pull check does not prove that a worn or incorrect holder is safe. Damaged hardware, persistent looseness or an uncertain blade remains a stop condition.
Make the complete sample cut
With the switch still at 0, confirm the accessory, clamps, waste support, cord route and dust arrangements. Adopt stable footing and hold the tool firmly with both hands on the designated insulated gripping surfaces, keeping the ventilation slots clear. The on/off switch must remain reachable without releasing the handle. Keep hands away from the blade, the sawing area and the underside of the workpiece.
Connect the verified supply only after those checks. Hold the blade clear, slide the switch forward to I and establish controlled running before contacting the wood. The manual recommends level 6 for sawing and cutting harder materials such as wood, while saying that the required rate depends on material and working conditions. Use that exact documented guidance with the actual sample; do not treat another model’s dial-to-speed table as a calibration for this one. A small controlled entry is not a powered fault test.
Follow the marked line with consistent, light contact pressure. Move the tool gently back and forth as the manual describes to avoid concentrating heat and jamming. Do not twist the blade to force a turn, lever out the waste or increase pressure to disguise poor cutting. Keep the waste supported while allowing the cut to open and separate. If visibility, support or control deteriorates, stop; do not continue by feel beneath the sample.
After complete separation, slide the switch back to 0, wait for the blade to stop fully, then withdraw along the clear path and set the tool down safely. Unplug before inspecting the cut or touching the accessory. If the blade jams or the tool behaves unexpectedly, establish OFF and isolation before investigating; do not repeatedly restart, force the blade sideways or adjust the workpiece while it is moving. An unexplained electrical or mechanical condition belongs with qualified service.
Accept the result—or correct the setup
With power disconnected and the blade cool, inspect both faces and the separated edge. Accept the sample only if the intended cut line and size are achieved, the cut is fully through, and there is no uncontrolled tear-out, scorching, shifted stock or evidence that the support trapped the blade. There is no invented dimensional tolerance or promise of a finished joinery surface. Loose splinters are a separate isolated finishing task, not something to wipe away beside a moving blade.
If the result is unacceptable, identify a supported correction before another sample: a correctly identified sound blade, a clearer approach, better workholding or a properly qualified dust arrangement. If blade condition, holder security, control behaviour or supply integrity remains uncertain, stop and obtain service evidence. A successful short cut does not certify the tool’s internal condition.
Keep sanding and care separate
Before installing or removing any sanding assembly, switch off, wait for standstill and unplug. The manual requires dry sanding, original Bosch sanding accessories and a connected extraction system. While still unplugged, remove any fitted application tool and the depth stop before installing the hood. Its Figure C shows the actual hood fitted over the holder onto the collar, positioned away from directly beneath the tool and secured with its clamping lever; the adapter clicks onto the hose and connects to the hood outlet. The hood serves the sanding plate only. Do not infer saw-blade capture or substitute an apparently similar hood.
Qualify the actual plate, sheet, aligned holes, extractor and equipment instructions before sanding. Avoid overheating and empty dust collection before breaks as required by the actual instructions. The selected 2022 manual does not supply the newer Bosch installed-pressure/flow table or a universal sanding maximum of 4; neither may be imported silently. This completed wood cut does not qualify an unverified sanding system.
Clean the isolated tool and ventilation slots without introducing liquid or pushing debris inside. Keep sharp accessories protected in storage. Cord replacement and internal repairs belong to Bosch or an authorised service centre. Retain the exact ten-digit article number and document revision for service enquiries.
Source basis: PMF 250 CES Original Instructions, 1 609 92A 84G, English pages 14–22 and figures A–C; exact UK product identity/accessory listing; UK Declaration 1 609 92A 6Z7, identity only.
Models referenced