
Flat approach and the rejected tipped-pad shortcut
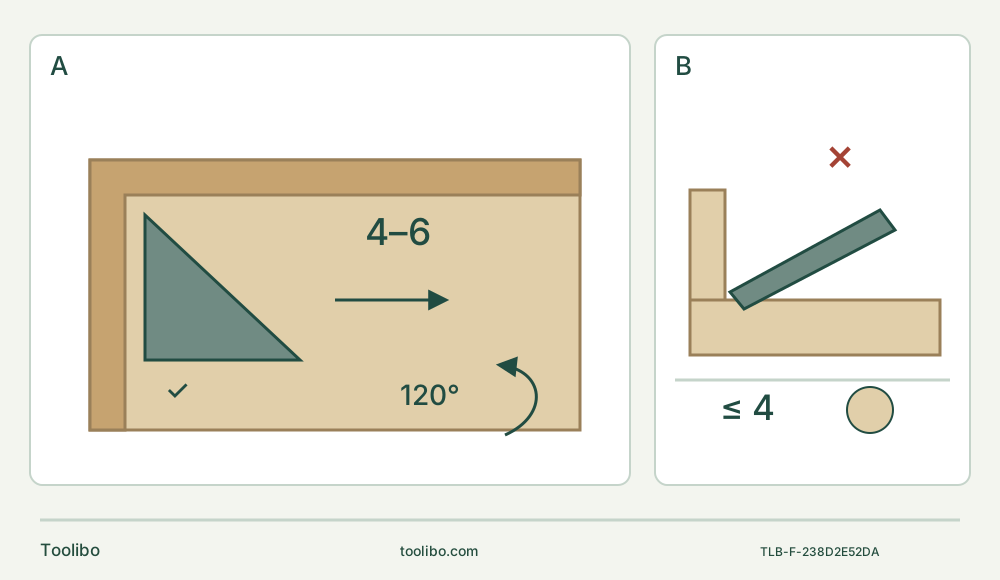
Two panels show a small triangular pad flat beside an inner corner with levels 4–6 and a 120° sheet-rotation reminder, then a crossed-out tipped pad and separate maximum-level-4 reminder for a different large/round system.
A · Qualify flat access and the small pad
Check the loose assembly, actual original FEIN small triangular pad, sheet and dust control. Keep the pad face flat at levels 4–6 subject to the accessory limit; isolate before sheet rotation or any setup change.
B · Reject the shortcut and inspect both faces
Do not wedge or tip the pad into the angle. Stop powered work where flat access ends, and accept only the intended even face without adjacent-face damage, rounding or shifted workholding. Large/round pads require separate qualification and a maximum level 4.
Original schematic, not a measured clearance. A requires the actual entire pad envelope to clear the adjacent face; stop short if it cannot. Rotate the sheet 120° only with the battery removed. B rejects tipping to reach the corner; its separate round-pad symbol and ≤4 label are a different accessory-class limit, not a way to make tipping safe.
Finish the flat face beside the corner, not the corner by force
A triangular pad can approach an internal corner, but its shape is not permission to wedge it between two faces. The aim here is an even barewood surface beside an upright edge while preserving the adjoining face and the corner line. This is a loose, securely assembled practice piece of known untreated wood, not an installed cabinet, painted window frame or structural joint. The assembly must already be sound; this guide does not establish adhesive cure, joint strength or repair suitability.
The selected system is the US FEIN AMM 300 Plus 12 V with an original small triangular sanding plate specifically released for that machine and a matching wood-sanding sheet. Match the actual body and instructions to 3 41 01 329 21 0, dated 2023-03-28. The current Select identity 71293262090 does not promise that every pad, battery or charger is included. This is not the 18 V AS machine, and the small-pad speed rule is not a rule for every triangular accessory.
The distinctive decision is access: can the actual pad remain flat on the intended face, with the abrasive and holder clear of the neighboring face? If not, stop powered sanding short of that area and choose a separately suitable hand-finishing method. Tipping the pad onto its point to reach the last strip defeats this project rather than completing it.
Qualify the surface and the actual sanding system
Inspect the entire workpiece. Reject unknown coatings, preservative-treated wood, old filler, protruding metal or a loose upright. The desired result is removal of minor surface irregularities, not reshaping the joint or grinding away a glue-filled internal fillet. Decide which face is to be smoothed and which edges must remain unchanged before choosing the abrasive.
Identify the actual original FEIN small triangular pad and compatible sheet from their own instructions. Starlock/StarlockPlus compatibility on this model is not permission for StarlockMax or any fitting third-party pad. The manufacturer requires an application tool released for the machine and intended task. If its identity, size class, material permission or condition cannot be verified, do not proceed.
Choose the grit for the actual bare surface and desired finish, using a matching scrap trial to confirm it. This guide does not invent a universal grit sequence or substitute a numerical grit for identifying the sheet. The sheet must fit the pad without a projecting edge that can scrape the neighboring face. Inspect the fastening surface, align the sheet evenly and align corresponding dust holes where provided. A worn pad that no longer retains the sheet is not repaired with extra pressure.
Use the already commissioned original B12A 12 V battery and an actually approved ALG 30, ALG 50 or ALG 80 charging system under its own instructions. This is a prerequisite, not a first-charge recipe or an assertion about the charger’s mains input. The manual gives 5–45°C for battery storage, use and charging; additional actual-system restrictions still apply. Stop for damaged, modified, repaired or unidentified batteries. Keep terminals away from loose metal, moisture and heat.
Make the access check with the battery removed
Slide the tool’s switch rearward to OFF, wait for stop, press the battery-unlocking button and withdraw the pack without force. Keep it out during pad or sheet changes, reorientation, inspection and cleaning. A red charge light or automatic shutdown is not physical isolation.
Clamp the loose assembly to a stable bench so neither the base nor upright can move or rock. Put clamps where the tool, pad and dust hose cannot hit them during the complete intended pass. Do not hold the piece in a free hand or against your body. Support the area being sanded so normal moderate pressure will not flex it.
With the actual pad isolated, check its full sweep and the tool housing—not just the tip—near the upright. Plan a flat approach and withdrawal that preserve control. The illustration shows the principle rather than a clearance measurement. Leave an unsanded strip if the real oscillating envelope would contact the adjacent face; a narrow gap in a drawing does not prove your pad can reach it.
If both faces need work, treat them as two separate setups. Finish one accessible face, stop and remove the battery, then reposition and reclamp the whole assembly to present the second face safely. Do not rock a running tool across the internal angle to sand two planes at once. Any fixture change demands another stability and clearance check.
Clip the pad in straight and complete sheet seating
Clean the holder and pad interface. Wear the manual’s protective gloves and keep fingers out of the clamping jaws. The insertion starting state has the jaws together. If they are open, pivot the clamping lever toward the front and back again to reset them together; never energize the machine to reset the holder.
Clip the approved pad straight into the holder and check secure seating. The tool permits accessory orientation in 30° increments; choose one that maintains a safe grip and clear approach, not merely one that makes the point reach farther. For release or repositioning, with the battery still removed, move the lever to the stop as illustrated through 180°, control the released accessory over a safe surface, and return to the proper starting position before refitting. Never run with the lever open, operate the lever while running, or run open jaws without an accessory.
Fit the intact sheet while isolated. The manual then specifies a brief adhesion-seating step: with the complete assembly secure, press the paper-equipped pad briefly and firmly against a flat surface and switch on briefly. Use a stable, clamped flat area away from the inner corner for this specific step. Restore power only after confirming OFF and secure battery seating. Keep the tool firmly controlled and hands away from the pad. This limited step is not permission for powered paper changes or ordinary contact-start sanding in the corner.
Control dust before setting the small-pad speed
Use dust extraction appropriately matched to the actual wood dust, good ventilation, eye and hearing protection and suitable respiratory protection. The manual gives a P2 filter-class mask as an example; the actual exposure and applicable requirements govern selection. Do not invent a connector, claim that an unassembled hose is functional extraction, or treat a mask as approval to sand unknown finishes. If the required dust control is not ready, postpone the powered task.
Keep the work dry and weather-protected. Avoid overheating the wood and tool, and empty the dust collector in time. Do not mix metal grinding sparks or unknown finish residue into the wood-dust setup. Keep the area uncluttered and people clear. Grasp the tool firmly at its proper insulated gripping area, with dry hands, stable footing and vents unobstructed.
For this small triangular plate the manual specifies electronic levels 4–6. Turn the frequency dial clockwise to increase and counterclockwise to decrease, respecting any lower limit from the actual accessory. The overall tool range is 11,500–18,000 oscillations per minute; it does not provide a numerical frequency for every intermediate dial position. Round and large triangular plates have a separate maximum of level 4. Their rule is shown only to prevent a false transfer—not to expand this small-pad project.
Sand toward a checked limit, not into a stop
For the normal sanding pass, start clear of the work by pushing the switch forward to I, then guide the running tool onto the intended flat face. Keep the whole pad surface working and move continuously with moderate pressure. Approach the checked corner limit under control, while preserving flat contact and clearance from the upright. Do not use the upright as a fence that stops a powered abrasive.
Lift clear at the end of the pass, switch rearward OFF and wait for complete stop before setting the tool down. Remove the battery before inspecting the surface or changing the sheet. More pressure does not increase removal; it wears the abrasive faster and can produce an uneven or heated surface. If only the tip is contacting, change the approach rather than pushing harder.
If one sheet corner wears while the rest is useful, the manual permits removing and refitting the sheet rotated 120°. Do that only with the battery out, after checking the pad and remaining abrasive; restore even seating and any matching hole alignment. This is sheet rotation, not permission to twist the live tool into the corner. Replace the sheet when it cannot perform the intended task securely.
Stop for moving stock, a catching pad, failing dust control, unusual vibration, heat or an insecure sheet. Switch OFF, wait, isolate and correct the cause. The special level-2 remedy for the named heavy 115 mm round plate and tile-joint kit is not a universal fault cure for this small triangular system. Persistent unexplained vibration or a damaged holder requires qualified FEIN service, not a lower dial setting and continued use.
Accept the face and preserve the corner
With the battery removed, inspect under good light across the whole intended area. Accept it only if the surface is consistently improved to the chosen finish, with no gouge, scorching, unwanted rounding, adjacent-face scuffing or sign that the assembly moved. Check the corner line separately: a smooth patch is not successful if reaching it damaged the adjoining face.
An inaccessible strip is a reason to stop the powered method, not to claim the entire corner finished. Record that remaining area and complete it only by a separately suitable method; do not conceal it by rocking the pad into the angle. If the result is uneven or damaged, reject the setup, correct the support, abrasive or approach on scrap, and reassess before another pass. No numerical flatness, joint-strength or finish tolerance is implied.
Finish with the switch OFF and battery removed. Clean the accessible pad, holder and exterior according to the instructions, keep vents clear without pointed metal probes and avoid solvents that damage plastic. There are no internal repairs in this project. Store the dry tool and protected battery within their actual instructions. The finished sample demonstrates this specific flat-face approach only, not permission for unknown coatings or installed work.
Source basis: FEIN AMM 300 Plus US instructions 3 41 01 329 21 0, 2023-03-28, safety/dust pages 3–8, exact power identity 11–13, clip-in and release 14–15, controls 16, sanding 17 and care 18. Corner-access decisions are a bounded application of the full-pad and stable-support requirements, not an invented manufacturer clearance rating.
Models referenced