
Separate the power system and pad limits
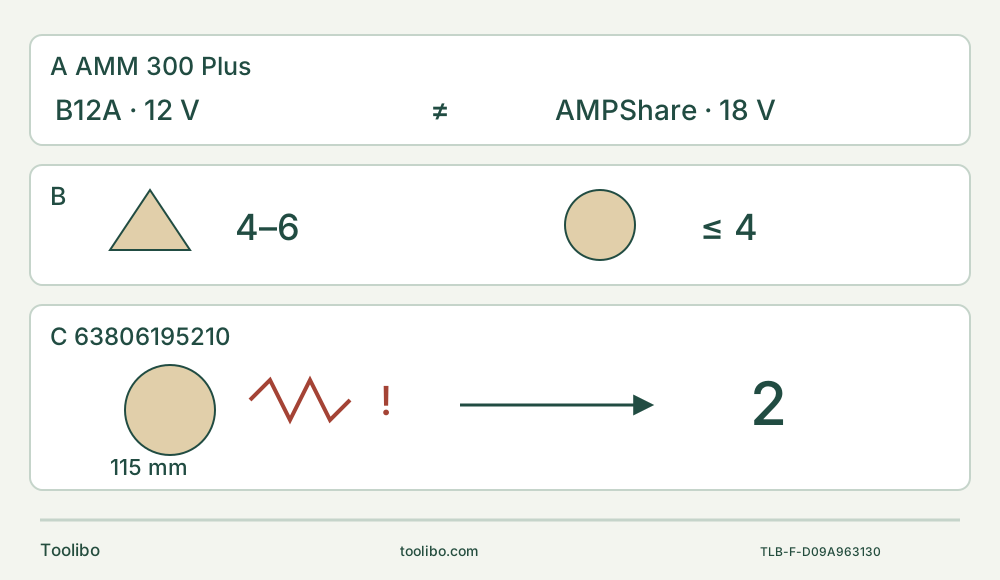
Three panels distinguish B12A 12 V from AMPSHARE 18 V, show small triangular pad levels 4–6 versus round-pad maximum 4, and identify the 115 mm heavy plate with its conditional level-2 vibration correction.
A · Confirm the exact 12 V system
Match original B12A and a qualified ALG 30, ALG 50 or ALG 80 under actual instructions. This is not an 18 V AS system; remove the battery before assembly.
B · Classify the pad before setting speed
Small triangular sanding plates use 4–6; round and large triangular plates use at most 4. Obey any stricter accessory instruction and provide complete dust control.
C · Keep the heavy-accessory exception narrow
The 115 mm plate 63806195210 can overload damping. For its specified intense vibration, level 2 is the manual correction and suitability remains limited; stop for unexplained faults.
Original schematic freshly reviewed. B also requires maximum 4 for large triangular pads, although only a round pad is drawn. C is the narrow 63806195210 exception; the text also covers 63719011220. These are not permission to continue an unexplained vibration or to use an unqualified accessory.
Keep the 12 V Select identity separate
This is a complete small-surface sanding exercise for an existing US FEIN AMM 300 Plus, using the Select product identity 71293262090 and the linked manual 3 41 01 329 21 0 dated 2023-03-28. Match the actual machine, battery interface and supplied instructions. This is the FEIN 12 V system, not an 18 V AMPSHARE/AS tool. “Select” is not proof that a battery, charger or every illustrated accessory was supplied. This documentation-based guide makes no hands-on performance or current kit-content claim.
The workpiece is a loose, known, untreated softwood sample with a small flat area and visible edges. The aim is to smooth that area with an approved small triangular pad and suitable sheet, then inspect and store the isolated system. Do not substitute a painted installed surface, unknown filler, treated timber or asbestos-containing material. Removing a finish is a different material-health decision.
Confirm the existing B12A system
The matched manual specifies a 12 V B12A lithium-ion battery and ALG 30, ALG 50 or ALG 80 chargers. Use only an intact original FEIN battery intended for this tool and an exact compatible charger already commissioned under its own instructions. Check the real labels. No battery adapter, other-brand pack or repaired/reconditioned substitute is authorized here.
This article does not supply a first-charge tutorial or establish the charger’s mains input. The tool manual requires reading the charger instructions before the first charge. If those instructions or an already qualified pair are missing, complete that gate before this exercise. The manual gives 5–45°C for battery storage, operation and charging, with the battery within that range at the start of charging; obey any additional or stricter limits in the actual charger instructions.
Inspect the housing, switch, holder, pad and battery for damage. Keep terminals away from loose metal, moisture and heat, and do not open a battery. Switch OFF before removal: press the unlocking button and pull the pack out of the handle without force. Remove it before mounting, repositioning, cleaning or inspection. OFF, a low-charge indication or electronic deep-discharge shutdown is not physical isolation.
Choose a small triangular system, not just any fitting pad
Use only an original FEIN application tool specifically released for this machine and the intended material. The current US product specifies Starlock and StarlockPlus compatibility; that does not include StarlockMax or override the manual’s original-FEIN requirement. An accessory that happens to fit is not thereby approved. Identify the actual small triangular pad and matching sheet from their instructions before proceeding, including any lower speed limit.
Inspect the pad’s attachment face and the sheet. Use a grit suited to the known surface and desired finish, testing on the sample rather than assuming an aggressive paper is always necessary. Seat the sheet evenly on the pad and align any corresponding extraction openings. A torn sheet or damaged fastening face is not repaired by extra hand pressure. This guide does not invent a dust-hose connector or declare an incomplete extraction assembly ready.
Small triangular pads have a different speed rule from round and large triangular pads. Keep that classification clear before fitting the accessory. This exercise is not the 115 mm round plate 63806195210 or tile-joint cleaning kit 63719011220; their heavy-accessory vibration exception is discussed below so that it is not mistaken for the normal small-pad setting.
Start with the jaws together and clip in straight
With the battery removed, clean the holder and application tool. Keep fingers out of the clamping-jaw area and wear protective gloves as the manual requires; used accessories can be hot and sharp.
The starting state has the jaws together. In that state, the correct accessory can clip into the holder. If the jaws are open before insertion, pivot the clamping lever toward the front and back again to reset them together. Do not energize the machine to reset the mechanism.
Align the accessory straight with the holder and clip it fully into place. Inspect secure seating while still isolated. Do not import a threaded-bolt tightening sequence from a different multi-tool. The accessory can be positioned in 30° increments to suit the work, but choose an angle that leaves a safe grip and keeps every part of your body clear of it.
For release or repositioning, follow the actual lever movement to the stop, illustrated through 180°, and return it to the starting position as shown in the manual. Control the released accessory over a safe surface; it may be hot or sharp. Refit it straight and confirm the lever is back in its operating position. Do not touch the lever while running, start with it open, or run the tool with open jaws and no accessory. Failure to seat or retain correctly is a reason to stop and obtain service, not force the mechanism.
Prepare dust control and stable support
Clamp the sample on a stable platform, leaving the intended surface accessible without letting the pad strike clamps or bench hardware. Never hold the piece against your body or in a free hand. Support it so it cannot rock or flex under normal sanding pressure. Plan a stance and grip that keep the machine under control across the whole small area, including the edges.
Work without water in a weather-protected environment. Arrange ventilation and dust extraction matched to the actual dust, and wear appropriate respiratory protection, eye protection, hearing protection and the other required protective equipment. The manual gives a P2 filter-class mask as an example; selection still depends on the actual exposure and applicable requirements. This ordinary wood task excludes asbestos and unknown hazardous coatings rather than pretending a mask makes them suitable.
Prevent heat buildup and empty the dust collector in time. Mixtures of sanding dust and paint, varnish or other chemicals can ignite, particularly with heat or sparks. Do not introduce metal grinding or a different contaminant into this wood-dust setup. Keep bystanders away and handles clean, dry and free of oil. A vibration-damping system does not guarantee a safe exposure time or eliminate the need to stop when control deteriorates.
Select the small-pad setting and complete the surface
The overall frequency range is 11,500–18,000 oscillations per minute, with 1.6° amplitude to each side. The dial increases clockwise and decreases counterclockwise through the displayed 1–6 range. The manual specifies levels 4–6 for small triangular sanding plates. Respect a lower limit imposed by the exact accessory; do not manufacture a frequency value for each intermediate dial position.
Complete the setup while isolated. Confirm the switch is rearward OFF, then insert the already qualified battery correctly and securely. The manual includes a brief adhesion-seating step: press the paper-equipped pad briefly and firmly against a flat surface and switch on briefly. For this step, use the secured sample, keep the tool firmly controlled and keep hands away from the pad. This specific seating instruction is not permission to leave the machine running unattended on a surface.
For the sanding pass, hold the tool firmly at its insulated gripping area. Start clear of the work by moving the switch forward to I, and guide the running tool toward the sample. Work with the whole pad face, not just a corner or edge. Move continuously with moderate pressure across the small area. Excessive pressure does not improve removal; it wears the sheet and can heat the material.
If the sample moves, the pad catches an edge, dust control fails or vibration becomes abnormal, move OFF, wait for complete stop and remove the battery before correcting the problem. Do not press harder to hide a worn sheet or insecure pad. End contact with the work, switch rearward OFF and wait for complete stop before setting down. Remove the battery before checking the finish, changing paper or cleaning the pad.
If only one sheet tip is worn, the manual permits removing and refitting the sheet rotated 120°. Do this with the battery out and restore correct sheet seating and any hole alignment. Repeat only after inspecting the remaining abrasive. Stop when the desired surface is achieved rather than continuing until the sheet wears through.
With the battery removed, inspect the finished sample in good light. Accept the pass only when the intended area has an even finish without unwanted rounding, gouges or scorching. If the stock shifted, the pad caught or the surface shows those defects, do not treat the pass as successful: correct the support, accessory, pressure or setting on a new trial before proceeding. No numerical flatness or surface tolerance is implied.
Keep the heavy-accessory exception narrow
Round and large triangular sanding plates are limited to a moderate setting, maximum level 4. Additionally, the specified heavy 115 mm round plate 63806195210 and tile-joint cleaning kit 63719011220 can overload the damping system. For the very intense, unpleasant vibration described with those accessories, the manual gives level 2 as corrective action and says suitability remains limited.
That exception is not the normal setting for this small-triangle exercise and not a universal cure for vibration. Stop and inspect a new or unexplained vibration, loose mount or damaged accessory. Do not simply dial down and continue an unidentified fault. A change to a heavy pad requires its own complete accessory and dust assessment.
Read the battery and finish safely
Press the pack’s indicator button with the motor stopped to read charge accurately. One to four green LEDs represent the charge condition. Continuous red means nearly empty; flashing red means not ready for operation. For flashing red, bring the battery within its specified operating-temperature range and then follow the qualified charging process. Do not interpret it as the Milwaukee four/eight-flash system or treat a deep-discharge stop as a disconnected battery.
If operation stops unexpectedly, set OFF, isolate and inspect before any deliberate restart. A persistent fault or damaged battery belongs with qualified FEIN service. The user-replaceable items listed in this manual are application tools; do not open the motor or clamping mechanism. Use original service parts.
Remove the battery for cleaning. Clean contaminated contacts with a dry clean cloth, keep vents clear using nonmetal implements and avoid pointed metal probes or plastic-damaging solvents such as gasoline, chlorinated cleaners and ammonia. The manual’s dry, oil-free compressed-air instructions for conductive or gypsum dust require eye protection and controlled handling of that dust; they do not authorize blowing unknown hazardous material around this bench. Store the clean dry tool and protected battery within their specified conditions, inaccessible to children. Current shipping or disposal requirements need separate checking; this owner task ends with inspection and safe storage, not transport advice.
Models referenced