
Front retention, rear tension and the separate punching step
A simplified pad shows front and rear clamp locations and the side clip; a second view shows the fitted pad pressing onto a punch template.
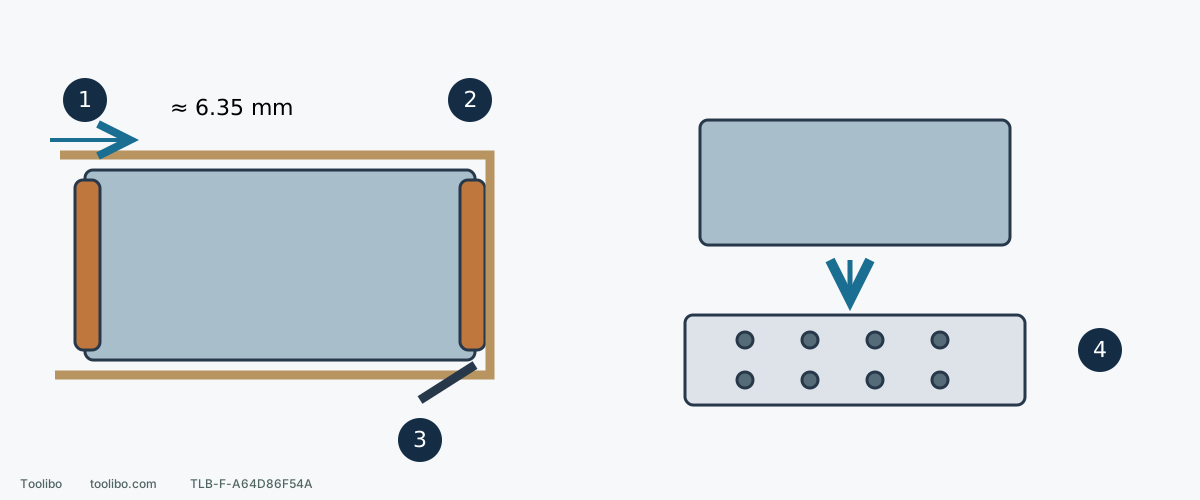
1. Front clamp first
Hold the front clamp open, insert about 1/4 inch and release it with the edge square.
2. Rear clamp holds the tensioned end
Wrap paper against the pad and pull the loose end flat beneath the rear clamp.
3. Side clip operates the rear clamp
Release to open, then return to close after the paper is positioned and tight.
4. Punch only after fitting
Keep the battery removed, align with the supplied punch and press down; inspect holes and retention afterward.
Clamp layout and punch pins are schematic, not an exact hole template. The approximately 6.35 mm dimension is the front paper insertion, not pad thickness.
Identify the sheet and three control locations
2649-20 uses 4.5×5.5-inch clamp-on paper, approximately 114.3×139.7 mm. Check the actual clamping dimensions rather than trusting every package labeled quarter sheet. Abrasive material and grit still depend on the work and finish; this guide explains fitting, not one grade for all wood.
The front clamp secures the first end. The rear clamp holds the other end, and the side clip opens and closes that rear clamp. The front clamp and side clip are not interchangeable fitting methods. Switch off, wait for motion to stop and remove the battery. Check sound paper without tears, brittle damage or severe creases, and clear particles from the pad and clamping surfaces.
Clamp the sheet in this order
- Push and hold the front clamp open.
- Insert the new paper edge about 1/4 inch, approximately 6.35 mm, beneath it. This is approximate insertion, not a demand for decimal-level measuring. Keep the edge square rather than trapping one corner.
- Release the front clamp. Gently check both sides are held before later tension can pull it out.
- Wrap the sheet around the pad with abrasive outward and backing against the pad, without folded corners underneath.
- Release the side clip to open the rear clamp. Insert the loose end beneath the rear clamp while pulling the sheet tight against the pad.
- Return the side clip to close the rear clamp. The working face should be smooth, not slack or stretched until it tears.
If the rear end will not reach, check sheet size and excessive front insertion instead of pulling harder. If the front slips out during tensioning, reposition and inspect the front clamp rather than working with just a corner caught.
Use the supplied paper punch
Fit paper first and keep the battery removed. Align the pad over the supplied punch and press down to make paper holes corresponding to the pad. The punch locates holes in the sheet; it does not redesign the pad. Never drill the pad or substitute another machine’s template.
Lift the tool and check aligned holes, flat paper and no slipping at either end. Oversized torn holes, split paper or loose attachment require a sound replacement, not tape on the working face. Keep fingers away from the punch projections.
Four checks before work
- Both clamps are closed and the side clip is in its retaining position.
- Correct-sized paper lies flat, with no slack, folds or damage.
- Paper and pad holes align and no coarse particles are trapped.
- Collection is connected as required, work is secured and the paper route clears clamps.
Confirm O before fitting a compatible M18 battery and check that it locks. This model starts before contacting the work; do not borrow the contact-start habit from the 2648-20 round-disc sander. Keep the pad flat during the trial. Flapping, a slipping end or a new deep line calls for stopping, waiting and removing the battery before inspection, not reaching near moving clamps.
Three problems after fitting
Flapping or wrinkling: check front slippage, whether the rear was tensioned before closure and whether the cut sheet is too long. Flapping is not a request for more pressure.
The same end repeatedly escapes: if correct sound paper still cannot be held, inspect visible dust or clamp damage. Stop when retention is unreliable; do not bend the clip or glue it as a repair.
Falling dust collection with stable paper: check incomplete punching and a full collection system rather than making additional holes. Wood and coating dust still require suitable protection and disposal; correct clamps do not make every material suitable for the same dust setup.
Models referenced