
Separate the pilot and screw trial
Clamped backed wood receives a pilot, followed by a removed battery and bit change, then a numbered-clutch screw trial.
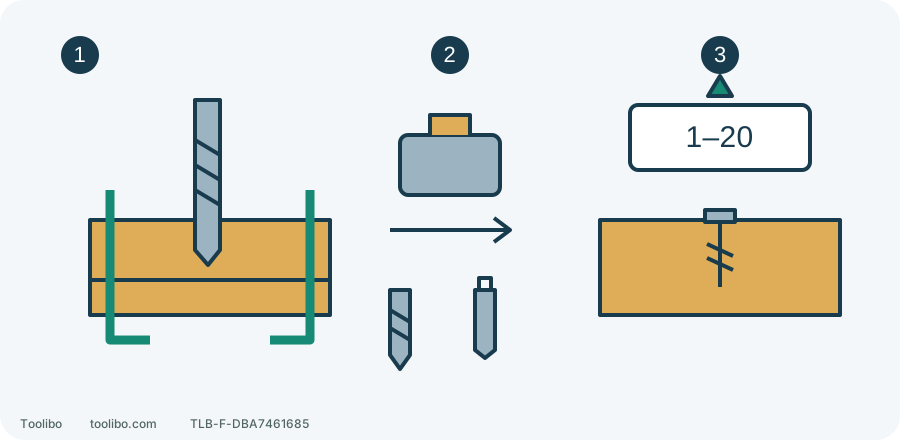
1. Pilot on the bench
Clamp the panel and backing, with a safe exit beyond the planned hole.
2. Isolate and change
Stop, remove the battery and let the bit cool before changing to the matching driver.
3. Numbered-clutch trial
Align a low number from 1–20 with the body arrow and read the screw result.
Sequence schematic, not dimensions or a screw-head specification. Establish the actual pilot and depth for the selected screw; reconnect only after checks.
Decide which steps need not happen inside
This uses US XFD15 controls for removable, nonstructural wooden cabinet parts. It has no hammer action and does not establish permission for unknown walls, structural joints or hidden services behind cabinets.
A smoking, leaking or rapidly and abnormally heating battery means move clear, not routine removal. With stable equipment safe to handle, release, wait for standstill and remove the battery. Move a removable panel to a stable bench, retaining face and assembly-orientation marks. Confirm the screw will not project through the back or meet existing fasteners or obstructions.
A bench makes clamping, axial alignment and rear-face inspection easier. Establish the pilot, screw fit and clutch before deciding what genuinely needs finishing inside. A short drill is no reason to hold a loose panel in a hand or on a knee while drilling.
Measure the complete setup
Choose the actual drill or driver bit, fit normally according to the exact manual, and keep the battery removed. Include accessory projection, body, battery envelope and gripping hand, not body length alone.
Rehearse entry, alignment along the hole/screw axis and withdrawal. Account for battery dimensions without reconnecting power merely to measure. Do not trap fingers against the cabinet or support near a rotating chuck. Insufficient withdrawal space calls for drilling on the bench or changing the method.
Do not arbitrarily stack extensions. A shorter accessory must still suit the chuck, recess and task. Shank fit does not establish approval for the complete accessory assembly, hole size or material.
Separate the two control setups
The XFD15 selector displays 1 or 2: 1 is low speed/high torque and 2 higher speed/lower torque. Shift only at complete standstill and seat the selector fully, never between positions. This screw trial starts in 1.
Turn the clutch ring to align the selected graduation with the arrow on the body. Numbered settings 1–20 are for screw trials. The drill symbol is for drilling, not a safer screw setting beyond 20. Numbers are not newton-metre measurements and cannot replace equipment specified for a torque-controlled joint. Check direction independently; centre lock does not replace battery removal.
Published 0–500 and 0–1700 rpm ranges are no-load values, not cutting speeds for every wood bit, diameter or timber. Check the accessory’s material and speed conditions before choosing a drilling range. Do not trial a task whose tool/accessory suitability is unconfirmed.
Stage one: verify the pilot on clamped scrap
Use nonstructural scrap matching actual material and thickness, with the intended screw. Establish pilot diameter, depth and any upper-piece clearance hole from that screw and joint’s requirements, not a universal size for roughly similar screws.
- Clamp scrap and suitable backing. Ensure the exit will not hit bench or clamp; plan blind-hole depth beforehand.
- With the battery removed, fit a sound suitable drill, hand-tighten securely as instructed and check for crooked seating or looseness. Never grip the chuck and use the motor to tighten.
- Choose drilling position, an appropriate range and correct drilling direction. Check clamps and hand positions, keep your finger off the trigger, reinstall a compatible battery and confirm it locks.
- Start slowly with the tip touching the mark and feed axially. Do not steer a misplaced hole sideways or treat slowing as a command for greater force.
- Finish at planned depth using normal drilling procedure, release and wait for standstill, then remove the battery to inspect entry, depth and rear face. Stalling or binding is abnormal: release, stop and isolate safely, rather than forcing normal withdrawal on a trapped bit.
A misplaced hole, split wood or severe exit damage calls for correcting location, bit, backing or feed on another scrap before proceeding. Do not cover a drilling mistake with the screw.
Stage two: change bits and establish the clutch
Keep the battery removed and change the cooled drill to a driver matching recess type and size. Select 1 and a low numbered clutch setting, and correct driving direction from the markings. Recheck accessory and work, then reinstall and lock the battery with your finger off the trigger.
Seat the driver fully, drive gently along the axis and release near target depth. Read three outcomes:
- Clutch releases before seating: stop, remove the battery and inspect pilot, length and fit before raising the clutch one small step.
- Correct depth with sound recess and wood: retain for the same material, screw and joint thickness.
- Excess depth, splitting, cam-out or stalling: release immediately and stop safely; do not raise the setting. Correct the cause and replace damaged parts before preparing again.
After each adjustment, recheck and reinstall/lock the battery with your finger away before another trial. Only after both stages work should you apply them to the actual panel. Recheck grip, entry and exit inside the cabinet. Poor visibility, grip or forced angled feeding means change the method, not rely on the compact label.
Models referenced