
Restrain the work and support together
Three conceptual setups show a backed board, supported round stock with separate clamps, and a backed thin sheet.
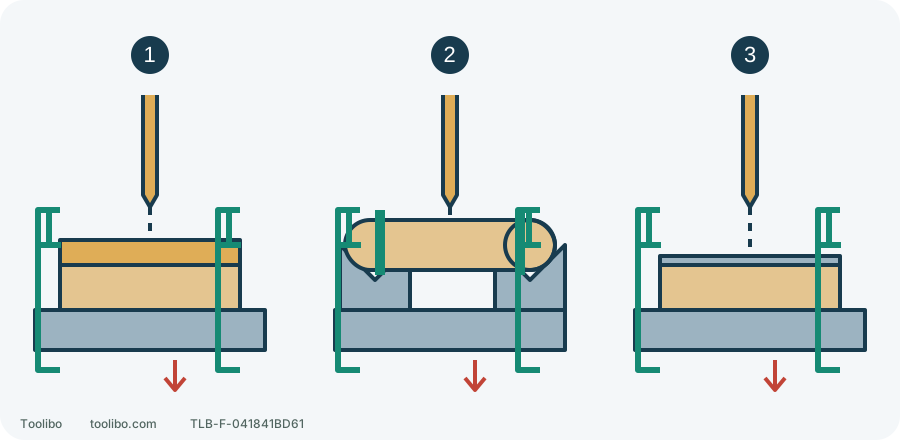
1. Flat stock
Clamp the board and sacrificial backing against sliding and pivoting.
2. Round stock
Support and clamp both the stock and fixture; a locating groove alone is insufficient.
3. Thin stock
Support around the hole without crushing or leaving a hand underneath.
Conceptual restraint and exit planning, not a Milescraft assembly drawing or a universal fixture specification. Red arrows mark the exit side to keep clear, not permission to drill through the bench.
Establish the restraint chain
These are planning examples for known material and ordinary non-structural work, not fixture engineering or large-cutter permission. Tool, accessory, material and fixture limits still apply. Fingers are not backup restraint for a small piece caught by the bit.
Remove the battery or unplug before setup. Check work-to-support, support-to-bench and bench stability. Clamping one board to another loose board secures only part of that chain. A heavy but unsecured vise is not automatically stable.
Flat board: clamp work and backing with a safe exit
For a small timber through-hole, use a stable bench and suitable flat sacrificial backing. Support the hole area continuously. Locate clamps clear of bit, chuck and grips, securing the work/backing assembly against bench movement.
- Mark the hole and projected exit. Below it should be intended drillable backing, not metal bench parts, clamps or a hand.
- Arrange restraint against pivoting around one clamp or lifting. Follow the fixture and geometry; there is no universal clamping-force prescription.
- With power isolated, gently push and try to turn the work while watching work, backing and clamps. Any sliding requires rearrangement.
- Place the isolated drill in the working position. Check chuck clearance and that neither hand must hold the work or reach under the exit.
Backing supports wood fibres near breakthrough; it does not justify a catching hand. Reduce feed near breakthrough while retaining restraint, and wait for standstill before removing the tool and unclamping.
Round stock: a V location still needs clamping
A rod can roll on a flat bench or slip between flat faces. Use a fixture explicitly suitable for its size, shape and material rather than a palm beside it.
Milescraft 1318 DrillMate provides a specific example: its instructions remove the base’s rubber feet, screw or clamp the base to the bench, place round stock in the upper V-grooves and clamp the stock firmly. The V locates; it does not eliminate clamping or authorize the same procedure on any drill guide. This DrillMate must not be run in reverse; do not transfer a bare-drill reversing technique to the mounted guide.
While isolated, confirm no rolling, lengthwise sliding or base movement. Check exit clearance against grooves, base and bench, and set permissible depth by the accessory instructions. Without a safe exit, change fixture or method. Thin hollow tube can crush; more force is not a universal cure for rolling.
Thin sheet: support around the hole
Thin metal or plastic held only far from the hole can flex under feed and lift at breakthrough. Use suitable flat backing around the hole and secure sheet/backing to a stable bench, leaving actual tool clearance.
Backing is support, not permission to drill into anything. Confirm it is intended to receive the bit, depth avoids underlying hardware and clamping does not damage the sheet. Bowing, lifting edges or distortion means stop at setup and change fixture or process, not press the flexing area by hand.
Metal also requires cutting conditions matched to material and bit; this page gives no universal speed or lubricant. Stable sheet support comes before parameter selection. Faster rotation cannot replace restraint.
Preserve restraint during work and faults
After setup, accessory, settings and exit checks, keep the finger clear and restore the compatible battery or supply. Follow the tool and fixture instructions with hands on designated grips. Do not move clamps while drilling or catch the exit underneath. Reposition only after stopping and isolating, then reclamp.
If work rotates, a clamp loosens or the base lifts, release immediately without catching moving stock. Wait and isolate when safe, inspect damage and rearrange. Retightening alone does not repair split timber or bent sheet. Without verified stable restraint, do not start the hole.