
BO5041: reach speed before contact, release the lock to stop
A raised running pad lowers onto a flat board; a separate trigger detail shows full pull followed by release.
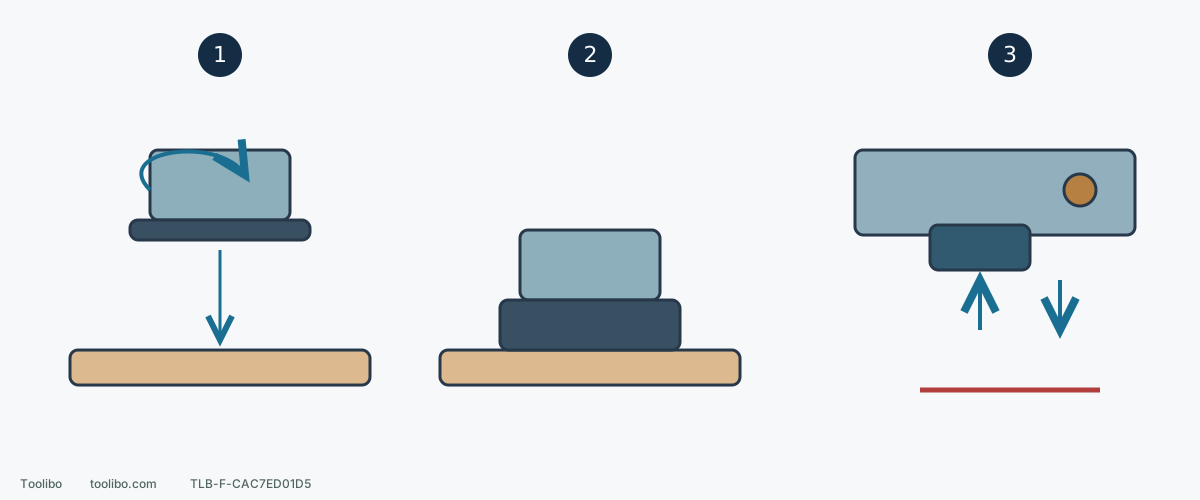
1. Start clear of the surface
Hold both handles securely and allow the tool to reach the selected speed.
2. Lower gently and keep flat
Use slight pressure and keep moving; do not work on the pad edge.
3. Fully pull, then release
For locked operation, fully pull the trigger then release it to stop. Wait for all movement, then unplug before checking.
This contact order is for BO5041, not a universal sander rule. Trigger symbols do not reproduce exact component geometry.
Confirm BO5041, not BO5040
These models look similar, but this guide concerns the BO5041 with its speed dial. The scale runs from 1 to 5; higher numbers mean a higher orbital rate. Its stated range is 4,000–12,000 orbits per minute. That is not the pad’s actual rotational RPM, and intermediate settings should not be converted into precise measured speeds using an invented linear formula.
The dial sets speed, the trigger switches the motor, and the lock button maintains operation after the trigger is released. Lock-on adds no sanding capacity and never makes it acceptable to put a running tool down unattended. Check the actual nameplate and applicable regional instructions for electrical supply and plug requirements; a shared model number does not make regional electrical rules interchangeable.
Know how to stop before connecting power
Switch off and unplug. Check that the trigger moves properly and returns to OFF when released. Locate the trigger and lock button without experimenting on a powered tool. A sticking trigger, failure to return or a lock that will not release normally means stop and arrange repair. Switching power at the socket is not a repair for a defective switch.
For ordinary operation, pull the trigger to start and release it to stop. For continuous operation, pull the trigger, push the lock button, then release the trigger. To release locked operation, pull the trigger fully and then release it. The first sanding trial can be made without lock-on, keeping start and stop straightforward. Never substitute tape, a wedge or a tie for the lock mechanism.
Prepare a representative sample
Secure an offcut of the same wood with a similar surface condition. Fit the appropriate abrasive and dust collection. Thin veneer or an already thin surface is not a suitable place for repeated coarse-abrasive experiments; an unidentified old coating is not ordinary bare wood. Establish the collection, ventilation and protection needed for the material before deciding the trial can proceed.
Record the abrasive product, grit and dial position. Choose a conservative setting consistent with the abrasive and material requirements. Keep the abrasive, slight pressure and travel broadly unchanged while assessing a speed change. There is no universal “setting 3 for wood”: hardness, abrasive condition, the defect being removed and the intended finish all affect the useful combination.
Do not borrow another sander’s contact sequence
- Secure the front grip. Hold the front grip and switch handle with both hands, with the abrasive clear of obstacles.
- Start the tool and let it reach the selected speed before gently placing the pad on the work. This start-before-contact sequence applies here to the BO5041; it is not a rule for other models.
- Keep the pad flush, apply slight pressure and keep moving. Do not use its edge as a cutting tool or dwell over a hollow hoping to erase it.
- Switch off after a short trial section. If locked on, pull the trigger fully and release it. Wait for all movement to stop, then unplug before inspecting the abrasive and surface or adjusting settings.
Judge the surface, not just the sound
Look for a reasonably even scratch pattern and gradual reduction of the defect you intended to remove. Deep scratches surrounded by a finer finish do not justify endless fine sanding. Check whether a grit jump was too large or a particle is trapped in the abrasive. Loaded or dull paper needs attention to the consumable, not extra speed and pressure.
Stop the trial for noticeable heat, smeared coating, unusual vibration, lifting paper or a new deep groove. With power disconnected, check material, abrasive, pad and workholding separately. Correct the cause before trying again; do not change the paper, select maximum speed and increase pressure together. Keep a satisfactory sample and its settings as a reference for the actual workpiece.
Models referenced