
Pins lock the cup; the pilot exits first
Exploded cup and arbor show two pins aligned with back holes and an upward collar arrow. A separate cutting section shows the pilot projecting below the board and an unobstructed exit.
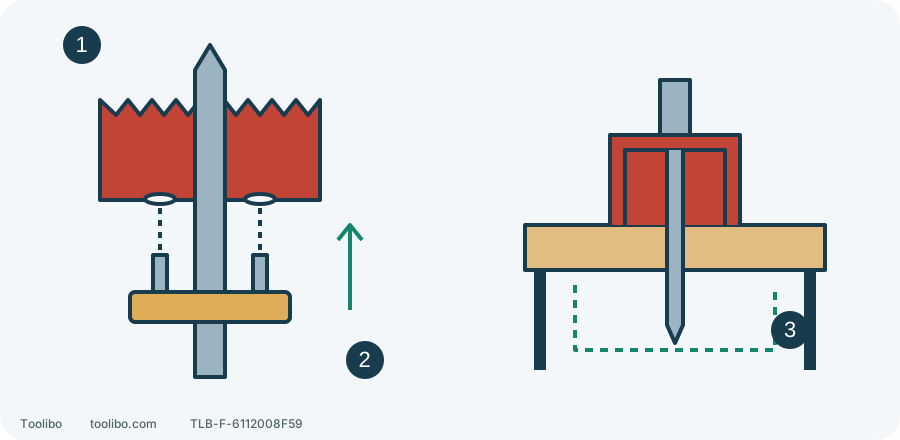
1. Thread and pins
Do not bottom out the cup; align the pins with its back holes.
2. Collar upward
Push toward the cup and verify engagement, not just movement.
3. Pilot exit
Allow for projection, feed and backing; keep the bench and hands outside the path.
Conceptual 49-56-7250 assembly and clearance, not dimensions or a cutting-depth gauge. Left cup teeth face upward to show its back connection; the right section shows the working orientation. Keep the battery removed for these checks.
Identify the four actual components
The example prepares a 1¼-inch hole in a removed, non-structural 12 mm plywood panel without hidden metal. It uses a US DEWALT DCD800, Milwaukee HOLE DOZER 49-56-9613 cup and 49-56-7250 arbor with its correctly installed matching pilot. This is assembly and pre-cut acceptance, not wall investigation, metal cutting or universal approval of mixed-brand combinations.
The DCD800 NA229093 table allows a maximum 3-inch wood hole saw, so the selected 1¼-inch cup is below that limit. That does not settle safety: verify the exact revision, accessory material suitability, condition, workholding, speed restrictions and grip. If you cannot maintain two-handed control against reaction, use suitable equipment rather than bracing the drill with your body.
The 49-56-9613 lists wood among its applications and a 1⅝-inch cutting depth. The 49-56-7250 has a 3/8-inch shank, fits chucks at least 3/8 inch, cups 1¼ inch and larger, and 5/8 × 18 threads. These are separate fields: shank size is not cup diameter, and cup depth is not pilot projection.
Remove power before assembly
Do not approach or handle a smoking, leaking or dangerously hot battery. When stable and safe to handle, release the trigger, wait for a stop, lock as instructed and remove the battery. Avoid sharp teeth and recently used hot cups; allow safe cooling first.
Inspect for broken teeth, a distorted cup or pilot, and damaged arbor threads, pins or collar. The correct pilot must remain properly fitted and secure. Do not improvise with a bent drill, an unrelated loose bit or missing fasteners. Replace damaged parts correctly or obtain inspection; running the assembly is not a damage test.
Record the actual cup, arbor and drill identifiers so replacements can be checked. A similar-looking arbor can lock differently; the following collar sequence applies specifically to 49-56-7250.
Lock the cup using the 49-56-7250 method
- Keep the battery removed and pass the arbor’s pilot through the back of the cup.
- Thread the cup onto the arbor without bottoming it on the threads. Forcing it tight is not this arbor’s locking method.
- Align the pins with the holes in the cup back and push the collar upward toward the cup so the pins enter and secure it. Verify engagement, not merely collar movement.
- Hand-tighten the arbor shank securely in the DCD800 chuck as its manual requires. Grip the intended shank, not threads, collar or pilot. Never hold the chuck and run the motor to tighten it.
- While disconnected, check for obvious looseness in cup, arbor and pilot and confirm the collar stays locked. Resolve uncertain engagement before applying power.
There is no extra instruction here to tighten a nut behind the collar. That belongs to the different 49-56-9100 arbor, not the 7250. To remove the cup, disconnect and let it cool, then push the collar down and unscrew the cup; never release the collar while rotating.
Measure below the panel for the pilot’s furthest reach
Clamp the plywood and suitable backing to stable supports, leaving the cutting region clear underneath. Keep clamps and bench outside the full travel of cup and pilot. Do not lay the panel directly on the bench and assume you can stop when the teeth just break through.
With power removed, inspect from the side: the pilot normally emerges before the teeth. A 12 mm panel does not imply that 12 mm of space below it is enough. Measure the actual pilot projection and account for intended feed, backing thickness and a safe margin. Never catch the plug by hand or hold backing underneath the exit.
This arbor’s instructions require pre-drilling the pilot hole before cutting. At the same securely clamped location, fit a suitable pre-drilling bit to the actual pilot’s requirements with power removed; check retention, forward rotation and an appropriate drilling speed. Insert and secure a compatible battery with your finger off the trigger, then start slowly with the tip on the mark. After normal completion, release, stop and remove the battery before refitting the checked hole-saw assembly. Do not omit or arbitrarily enlarge the pilot hole. If it is misaligned or the panel moves, correct preparation rather than steering the cup sideways.
Separate ready, unresolved and stop conditions
Swipe or scroll horizontally to see all columns.
| Condition | Action |
|---|---|
| Identifiers, material, shank, cup range and wood capacity match; pins engage; clamping and exit are checked | Proceed to normal setup: ordinary drilling mode, direction and speed according to the exact drill and saw; install and secure a compatible battery with your finger off the trigger |
| It fits the chuck, but thread, pilot retention or speed conditions are uncertain | Keep power disconnected and establish the exact requirements; maximum no-load drill speed is not the cutting setting |
| Cracked cup, disengaged pins, moving panel, blocked exit or inadequate two-handed control | Stop and replace damaged parts or rearrange the work; more pressure, tilting or a higher clutch number does not fix it |
If the saw jams, release immediately, wait for a stop and safely remove the battery before addressing the cause. Do not repeatedly pulse the trigger through a jam. Plug removal and tooth inspection also require a stopped, disconnected and cooled assembly. Passing these checks establishes preparation, not permission to ignore the accessory’s cutting instructions.
Models referenced