
Hook seating and two-hand clearance
Simplified sections contrast engaged hooks with incomplete seating; a lower silhouette shows side and main grip space.
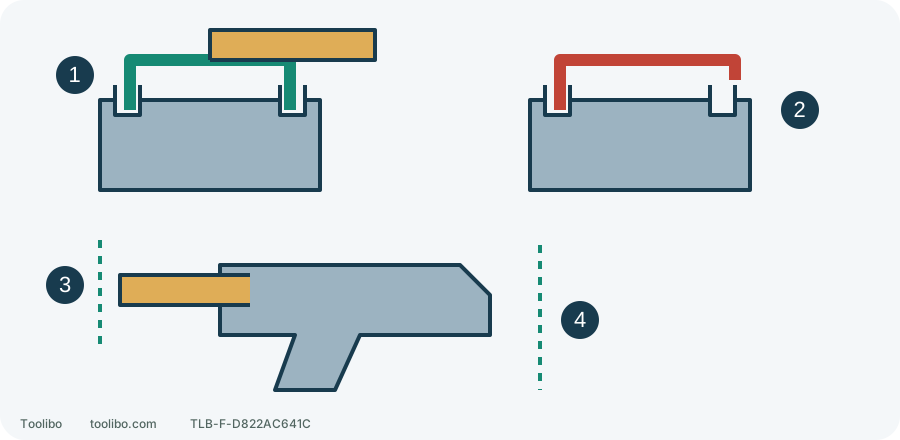
1. Both hooks seated
Engage the specified slots before tightening.
2. Incomplete seating
Reposition; extra force does not correct a missed slot.
3. Side-grip space
Keep the second hand on the matched handle.
4. Main-grip space
No wall or clamp immediately trapping the hand.
2904-20 mounting principle, not exact part geometry. Inspect with the battery removed; no deliberate binding test.
Identify the mounting structure first
This example is Milwaukee 2904-20 under manual 58-14-9998d1. Its side handle is required, not an optional large-hole accessory. Do not transfer this hook mounting method to another brand’s collar, sleeve or threaded handle.
Release, wait for standstill and remove the battery. Inspect the matched handle hooks, grip and front mounting slots. Bent hooks, damaged slots, defective threads or mismatched parts cannot be corrected by extra tightening. Obtain the proper handle rather than substituting pipe clamps or straps.
Engage the hooks before tightening
- Locate the gear-case ring slots, not the chuck sleeve or an arbitrary smooth plastic surface. Never attach to a rotating part.
- Loosen the handle grip enough to separate the hooks for normal engagement. Do not dismantle or bend them apart.
- Position the handle on top of the tool, pointing left or right as needed, and engage the hooks in the slots. If only one side seats, reposition instead of pulling the other into place by tightening.
- Tighten the grip securely. With the battery still removed, hold both grips and gently check normal holding stability: the mount must not slip or lift.
- To reposition, loosen enough for normal removal, refit and tighten. Check before every use; yesterday’s tightening is not today’s inspection.
No invented tightening torque or plier extension is offered here. If normal assembly cannot secure the handle, stop and inspect the parts or arrange service.
Rehearse the hand position without power
For a clamped board on a bench, put one hand on the main grip and the other on the side handle. Clamps hold the board; do not exchange the side-hand grip for holding the work. Keep hands away from the intended exit underneath.
With the battery removed, place the drill at the intended hole. Check clearance around both grips, hands and battery tail relative to clamps and walls. Stand securely without overreaching, with the trigger easy to release. A hard obstruction must not immediately trap a hand if the tool tends to rotate.
This is a static access check, not deliberate reaction testing or bracing the housing against your body. If switching handle side still traps a hand near a corner, move the work, change height or choose a suitable access method.
Watch your remaining control while cutting
After checking accessory, settings, restraint and exit, keep the finger off the trigger and install the compatible battery securely. Establish both grips before starting by the tool, material and accessory instructions. A secure handle does not enlarge rated capacity or approve an unsuitable long bit or hole saw.
If maintaining direction needs a shoulder or abdomen against the drill, or viewing the hole requires repeatedly releasing the side grip, stop and rearrange. A sharp speed reduction does not justify harder pushing. Distinguish cutting resistance from a developing loss of control; continued rotation alone is not a sufficient acceptance test.
Do not force through a bind using the handle
Release immediately for binding or sudden twist while retaining safe grips; do not move hands to chuck or bit. After standstill and when safe to handle, remove the battery and check work movement, blocked chips, accessory damage and task suitability.
This page does not prescribe repeated powered pulses for release or an actual jam to test AUTOSTOP. Electronics do not replace the handle, workholding or stance. Establish and remove the cause, verify sound handle and accessory, then repeat full preparation before work. Unknown cause, shifted handle or unreliable control means stop and arrange inspection.
Models referenced