
A flat cork lining with separate small attachment points
Top view of an intact wooden tray and a flat cork insert; a section contrasts a low adhesive spot with a thick lump lifting the insert.
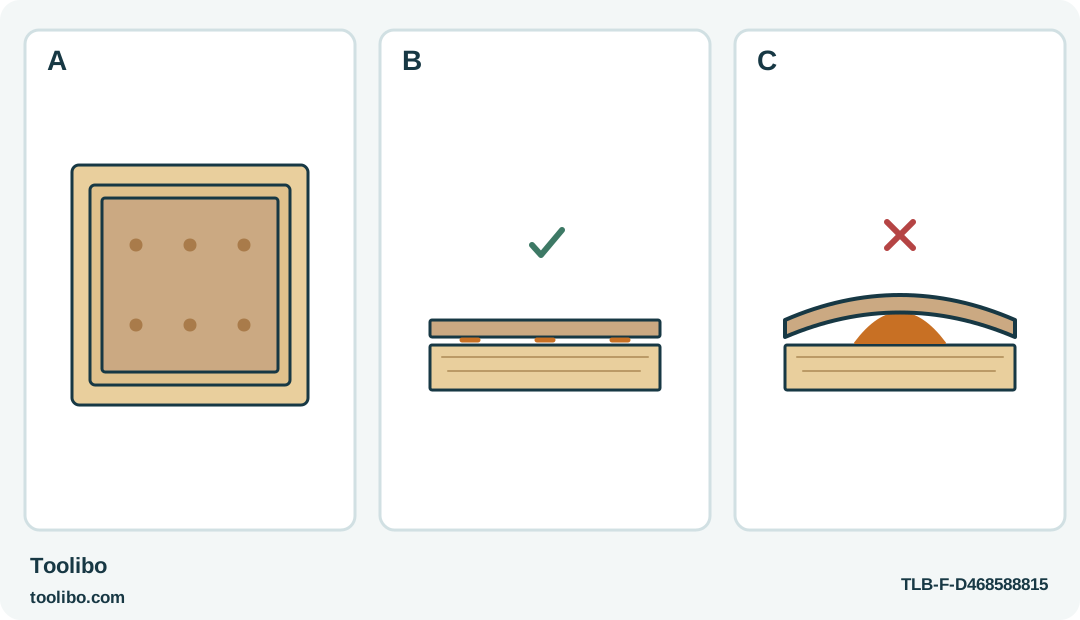
A · Dry fit
The cork lies flat inside the intact tray without wedging under its rim.
B · Small attachment points
Separate small bonds retain the lining without building a raised cushion.
C · Reject a high spot
A thick adhesive lump lifts the cork and makes the contents rock.
Generic craft geometry, not a tool installation drawing. The tray is sound before gluing; adhesive retains the lining only. No removal or load guarantee.
Decide what the cork is doing
A cork insert can quiet the bottom of a small wooden desk tray and keep its contents from rattling. It should not hold the tray together. Start with an intact tray whose corners and base already work without adhesive, and use the GluePen only to attach a light, flat cork lining. This is a dry indoor organizer for ordinary desk items, not a trivet, food container, waterproof liner or repair to a carrying handle.
This workflow concerns the German-listed Bosch GluePen 06032A2000 covered by the matching instructions. The pen uses an integrated battery and a recommended 7 mm stick. Its small body does not make the hot end safe to touch. Keep the tray on the work surface throughout gluing, with people and pets outside the working area.
Choose cork and wood that are known, clean and dry. A decorative coating can be the weak layer even when the underlying wood is suitable. If the tray has a valuable finish, loose paint, an unknown plastic lining or a coating you cannot test, choose a loose cork insert instead. A project that needs no glue is a perfectly good result.
Fit the insert before turning on the pen
Prepare the cork with a suitable nonpowered cutting method before bringing the glue pen to the bench. Follow that cutting tool’s own instructions; hot glue is not a way to compensate for a badly cut edge. Set the insert into the empty tray and check all four sides, rounded corners and the actual usable base.
A good dry fit lies flat without being forced under a rim. Lift it out again and check that you can return it to the same position without a hurried sideways slide. Mark the underside lightly if the shape is not symmetrical. Keep those marks away from the visible face and the intended bonding spots.
Plan a modest number of small attachment points rather than covering the entire base with a thick layer. The aim is to retain a lightweight lining, not to build a raised cushion of glue. Too much adhesive can leave high spots that make pencils roll or cause the cork to rock. Decide the placement now, while both hands and the materials are cool.
Prove the glue system on matching scraps
Protect the bench with a heatproof silicone mat. Place offcuts of the actual cork and a comparable wood surface on it; a different finish is not an equivalent test. Remove loose dust without introducing flammable solvent residue. Do not hold thin cork in a bare hand behind the place receiving hot glue.
Charge the pen using its specified supply, disconnect it, and prepare the recommended stick suited to the materials. The GluePen does not operate while charging. Switch it on and wait for the heating indication to become steady green before expecting normal glue flow. Do not compensate for an unready pen by squeezing harder.
Apply a small amount to one scrap surface, put the second surface into place promptly and keep the joint aligned without fingers near squeezed-out glue. Use a heatproof pressing aid where necessary. Once the sample has cooled, inspect both the bond and the visible cork face. Reject darkening, distortion, a conspicuous hard lump or easy separation under the light handling the lining will receive.
Attach the lining without chasing a cooling bead
Arrange the tray, insert and safe resting place so the move from application to placement is short. Work only on a project small enough to position comfortably in one controlled movement. If the dry rehearsal is awkward, divide the design into smaller independent inserts or leave it loose rather than rushing the hot stage.
Use moderate trigger pressure and place the planned small adhesive spots on one side of the joint. Stop feeding before lifting the pen away. Return the pen to its safe resting place, then lower the cork using the dry-fit references. Keep the visible surface level and resist sliding it repeatedly through partly cooling glue.
Support the cork until it stays in position, then leave the tray undisturbed while the adhesive cools. A surface that feels firm is not a license to load or aggressively pull the joint. Do not press a warm glue ridge with a finger or try to flatten it by reheating the finished tray.
Check the finished organizer and put the pen away
After cooling, check flatness at the corners and center and place a few ordinary desk items on the lining. The insert should stay seated during normal placement and removal of those items. If an edge lifts or the lining rocks, empty the tray and reconsider the fit; adding more hot glue around a failed edge can hide the problem without fixing it.
Switch the pen off deliberately and let it cool fully before storage. Leave the remaining glue stick in the tool rather than pulling it backwards. Keep this organizer dry: a satisfactory tabletop trial does not establish resistance to washing or moisture. Record the successful stick and material combination so a future matching insert starts with a useful test rather than a guess.
Models referenced