
Complete one attachment before coating the next
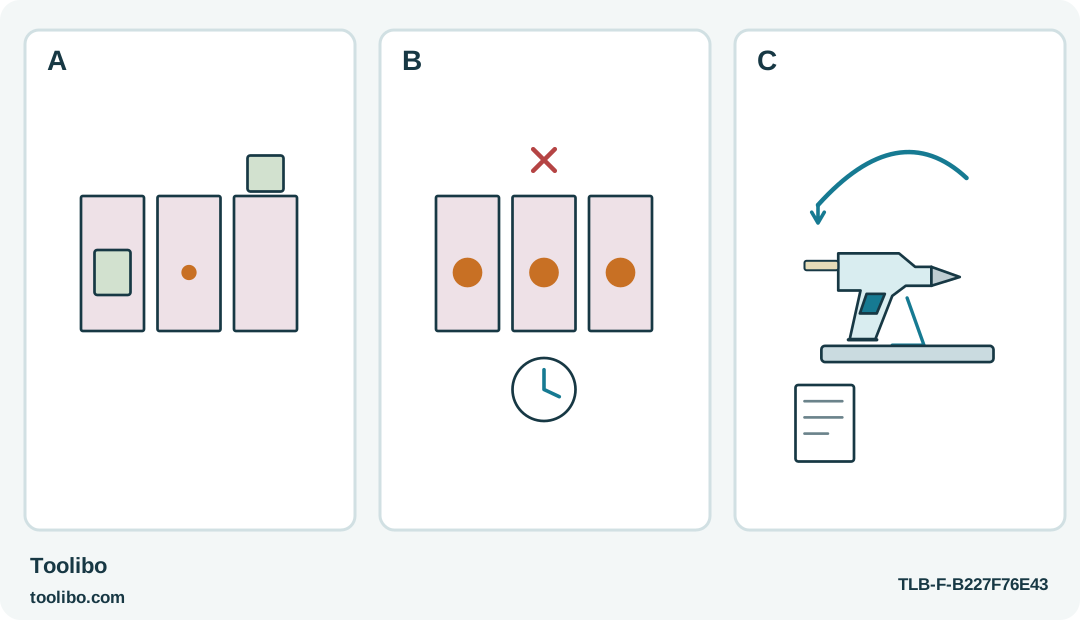
Three stages of a small batch contrast with all pieces pre-coated; a separate resting and recovery loop keeps heating pauses model-specific.
A
Prepare a joined cooling piece, one current application and one still-uncoated next piece rather than a row of aging beads.
B
Do not pre-glue the whole batch before assembling it; early deposits can cool while later parts are arranged.
C
Use the exact model’s pause or reheating routine. Residual-heat 940, corded PKP and battery MobileGlue do not share one charging-dock rule.
One cooling joint, one current application and one uncoated piece keep the batch from outrunning the adhesive.
Make the assembly smaller before making the bead longer
A glue gun can dispense faster than you can arrange a complicated decoration. When the first adhesive cools before the last part is positioned, the solution is usually a better sequence, not more trigger pressure. For a broad decorative panel or several small ornaments, divide the work into manageable attachments and keep a clear resting place for the tool between them.
This applies to the Bosch PKP 18 E, Dremel 940 and STEINEL MobileGlue 1007, but their power arrangements are different. The PKP 18 E is mains-powered, the 940 can briefly dispense using stored heat after its cord is detached, and the MobileGlue 1007 heats from an integrated battery. A pause or return to power must follow the actual model, not a generic rule that every cordless-looking tool belongs on a charging dock.
Before heating, lay out the parts and rehearse one complete joint. Include the time to park the gun, pick up the second piece and align it through cool edges. If the rehearsal is awkward, rearrange the bench. Glue working time should not be spent searching for an ornament or finding somewhere to put a hot tool.
Establish normal flow without forcing it
Use only the adhesive recommended for the exact gun and material. The PKP 18 E and 940 use their specified larger-stick systems, while the MobileGlue 1007 uses recommended 7 mm STEINEL sticks. Do not transfer a stick based on color, and do not assume a similar nozzle means a similar processing temperature.
Heat the selected model according to its own instructions, then make a small supported scrap application. Moderate, controlled pressure should produce usable adhesive. If the feed is stiff, do not treat your hand strength as a substitute for heat. Pause and check the normal heating state, correct consumable and power condition without dismantling the tool.
For the 940 operating with its cord detached, flow will eventually become less workable as stored heat is used. Return to its instructed powered setup to reheat rather than trying to complete a long bead at any cost. The MobileGlue 1007 is different: it cannot be used while charging, so a charging pause is not a continuation of powered gluing. Let the project wait rather than improvising around that restriction.
Divide the decorative job into complete joints
- Choose a first attachment that can be applied and aligned in one calm movement.
- Keep the next piece nearby but outside the hot tool’s parking area.
- Apply a modest amount to one side, park the gun and join promptly.
- Leave that joint supported while you prepare the next independent piece.
- Check the tool’s flow on scrap again if an extended pause or a change in behavior makes readiness uncertain.
For a long rigid decoration, separated contact points may be more manageable than coating an entire surface. For suitable flexible material, a short controlled line or wave may suit the contact area. Neither layout is a structural spacing rule. Trial the actual material so you can see whether the amount creates bumps, stains or poor contact.
Do not apply glue to every part in a batch and then begin assembly. The earliest beads may already be skinned over. If a bead has cooled before contact, let the attempt cool fully and revise the sequence. Pressing harder or sliding the pieces around does not reliably restore the original contact.
Recognize a pause versus a fault
A planned heating pause belongs in the work rhythm. Persistent feed resistance after proper heating, glue appearing where it should not at the rear, a damaged housing or abnormal heat does not. Stop using the tool and follow its service guidance rather than repeatedly pushing the stick or changing formulas to conceal a problem.
Keep the gun upright in its intended resting position, not laid on its side across the scraps. For the corded models, keep the cable clear of the nozzle and moving work. For the battery model, do not ignore shutdown or low-energy indications to finish one more ornament. The project is easier to pause before adhesive is applied than halfway through a cooling joint.
After the last attachment, switch off or disconnect the exact tool as directed and allow complete cooling before storage. Inspect the finished work cold for lifted edges, rocking and gaps that might have been hidden by a warm bead. A failed decorative joint should be reconsidered, not reinforced automatically with more glue.
The useful pace is the one at which every application reaches its partner while workable and every hot tool has a safe place to rest. That pace may vary between materials and sessions. Build the sequence around actual flow and assembly control, not a promised number of pieces per minute.
Models referenced