
Match the pattern to rigid or flexible contact
A point pattern on a broad panel, a short wave on relaxed textile and thin-versus-tall contact sections compare application layouts.
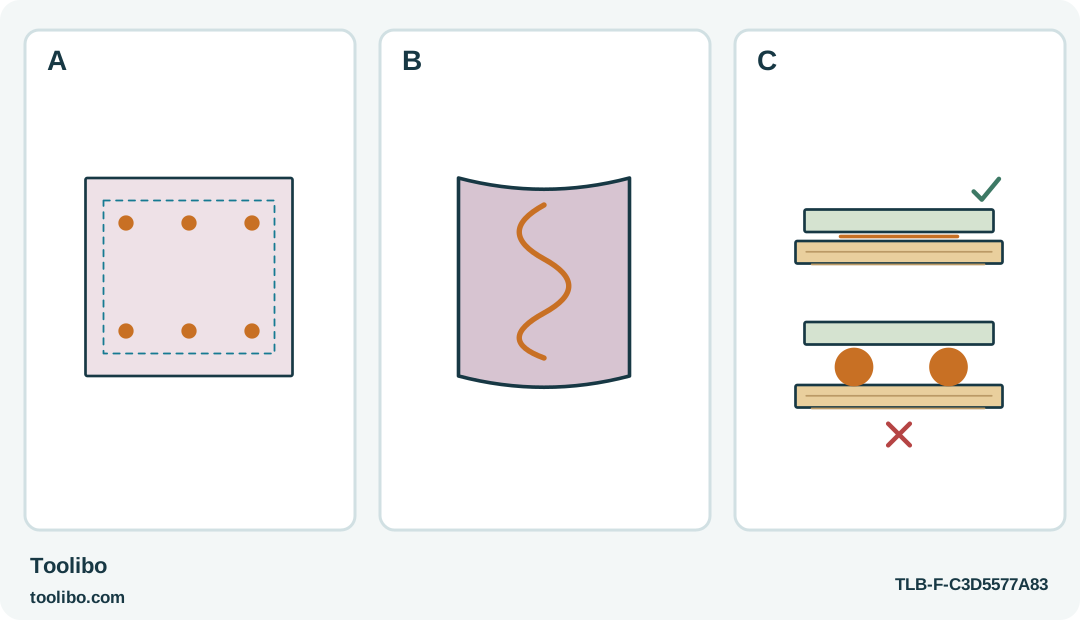
A
A broad rigid decoration may use separated modest contact points that can all be joined promptly; no dot spacing here is a structural rule.
B
For a suitable textile, a controlled short wave can follow the relaxed material. Test for heat damage and penetration first.
C
Keep the contact thin enough to avoid visible ridges or rocking. Tall glue pillars are not a substitute for fit.
Separated points suit one contact pattern and a short wave another; neither should become a tall spacer under the decoration.
Match the pattern to how the pieces meet
A long bead is easy to imagine but not always easy to assemble before it cools. For a broad lightweight decorative panel, separated attachment points can make the work more manageable. For a flexible textile piece, lines or a gentle wave can follow the material more sensibly than isolated large lumps. The pattern is a way to control placement and contact, not a universal calculation of bond strength.
Keep the project small, dry and nonstructural: for example, a decorative card facing on an already sound organizer or a textile accent on a removable display panel. Do not use these layouts to determine the spacing of structural fixings, overhead trim or a safety-critical attachment. No dot count in this guide provides a load rating.
First dry-fit the entire piece. Identify the places that actually touch, the visible edges and the areas where your hands can safely guide alignment. If the panel bows away from its support, solve that fit problem before choosing a glue pattern. A wave of adhesive cannot make a poorly fitting part flat without consequences.
Use the model and material rules separately
The STEINEL GlueMatic 1007 instructions recommend spot gluing on long items with large surfaces and wavy lines for textiles or similar materials. That guidance is useful for arranging a compatible decorative bond. It does not mean every textile can tolerate this standard 170 °C tool, and it must not be confused with the separate 1007-LT 85 °C system and its dedicated sticks.
The Bosch PKP 18 E uses recommended 11 mm sticks at its specified processing temperature. Its application instructions call for adhesive on one side, immediate joining and supported cooling. Use that sequence rather than coating both surfaces in an attempt to extend the working time. The quantity, substrate and exact adhesive influence how quickly the application becomes difficult to assemble.
For either gun, select a manufacturer-recommended adhesive suited to the material and tool. Keep the glue pattern away from areas that would force fingers over a molten bead. Use supported scraps to see whether the amount spreads beyond the intended footprint or shows through the visible face.
Rehearse dots and lines on a cold layout
- Mark the intended decorative position lightly on a hidden surface, or use external registration marks that will not be trapped under glue.
- For a broad rigid piece, identify a modest set of separated contact areas that can be reached and joined promptly. Do not specify arbitrary spacing as though it were an engineered fixing schedule.
- For a flexible strip, rehearse a short line or gentle wave within the contact area, leaving room for limited spread away from the edge.
- Practice setting the tool down and placing the second piece without sliding it across the whole surface.
- Reduce the working area if the rehearsal takes longer than you can reasonably manage after dispensing.
A line should not become a thick ridge that makes the textile stiff or holds its edges off the support. Dots should not become tall pillars that make a panel rock. The scrap trial is where you adjust the amount, keeping the gun’s nozzle away from the material and the work supported on a heatproof silicone mat.
For permeable materials, never hold a hand behind the application. Inspect both sides after the trial cools. Bleed-through, distortion or visible bumps can make a technically attached decoration unacceptable.
Assemble once and inspect the actual contact
Heat the exact tool according to its manual and establish normal flow on scrap. Apply the planned amount to one side and join promptly through cool accessible edges. Park the gun on its intended stand between applications; do not lay it across the project while reaching for the second part. Hold the alignment without squeezing molten glue toward your fingers.
If the starting dots have cooled before the last one is dispensed, stop the oversized sequence. Let the attempt cool and revise the layout or divide the work. Do not drag the hot nozzle through older adhesive to keep an entire panel fluid, and do not force the trigger when flow slows.
After cooling, inspect the panel for rocking, open areas and a visible glue ridge. Check flexible material for unnatural stiffness, stains and edges that pull away. A good-looking surface does not prove every concealed point made contact, so handle the decoration gently and keep its purpose nonstructural.
Unplug the corded tool when finished and let it cool completely on its stand before packing it away. Preserve the successful scrap and adhesive label if you plan a matching batch. The useful pattern is the one you can apply, assemble and inspect cleanly with the actual materials—not the pattern with the greatest total quantity of glue.
Models referenced