
Keep references visible outside the adhesive footprint
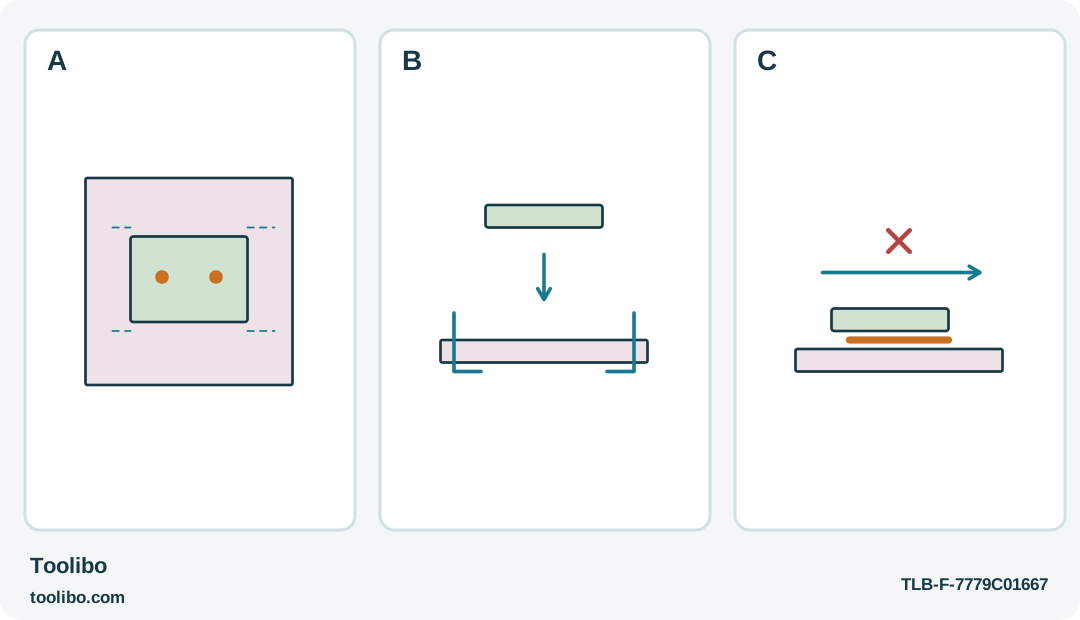
External registration ticks, a direct downward placement and a crossed sideways sliding arrow distinguish prepared alignment from late correction.
A
Place registration marks where they remain visible when the decoration covers its contact area; keep temporary guides out of glue.
B
Rehearse a prompt single placement after parking the hot tool, using cool edges and prepared support.
C
Do not slide a misplaced decoration through partly set glue. Let an unacceptable result cool before deciding whether cold rework is possible.
Visible external references make a direct placement possible without relying on a late sideways correction.
Choose a reference you can find while the glue is hot
A small decoration can be securely attached in the wrong position if you begin looking for alignment only after dispensing. Before using a Bosch GluePen or Dremel 940, establish a clear cold reference: an edge, a center mark or a pair of external registration marks. Keep those references visible when the second part covers the glue area.
Use a removable dry indoor workpiece, such as a decorative card panel on an already sound organizer. The attachment should be cosmetic rather than structural. Decide which edge matters most visually and how much clearance should remain around it. You do not need an engineering tolerance; you need a repeatable position that can be reached without sliding the part through a large wet bead.
Put the pieces together without adhesive and inspect them from the viewing direction of the finished object. A centered position measured from an uneven outer edge may not look centered. Resolve that choice while everything is cold, then leave the marks and supporting arrangement in place.
Arrange the support and tool route
The integrated-battery GluePen and the Dremel 940 do not have the same power behavior. The 940 can be used briefly after its detachable cord is removed, using stored heat rather than a battery. Do not detach the cord merely to gain room if the project can instead be arranged with a clear cable route. Whatever configuration you use, provide the exact tool’s proper resting position before applying adhesive.
Place the work so one hand can guide the second piece through cool edges while the other sets the tool down safely. Do not plan to hold the gun and align a tiny part simultaneously. If the piece is too small to handle outside the glue zone, use a suitable support or tongs rather than bringing fingertips closer to the bead.
Keep any temporary alignment aid outside the adhesive footprint. A loose guide that becomes trapped in the glue can pull the decoration out of position during removal. Test the complete movement with no power: approach, place, park the tool, align and release. Rearrange the bench if that sequence feels crowded.
Apply only what you can position promptly
- Select the manufacturer-recommended adhesive for the exact tool and material. The GluePen and 940 are different stick systems; matching color is not compatibility.
- Make a trial on supported matching scraps to check appearance and flow before the finished object.
- Heat the selected tool according to its manual and confirm normal dispensing without forcing the feed.
- Apply a modest amount to one bonding surface, staying away from visible edges and finger positions.
- Park the hot tool, bring the parts together promptly at the prepared references and hold through cool accessible areas while the bond cools.
Do not cover a large area simply to give yourself more chances to land in the right place. A long application can begin cooling before assembly, while excess adhesive can let a small part skate out of position or squeeze out at the edge. For several ornaments, complete one at a time instead of preparing a row of cooling beads.
A limited correction may be possible immediately after joining, but do not make that the alignment plan. If the glue has skinned over or the part resists movement, stop sliding it. Disturbing a partly set joint can compromise contact while leaving a convincing-looking surface.
Judge a crooked joint only after it cools
Keep the work supported until cold, then inspect it against the original references. Look from the intended viewing angle and check that the decoration lies flat. Do not lift a corner while the adhesive is still soft to see what happened underneath; that action can create the failure you are trying to assess.
If the position is unacceptable, decide whether cold rework can preserve the materials. Gentle removal of accessible hardened residue may be possible on a robust surface, but a fragile coating or thin card may be damaged. Do not use the nozzle as a reheating iron or a flame to release the whole piece. Sometimes replacing a small decorative offcut is preferable to forcing a repair on the main object.
If the alignment is acceptable, check ordinary gentle handling for movement or a lifted edge. This is not a structural strength test. Keep the finished item in a dry, cool display setting and avoid assuming that a neat joint will resist heat, washing or repeated flexing.
End the session with the exact shutdown procedure: switch the GluePen off, or switch off and disconnect the 940 as directed. Allow complete cooling in the designated resting position before storage. Good alignment comes from a visible reference and a rehearsed placement—not from racing to rescue a crooked bead after it begins to set.
Models referenced