
Match the work point and the attachment
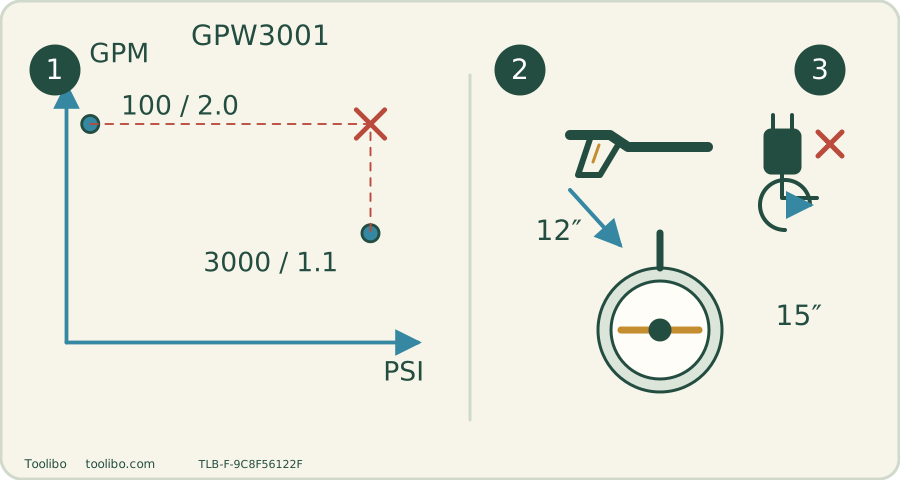
Two documented operating points sit beside separate wand and guarded-cleaner routes, with a stop-and-isolate gate before changeover.
Ratings
3000 PSI/1.1 GPM and 100 PSI/2.0 GPM are separate points.
Attachment
Choose wand or matched guarded cleaner by surface.
Pause
Continuous-run motor still needs deliberate shutdown, isolation and pressure release.
The 15-inch cleaner and 12-inch extension belong only to the named US bundle. The plotted points are two documented nozzle-conditioned operating points, not a measured continuous performance curve.
Identify the actual bundle
The verified US product is GPW3001 bundle SKU 5125602-VK, variant 44442974421152. Its listed extras are a 15-inch surface cleaner and 12-inch wand extension. A bare GPW3001 or another retailer package may not include them. The linked PWA212 manual names GPW3001 and GPW3001-SK; match the actual unit and attachment before following a combined setup.
The manual gives 120 V AC, 60 Hz, 14 A, 3000 PSI maximum pressure, 1.1 GPM rated flow and 40°C maximum inlet temperature. The product separately states 3000 PSI at 1.1 GPM and 2.0 GPM at 100 PSI. Do not advertise or expect 3000 PSI at 2.0 GPM: those belong to different operating conditions.
The package lists 25 ft hose, 35 ft cord, 15°, 25°, 40°, soap and turbo tips. Its 1/4-inch nozzle connection describes one interface only; it does not establish every hose or gun thread size.
Plan a flat working position and separate routes
Assemble the handle, wheels, front panel and storage hooks using the matched manual, with electricity disconnected. Confirm the supports and retainers are seated before loading the hose. Place the machine on a stable horizontal surface; its compact vertical storage arrangement is not permission to lift or tip it while running.
Uncoil the pressure hose and connect it without cross-threading. Route the supply hose and electrical cord separately, keeping plug connections dry and clear of the cleaning area. A 25 ft pressure hose does not gain reach from the 35 ft cord: each must independently reach its destination without tension or a trip hazard.
Inspect the inlet screen and supply before starting. Connect clean cold water within the inlet-temperature limit, open the supply and purge air with the motor off until a steady stream appears. Do not use the motor to compensate for a restricted or absent supply. Test the cord’s GFCI as instructed; failed protection ends the setup.
Select the job before selecting an attachment
For a small irregular object, the wand allows controlled access to a test patch. Choose a suitable fan pattern and begin cautiously; the turbo is concentrated cleaning action, not a universal safe option. Stop if the coating lifts, joints erode or the texture changes.
For a suitable broad flat surface, the bundle’s guarded rotating cleaner offers a different way to cover an area. First clear loose objects and identify edges, drains and fragile joints. The cleaner’s 15-inch width is a tool dimension, not a promise of a fixed pass speed or a percentage time saving. Edges and corners may still need a separate wand pass.
Before changing between wand and cleaner, switch off, unplug, close water, release trapped pressure and lock the trigger. Use the matched assembly and extension arrangement, and verify the quick connection is fully retained before restoring water and power. Keep hands and feet away from the underside; never inspect the rotor while pressurized or lift the cleaner to watch it spin.
Understand the continuous-run motor
The official product description identifies continuous-run operation and thermal-relief valves. Unlike a start/stop washer, the motor continuing after trigger release is not automatically a fault. Do not use a quiet-motor expectation from another Greenworks model as a diagnosis.
However, continuous run is not permission to leave the machine unattended or hold it in bypass indefinitely. The presence of thermal relief does not establish an arbitrary safe idle time. If you are pausing to move objects or change the setup, stop the machine rather than relying on the valve to manage the pause.
Do not block a relief outlet or modify the trigger to control temperature. Abnormal leakage, unexpected behavior or persistent performance loss should be checked only after shutdown and pressure release, with service escalation if external supply/nozzle checks do not resolve it.
Use detergent in its own mode
Before opening or filling the detergent tank, switch off, unplug, close the water supply and discharge residual pressure. Use the soap tip for the tank’s detergent route, and prepare only suitable pressure-washer detergent according to its label. Keep the machine stable while filling and clean spills. Do not infer a chemical dose from the 2.0 GPM low-pressure flow point or assume a high-pressure tip draws soap equally.
Work a manageable section, observe the chemical’s dwell guidance and rinse before it dries. Stop, isolate electricity and water and release pressure before changing tips or attaching the surface cleaner. The cleaner is not automatically a detergent applicator just because it belongs to the same bundle.
End with drained equipment and a checked next-use state
Stop the motor, shut water, disconnect power and safely release residual pressure before detaching components. Empty and rinse detergent equipment, drain hoses and attachments, and inspect the cleaner underside only when disconnected and depressurized. Remove visible debris without bending or modifying the rotating assembly.
Store dry indoors and protect the pump and accessories from freezing using the matched storage instructions. Secure the hose and wand without kinks; keep the cleaner and extension identified as separate bundle parts. A damaged pressure hose, failed protection, loose attachment or persistent pump fault is a stop-and-service issue, not a reason to fit an unverified substitute or open the electrical housing.
Models referenced