
Work safely with a surface cleaner
Numbered schematic explaining Work safely with a surface cleaner.
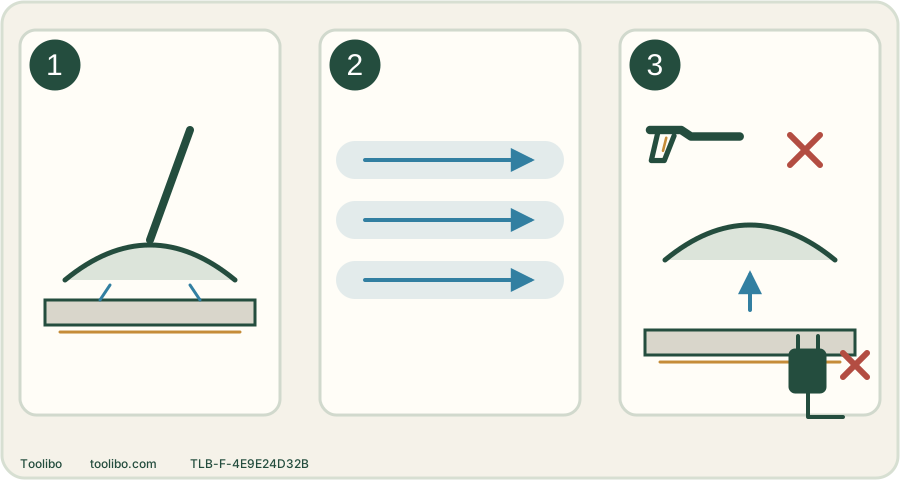
Flat supported working position
Keep the compatible head on its approved flat surface; the underside contains moving jets.
Overlapping lanes
Use steady passes and inspect the result rather than pressing down harder.
Stop before lifting
Release the trigger before lifting; isolate and depressurize before inspecting underneath.
Use a compatible head on the permitted surface, keep it flat while operating and stop before lifting or clearing anything. Conceptual schematic, not a product image or scale drawing.
Match the head, machine and surface
Check the exact accessory’s compatibility list, required connection and any pressure or flow limits. A connector adapter alone does not prove that the head is suitable. The Bosch AquaSurf 250 instructions identify supported Bosch families and illustrate work on a flat paved area. Check the current machine/accessory match rather than assuming all Bosch generations use the same fit.
The supplied pictograms prohibit use on gravel, steps or raised edges, and sloping or uneven surfaces. These restrictions belong to this attachment; another cleaner may have different approved uses. For wood, coated paving or soft stone, also check the material maker before choosing a head.
Sweep first and plan the path
Remove stones, loose debris and objects that could obstruct the moving jets or be thrown out. Inspect the paving and joints for defects. Arrange hoses so they do not pass underneath the head or pull the washer over. Work toward an appropriate runoff route, keeping people and animals outside the splash and debris area.
A dirty surface is not necessarily a smooth surface. If the housing cannot sit correctly because of an uneven edge, do not force it down or tilt it to bridge the gap. Clean that area with a separately permitted method.
Fit it with the machine safe
Complete the washer’s specific shutdown and pressure-release sequence, then isolate power before changing the attachment. Fit the prescribed extension pieces and coupling, checking seals and locks. Keep fingers away from the underside when preparing to restart. Put the head on the approved surface before operating the trigger.
Never hold the head in the air and press the trigger to see whether the bar spins. A stopped motor is not proof that retained pressure has gone, and a spinning rotor can be difficult to see under spray.
Make steady, overlapping passes
Start on a small inconspicuous section. Move the head at a steady pace with enough overlap to avoid untouched bands, then stop and inspect the result. Persistent stripes can come from uneven movement, dirt or an attachment problem; do not respond by standing on the head or forcing it harder into the ground.
Keep the housing flat within its allowed working position. Release the trigger before stopping, turning at an edge or lifting the head. Do not use a foot to hold a running head down, reach underneath it or move it onto gravel to clear a blockage.
Deal with poor cleaning after shutdown
If the pattern becomes uneven or the head does not move normally, stop and make the equipment safe before inspection. Remove loose external debris. Follow the accessory instructions for permitted nozzle cleaning; do not enlarge jet holes with drills or dismantle pressurized parts. Damaged nozzles or a damaged rotor need the specified replacement or service route.
When finished, inspect the paving and joints, rinse residue by an approved method and store the cleaned attachment without crushing its brush skirt or straining the coupling. Keeping the head clean helps the next job, but it does not cure an incompatible machine/accessory combination.
Mark the edge of the approved working area before starting a long pass. This creates a clear stopping point before the head reaches a step, gravel border or unsupported edge.