
The inlet hose and pressure hose do different jobs
Water-main supply passes through at least 3 m inlet hose and filter before the pump; 25 ft pressure hose leads to the gun and selected tip.
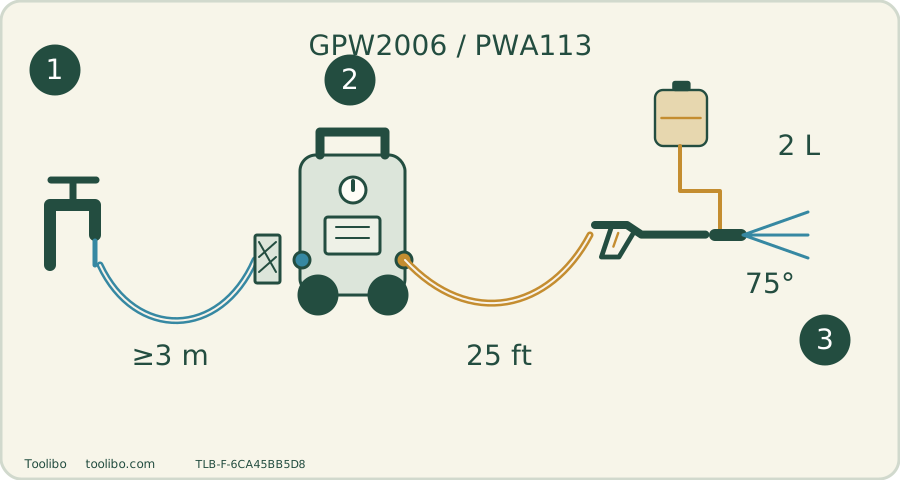
Supply
Water main; minimum 3 m unrestricted inlet hose.
Prime
Motor off until the stream is stable.
Detergent
2 L tank uses black 75° soap tip; change only after isolation.
The 3 m requirement applies to the supply side, not the pressure-hose length.
Match the model rather than the headline alone
This guide concerns Canadian GPW2006 SKU 5107402CAVT. The manufacturer product page links an operator manual whose cover identifies GPW2006 and PWA113. Its technical data gives 120 V AC, 60 Hz, 14 A universal motor, 2000 PSI maximum pressure, 1.2 GPM rated flow and 40°C maximum inlet-water temperature.
The product page’s structured 13 A field conflicts with its 14 A headline and the manual. Use the matched 14 A manual value, not the smaller inconsistent figure. The page was unavailable for purchase when checked; this remains an owner/setup guide rather than a promise of current local stock.
The documented configuration has a 25 ft hose, 35 ft cord, 2 L soap tank and 25°, 40°, turbo and soap tips. Check the actual box or used machine for those parts before starting. A pressure-washer accessory from another Greenworks SKU is not automatically equivalent.
Assemble a stable frame and an unrestricted inlet
With the switch off and electricity disconnected, assemble the upper panel, handle, wheels and storage hooks as shown for this model. Confirm retainers seat before loading the hose or rolling the machine. Uncoil the pressure hose, connect the spray wand and secure the pressure-hose connections without cross-threading.
The manual requires a water-main supply, not water from ponds or lakes. It also requires at least 3 m of free hose between the water source and washer inlet. That is an inlet-hose requirement, not a claim that the 25 ft pressure hose is too short. Do not replace the inlet route with an unsupported bucket-suction arrangement.
Inspect the inlet filter. A dirty screen needs cleaning before use; a damaged screen needs replacement, not removal so debris can reach the pump. Flush the garden hose for 30 seconds before connecting it. Keep the feed unrestricted and the electrical connection dry.
Purge before starting the motor
- Put the assembled washer on a stable surface with the high-pressure hose free of sharp bends. Keep the power switch off.
- Connect and open the water supply. Aim the spray gun safely, release the trigger lock and squeeze until a stable stream appears. If air remains, continue the water-fed purge rather than running the motor dry.
- Before installing or changing a tip, turn off, unplug, shut water and release any remaining pressure. Lock the trigger. Insert the tip into the quick-connect collar and pull-check that it cannot come out after the collar returns.
- Restore water, complete the plug’s protection test as directed and connect only to the specified supply. Start with the gun controlled in both hands and an appropriate test area clear of people, pets and electrical equipment.
The manual’s “before you start” preparation explicitly establishes water and air purging. Do not read a later abbreviated switching list as permission to start a dry pump. If steady water cannot be established, check the tap, feed hose and filter before any powered test.
The black soap tip has a specific job
Before opening or filling the detergent tank, switch off, unplug, close the water supply and discharge residual pressure. The matched manual specifies the black 75° soap tip for detergent application. Put the machine upright on a flat surface, prepare compatible pressure-washer detergent according to its label and fill the tank without spilling. Clean spills promptly so the floor does not become slippery.
A 2 L tank is storage capacity, not a dosage instruction or proof of how many cars can be washed. As a practical example, if a product label calls for a ready-to-use solution, do not add concentrate simply because the tank has room. If dilution is required, prepare the specified mixture rather than guessing from the washer’s PSI.
Apply a manageable area and avoid letting detergent dry. To rinse, stop, isolate electricity and water, release pressure and change to the suitable rinse tip. High-pressure tips are not equivalent to the black soap tip for drawing detergent. If soap does not appear, check tip selection and liquid supply first.
Understand start/stop without treating it as isolation
The product describes a motor start/stop system that switches the motor off when the spray wand is not engaged. That is normal control behavior. It does not mean the power is disconnected or that the hose is depressurized.
When a short pause becomes the end of a task, use the switch and complete shutdown. Do not leave the plugged-in machine unattended or remove a fitting just because the motor is quiet. Repeated cycling with the trigger released, leaking joints or abnormal behavior needs a stopped, external check—not a bypass of the control system.
Shutdown and owner-care limits
Stop the motor, turn off the water and disconnect the cord. Point the gun safely and release remaining pressure, then engage the lock before detaching parts. Drain the hose and accessories, clean detergent residue and store the machine indoors protected from freezing. Keep hose loops broad enough to avoid sharp kinks.
Inspect the screen, gun and pressure hose before the next session. A nozzle blockage can be checked only after full isolation and pressure release. Do not put a hand over a suspected pressure leak, run harsh cleaning chemicals through the pump or open the motor housing. A damaged cord, failed protection, bulging hose or persistent pump fault after supply checks requires qualified service.
Models referenced