
Hardness changes support, not grit
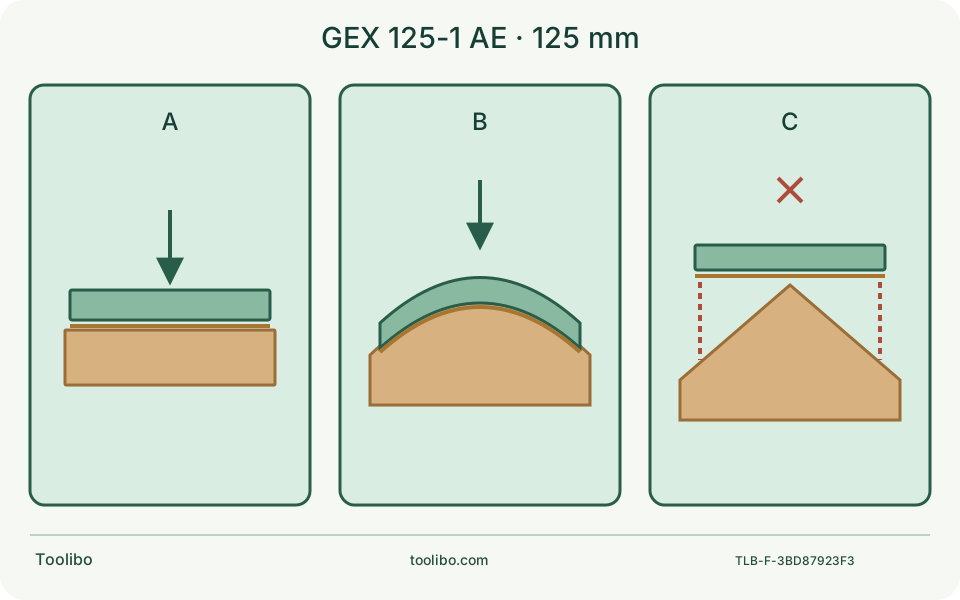
Original cross-sections contrast a flat supported surface, a broad curve and a sharp edge where support is lost, with separate symbols for pad and abrasive layers.
Match
Establish exact accessory compatibility.
Separate
Treat pad support and abrasive grit independently.
Inspect
Stop when full, controllable support is lost.
The cross-sections explain support relationships. They are not tested deformation profiles, a universal hardness scale or replacement-part dimensions.
Start with a pad that is actually applicable
The German GEX 125-1 AE uses a 125 mm hook-and-loop sanding system. That diameter does not identify every mounting detail or replacement pad. Record the actual ten-digit service identity from the tool, its current pad identification and the intended accessory listing. Do not buy a pad for GEX 125, a cordless GEX or another manufacturer’s machine merely because it is round and the same nominal size.
The manual explains several hardness options. It does not make all similarly described pads interchangeable. Confirm the exact accessory against the machine and regional instructions before discussing whether soft or hard is better. A correctly chosen hardness on the wrong mounting system is still the wrong part.
Read the three categories as support choices
Swipe or scroll horizontally to see all columns.
| Manual category | Intended direction | What it does not prove |
|---|---|---|
| Extra-soft | Sensitive sanding and suitable curved surfaces; polishing applications also listed | Permission to lean into a sharp edge or polish an unknown coating |
| Medium-hard | General sanding work | A guaranteed compromise for every veneer or contour |
| Hard | Heavier sanding on flat surfaces | Safety for thin faces or permission to press harder |
These are documented application categories, not independent test results. A hard support may help maintain flat contact in an appropriate job, but cannot create missing material allowance. An extra-soft support may accommodate a suitable curve, but cannot protect an edge if the operator concentrates force there.
Separate hardness, grit and intermediate layers
Abrasive grit identifies the cutting stage; pad hardness describes the support beneath it. Changing one is not equivalent to changing the other. A finer disc on a hard pad does not become a soft pad, and a soft pad with coarse abrasive is not automatically gentle on a thin surface.
Do not add an unverified foam interface or stack discs to imitate a different hardness. Intermediate accessories change the attachment and hole path and need their own exact applicability. If the chosen abrasive, pad and extraction arrangement cannot be documented as a working combination, resolve the combination before making a trial.
Compare two bounded tasks
For a flat bare-solid-wood panel with known preparation allowance, establish the finish requirements and whether the surface is already level. A confirmed suitable medium-hard or hard system may be considered according to the manual and abrasive requirements. A deep dent is not a reason to remove the whole surrounding surface until it disappears; repair or a different process may be appropriate.
For a broad, known curved solid-wood surface, an applicable extra-soft system may be considered only if the pad can remain controllably supported. A narrow bead, sharp transition or recessed profile may still need a shaped hand block or another method. Do not tilt the round pad onto its rim to make the tool fit. Unknown veneer thickness or coating identity stops the plan before hardness selection.
Inspect before deciding that softness is the problem
Unplug and remove the abrasive. Look for cracks, a damaged edge, degraded attachment or an uneven support face. A worn or contaminated pad can produce poor contact that resembles the wrong hardness. Replacing the abrasive repeatedly will not repair a failing support. Keep debris out of the extraction holes and confirm the disc is centred.
The manual directs prompt replacement of a damaged pad and treats a worn pad brake as authorised-service work. Do not run the tool against an object to diagnose the brake, improvise mounting screws or guess a tightening value from another model. Obtain the applicable fitting information or service help when the correct replacement details are uncertain.
Make the sample compare one change
Use matching, identified scrap and document the starting surface, abrasive and pad. Secure it with support under the work area and keep clamps clear. Use suitable collection and personal protection, maintain full contact and inspect in consistent grazing light. When comparing an approved hardness change, avoid changing grit, pressure and material at the same time; otherwise the result cannot show what made the difference.
Stop if an edge loses shape, a thin face changes appearance or the tool becomes difficult to control. Inspect only after movement has stopped and power is disconnected. A good small sample supports a cautious next step, not unlimited repeated sanding across the entire object.
Keep the final decision reversible
Save the old pad identification, new accessory packaging and sample notes before moving onto the real work. Reject a setup that relies on unexplained adapters, misaligned holes or body modifications. Pad selection is successful when the exact compatible system supports the intended surface and you know when to stop, not when the softest or hardest product has been purchased.
Models referenced