
A 35 mm concealed-hinge cup: verify the KHI-HINGE setup on one door sample decision map
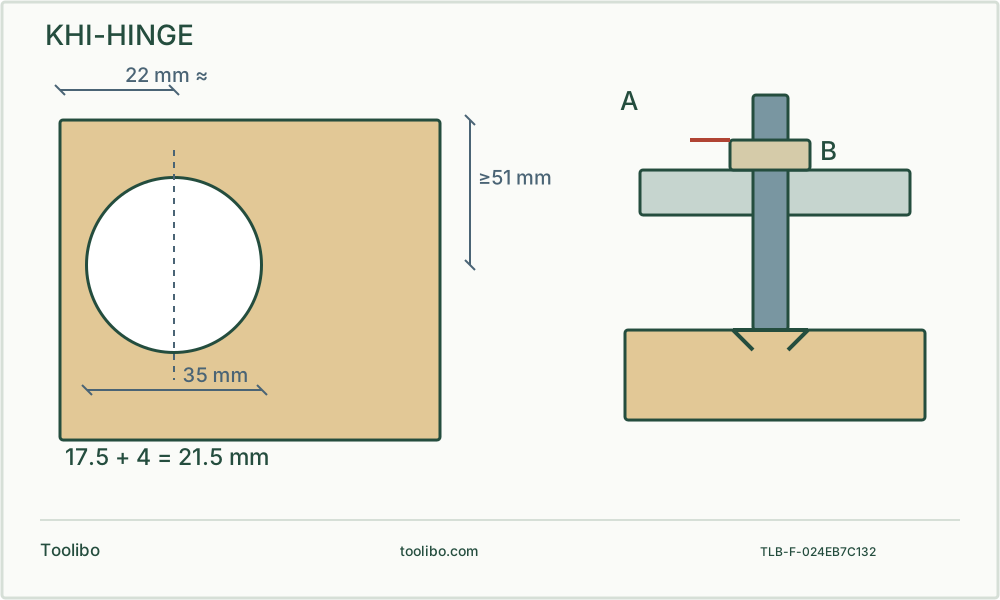
A 35 mm cup top view separates the rounded 22 mm table reference from the 17.5 + 4 = 21.5 mm geometry, beside a shoulder-seated collar and the 51 mm end clearance.
Match
Confirm hinge geometry and a drill suitable for the 35 mm cutter.
Shoulder
Seat the specified collar against the custom cutter shoulder.
Sample
Test cup depth and screw-pilot depth separately.
Original cutter cross-section shows a collar seated on a shaft shoulder above a guide, distinct from the cutter tip and remaining door thickness; a top view shows both edge cams and the 51 mm end-clearance constraint.
Check that the hinge, door, jig and drill form a valid set
This guide covers Kreg KHI-HINGE with its specified 35 mm concealed-hinge cutter, on a removed, known wooden cabinet door or matching sample. It is not a method for freehand cup drilling, enlarging an existing damaged recess or drilling an installed door beside hidden services. Obtain the actual hinge instructions before choosing edge distance, cup depth and screw locations.
The drill must be suitable for this cutter and task under its own instructions. Do not infer permission from shank fit. For example, the GSR 12V-35 FC and GSB 12V-35 list 32 mm wood capacity, while DF333D and HP333D list 21 mm; none of those figures covers a 35 mm cup. A drill’s hole-saw allowance is not automatically an allowance for every other cutter type.
Use the custom shoulder as the stop reference
With drill power disconnected, remove the drill guide from the jig base and fit the specified cutter through it. The KHI-HINGE cutter has a particular length and shaft shoulder. Seat the stop collar against that shoulder and secure its set screw with the provided hex key. Do not substitute a visually similar ordinary Forstner bit and copy the same collar position.
The collar’s purpose depends on the complete cutter-and-guide geometry. Measuring a chosen distance from the pointed tip is a different method and can produce a different cup. Keep the cutter capped during preparation when possible and protect against its sharp edges while isolated. Remove handling gloves before operating rotating equipment and keep hands away from the cutting area.
Translate the hinge drawing into the correct reference
An edge-to-cup-edge dimension and an edge-to-cup-centre dimension are not the same measurement. The jig’s edge indexers must be set using the applicable Kreg table and your hinge instructions. Do not enter a centre distance as though it were a small clearance from the door edge. If the hinge drawing is incomplete, stop and obtain the missing specification rather than estimating from another hinge.
Set both edge indexers consistently and verify that both contact the same straight door edge. Mark the hinge centreline and orient the door so its inside face, top and hinge edge are unmistakable. The Kreg instructions require at least 51 mm from the door’s end to the cup centre to keep both cams in contact. A desired location closer than this needs a different suitable method, not one cam hanging unsupported.
For example, when the actual hinge instructions specify 22 mm from the door edge to the cup centre, the matched Kreg table maps that to edge-indexer setting 4 mm. Set both indexers to that mark and verify on scrap. The table uses rounded centre distances: do not treat its labels as an exact geometric conversion or silently replace the hinge maker’s required dimension. If the hinge requires a precise offset the available settings cannot reproduce, use a suitable different jig or method.
Clamp and rehearse before cutting
Support the removed door flat, protect its finished face and secure the jig with two clamps, one above and one below its drill-guide socket. Check that neither clamp obstructs the drill or withdrawal path. Insert the assembled guide and rotate it into its engaged position. Keep the cutter from contacting the work unexpectedly while preparing the start.
Use scrap of the same material and thickness first. In this guided procedure, the manufacturer instructs bringing the drill up to speed before cutting and stopping feed when the collar contacts the guide. Withdraw as instructed while the cutter is still rotating, then release and wait for a complete stop before removing the guide or handling chips. This is the specified guided method, not a general instruction to spin a long unsupported bit freely.
Inspect the sample cup before repeating it
After isolation and safe cooling, clear debris without touching sharp or moving edges. Check cup location, depth, edge integrity and remaining material at the back. Test the actual hinge cup according to its instructions. Do not deepen a recess solely because the hinge does not sit: trapped chips, incorrect cup size, wrong hinge type or an incompatible door thickness can cause the same symptom.
Swipe or scroll horizontally to see all columns.
| Sample result | Before the finished door |
|---|---|
| Cup is misplaced but clean | Recheck the marked face, edge reference and both indexers |
| Cup is shallow or uneven | Check the specified cutter, collar seating, guide engagement and debris |
| Back face is marked, thin or broken | Stop; reassess door and hinge compatibility and the complete depth setup |
| Hinge sits correctly without forcing | Verify its screw pattern and test the next operation separately |
Treat hinge screw pilots as a second depth problem
The small pilot-hole guide has its own height; its depth reference is not the cup cutter’s collar. Confirm the hinge screw’s required pilot diameter and penetration. A tape flag is a visual warning, not a mechanical stop, and it can move or disappear into debris. Test on scrap and account for guide thickness as well as penetration into the wood.
Do not drill every pilot merely because a guide hole exists; match the actual hinge pattern. Isolate before exchanging bits, clamp the door throughout and check the back face again after the trial pilot. Stop if the jig shifts, the cutter chatters, the drill binds or any control becomes uncertain. Only repeat a setup that has passed both the cup test and the separate screw-pilot test.