
Frame first, then water and tip
Upright washer frame retainers and wheels beside separate hose routes and five tip-action symbols.
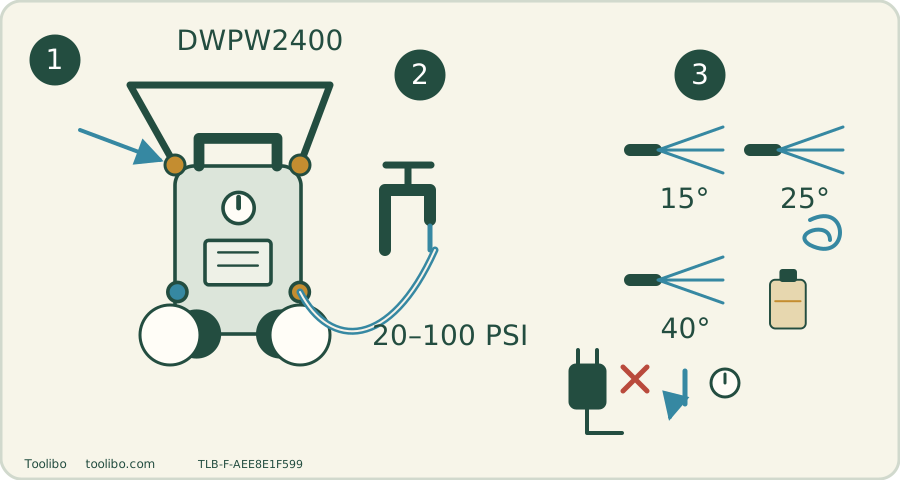
Frame
Confirm retaining pins and wheel condition before moving.
Water
Cold tap 20–100 PSI; purge before motor starts.
Tip
Isolate and release pressure before every nozzle change.
Tip choice follows the surface; the maximum rating is not a five-step pressure dial.
Match the machine and the supply
This is the US DWPW2400 corded washer. Its matched manual specifies 120 V AC, 60 Hz, 13 A and a minimum 15 A source. It lists 2400 PSI maximum pressure and 1.1 GPM rated flow; the official product footnotes tie the pressure and flow presentation to the 15° tip. Do not replace these with a retailer’s 1.3 GPM claim or the website’s inconsistent 110 V structured field.
Supply it with cold tap water at 20–100 PSI. That range describes the inlet, not a cleaning setting. Check the tap and water route before assuming a low-pressure symptom means a failing pump. A bucket-fed configuration is not established by these documents.
Build a transportable frame before loading the hose
- Keep the washer unplugged and switched off. Align the upper handle posts with the lower frame posts and push until the retaining pins snap into their correct positions. Confirm both sides retain before moving the machine.
- Inspect the 10-inch pneumatic wheels and their attachment. A damaged or inadequately supported wheel changes stability; do not invent an inflation pressure from the washer’s PSI rating. Use the wheel’s own marking and applicable instructions.
- Connect the wand to the spray handle, then uncoil the 25 ft pressure hose. Thread its collars to the handle inlet and washer outlet without cross-threading. A collar that binds immediately should be backed off and aligned, not forced.
- Place the machine where the hose and 35 ft electrical cord can follow separate clear routes. Leave connection slack and keep the electrical connection dry. The cord length cannot be added to the hose to create a larger working radius.
For example, a driveway position may allow the cord to reach the outlet while the hose cannot pass around a vehicle’s far end. Move the shut-down machine to a suitable position instead of tightening the hose around a tyre or lifting the inlet with hose tension.
Flush and purge before asking the pump to work
Flush the garden hose before attaching it, then hand-tighten it at the inlet. Open the water source. With the motor still off and the wand pointed safely, release the trigger lock and squeeze the trigger to clear air. The manual’s preparation sequence uses 30 seconds and continues if air remains: steady water is the success condition, not the clock alone.
Before installing or changing a nozzle, switch off, unplug, close water and discharge pressure. Pull back the quick-connect collar, insert the tip, release the collar and tug-check retention. Lock the trigger when not deliberately operating it. Restore water and complete the GFCI test before starting. Failed protection or a tip that will not lock means stop, not “try at lower pressure.”
If purging produces only intermittent water, look for a closed tap, kinked supply hose or restricted inlet before starting the motor. If a fitting leaks, inspect only after isolation and depressurization. Never use a hand to find a leak while the pump is running.
Five tips are different actions, not five guaranteed safe settings
The verified package lists 15°, 25°, 40°, soap and turbo tips. The broad 40° pattern is a different tool from the narrow 15° fan; the turbo concentrates action as it rotates. A surface must be suitable for pressure cleaning before any colour-coded tip recommendation matters.
Choose the least aggressive suitable action and test an inconspicuous patch. Keep the spray moving and observe texture as well as colour. Raised wood fibres, loose coating or eroding joints mean the cleaning method is damaging the material. A more powerful-looking jet will not repair that damage.
The soap tip serves detergent application from the tank. It is not a high-pressure cleaning tip and it does not make every chemical safe. Prepare only a compatible pressure-washer detergent at its label dilution. After a section is treated, stop and isolate before changing to a suitable rinse tip; do not let detergent dry while you search for a missing accessory.
Make shutdown part of the job
Switch OFF, unplug and close the supply. Point safely and squeeze the trigger until no more water exits; then lock it. Only afterward disconnect and drain the garden hose, pressure hose and spray assembly. Empty and clean the soap tank as directed so residue is not stored in the system.
Coil the hose without sharp bends and secure it to its storage position. Check that the wand cannot fall or snag during transport. Move by the frame handle, not the hose or power lead. Store the machine dry indoors; the manual’s safety section specifies a location not below 4°C, which is stricter than merely staying above 0°C.
External care includes checking hoses, cleaning the inlet screen and removing nozzle debris after isolation. If protection repeatedly trips, the cord is damaged, a pressure hose bulges or the pump continues to behave abnormally after supply checks, stop using the washer and arrange qualified service. Do not open the pump or substitute an unknown pressure fitting simply because its thread appears to start.
Models referenced