
Working position is not storage position
Horizontal operating washer with separate water and power routes, contrasted with a drained vertical storage unit.
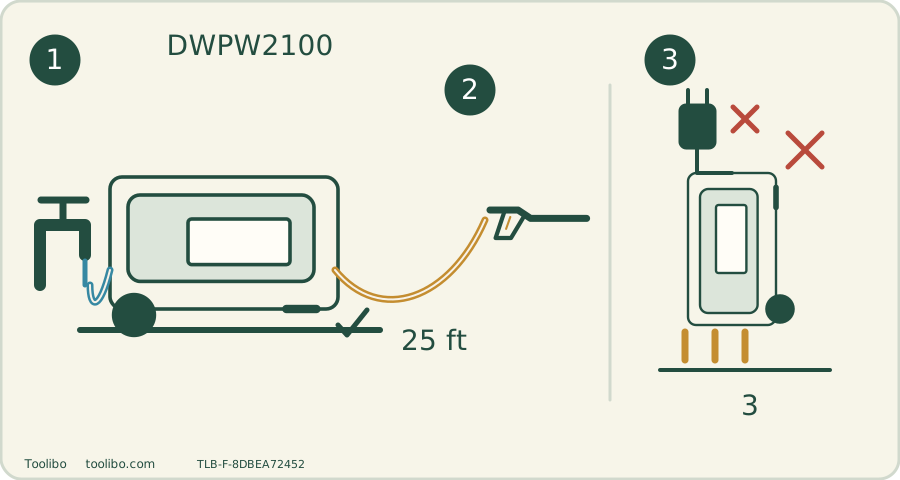
Operate
Keep feet and wheels on the ground.
Feed and purge
Cold tap → washer → hose → wand; motor off until the water stream is steady.
Store
Shut down, unplug, release pressure and drain before packing the three-piece wand.
The 25 ft hose and 35 ft cord follow different paths; vertical storage is not permission for vertical operation.
Start with the US model, not the storage shape
This guide covers the US DWPW2100 corded electric washer. Its manual specifies 120 V AC, 60 Hz and 13 A, with a minimum 15 A supply. The performance labels are 2100 PSI maximum pressure and 1.2 GPM rated flow. Neither number is an adjustable setting on the power switch, and the maximum figure is not a promise about pressure remaining at a surface.
The compact cage has two jobs: it provides carrying grips and surrounds a storage compartment for the dismantled wand. The telescoping handle and wheels help move the unit; they do not turn it into an upright-operating washer. For operation, its feet and wheels must be on the ground with the unit right-side up. Vertical or horizontal storage is allowed after draining, but vertical operation is not.
Lay out water, hose and power before assembling
The supplied high-pressure hose is 25 ft (7.6 m); the power cord is 35 ft (10.6 m). These are two separate routes, not 60 ft of usable reach. For example, a machine position can be within cord reach of an outlet while the hose still cannot pass around a parked car without pulling on the machine. Plan both paths, leave slack at connections and move the washer rather than tow it with a hose.
Use cold tap water within the manual’s 20–100 PSI inlet range. That is incoming supply pressure, not the washer’s cleaning output. A 2100 PSI machine is not permission to connect a 2100 PSI source. Do not assume a bucket or rain barrel is suitable: this guide does not establish a suction-feed configuration.
Before connecting electricity, inspect the cord, plug, hose, trigger and connectors. Bulging, split or leaking high-pressure hose requires replacement, not tape or a hand pressed against the leak. Keep plug connections dry and away from standing water. If the outlet or circuit cannot provide the specified supply, resolve that before starting; do not bypass protective devices.
Assemble and purge in a controlled sequence
- Set the switch to OFF and keep the plug disconnected. Open the accessory compartment by turning its latch counterclockwise. Remove the spray handle, handle grip and wand.
- Thread the spray handle onto the grip, then fit the wand into the handle’s threaded collar. Tighten correctly without starting a thread at an angle. Assemble the complete wand before using it.
- Fully uncoil the high-pressure hose. Attach its collars to the handle-grip inlet and washer outlet. If a collar immediately binds, back it off and align it; forcing it can cross-thread the connection and create a leak.
- Run water through the separate garden hose for 30 seconds to clear debris, then stop the tap and hand-tighten that hose at the washer inlet. Open the supply again.
- Point the assembled wand into a safe open area, release its trigger lock and hold the trigger with the motor still OFF. Purge for 30 seconds; if the stream still contains air, continue until it is steady. These are two different checks: flushing the garden hose removes debris, while purging the assembled washer removes air.
- Before fitting or changing a tip, keep the unit off, unplug it, shut the supply and squeeze the trigger to release trapped pressure. Pull the quick-connect collar back, insert the selected tip and release the collar. Tug the tip to check retention; a tip that pulls out is not ready to pressurize.
A sputtering stream at the purge stage is a reason to check the water supply, hose kinks and connections—not to start the motor and hope extra power will clear a supply problem.
Test protection, then test the surface
The cord’s GFCI must be tested before each use. With dry hands, connect it to an appropriate working outlet: the indicator should show green. Press TEST; the green indication should disappear. Press RESET to restore readiness. Do not use the washer if this sequence fails. Repeated tripping is a stop-and-investigate condition, not a reason to hold a button down or remove protection.
Reopen the water supply after any tip change and ensure the system is water-fed before switching ON. Hold the spray assembly with one hand on the handle grip and the other on the spray handle; anticipate recoil. Begin on an inconspicuous test area with a suitable broad spray, keeping people, animals and electrical equipment out of the spray path. Stop if the surface changes colour, lifts or becomes rough; switching to a more aggressive tip will not correct material damage.
The verified package identifies 15°, 40°, soap and turbo tips. The manual also describes a 25° tip among common accessories, but that table is not proof it comes in this box. The 40° tip is a broad application option; the turbo tip is abrasive, not a gentler rinse. Surface finish, condition and the cleaning-product instructions still decide whether pressure washing is appropriate.
Treat the soap tank as a separate cleaning circuit
Use pressure-washer detergent and the detergent maker’s dilution instructions. Do not invent a stronger mixture because the tank is small. To remove the tank, switch off, disconnect electricity, shut water and discharge pressure first. Lift it out, fill it, tighten the cap and reinstall it securely.
Select the soap tip for applying detergent rather than expecting the high-pressure tips to perform the same job. Work in manageable sections so the product does not dry before the required rinse. If detergent does not appear, stop and confirm the selected tip, tank seating and fluid supply before repeatedly topping up the tank. Do not open the injector or pump to diagnose an external setup problem.
After use, remove leftover detergent according to its label, rinse the tank thoroughly with clean water, empty it and allow it to dry. Keep incompatible chemicals out of the tank and do not return a contaminated mixture to an original product container.
Move, drain and store without confusing the positions
Switch OFF, shut the tap and unplug. Point the wand safely and squeeze until no more water emerges; then engage the trigger lock. Disconnect the garden hose and high-pressure hose, and drain the hose, wand, nozzles and machine. Releasing the trigger alone does not remove trapped pressure.
For a move, use the cage handles or the locked-out telescoping transport handle once the unit is shut down and depressurized. For storage, separate the wand into its three pieces and use the internal compartment; coil the hose between the cage and body without sharp bends and wrap the cord on its hooks. Close and latch the compartment rather than letting loose parts fall during the next lift.
Store indoors, dry and protected from freezing. The manual’s safety section requires temperatures not below 4°C, so an unheated shed that merely stays above 0°C is not a sufficient plan. The unit can be stored vertically or horizontally; that permission does not change the feet-and-wheels-down operating rule.
If a connection still leaks after depressurized reseating, a tip will not lock, the power protection fails or the pump behaves abnormally after supply checks, stop using the unit and arrange qualified service. This is an external setup and care guide, not permission to open a pressurized pump or electrical housing.
Models referenced