
Secure the frame before loading the hose
Wheel and frame retaining points lead to a stable upright washer, then separate soap and rinse-tip routes.
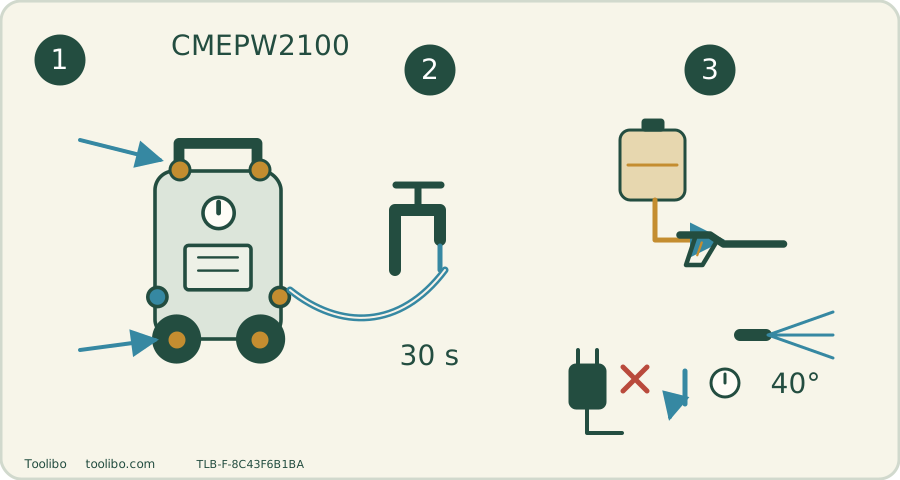
Build
Retain wheels, frame and storage supports.
Prime
Open cold-tap supply and purge with motor off.
Change mode
Stop, isolate and release pressure before changing soap/rinse tips.
Storage supports and wheel retainers are functional checks, not decorative assembly steps.
Read the model and rating condition
The US CMEPW2100 manual specifies 120 V AC, 60 Hz, 13 A and a minimum 15 A source. Its performance table lists 2100 PSI maximum and 1.2 GPM rated flow. The product footnote associates the listed pressure and flow with the 15° nozzle. This is not evidence that changing to a wider tip preserves the same impact on a surface.
The package is a wheeled upright with 25 ft high-pressure hose, 35 ft cord and an onboard soap tank. The product page’s brief prose and detailed contents disagree on the number of tips. The matched manual describes 15°, 25°, 40°, soap and turbo types; verify the actual box instead of treating a generic count as a guaranteed inventory.
Assemble the frame before loading accessories
- Keep the machine off and unplugged. Fit the wheels with their axle pins and retaining pins, checking both sides are secured.
- Align the lower frame and kickstand components so the detent pins engage. Fit the upper handle until its pins also snap into place. Check that the frame stands firmly before attaching the loaded hose.
- Secure the crossmember and spray-handle storage holder with their specified fasteners. Fit the hose-storage hook and cord-retaining hooks so they seat rather than merely rest against the frame.
- Connect the wand to the spray handle and uncoil the pressure hose. Thread the hose to the handle and machine outlet without forcing misaligned collars.
The observable result should be a stable frame with retained wheels and storage parts that do not detach under light checking. Missing or damaged retainers are a reason to complete the assembly correctly, not to roll the machine carefully and hope.
Establish water before pressure
The inlet requirement is cold tap water at 20–100 PSI. Flush the garden hose before connecting it, then tighten the inlet connection by hand and open the supply. With the motor off, point safely and hold the unlocked trigger for 30 seconds. Continue if the water stream still contains air.
A stable stream is the checkpoint before starting. If the supply is intermittent, check the tap, hose kinks and inlet rather than using motor power to conceal starvation. A nominal 25 ft hose may be enough in a straight line but too short around a vehicle; leave slack and reposition the stopped machine instead of stretching connections.
Before installing a nozzle, switch off, unplug, close water, release residual pressure and lock the trigger. Insert the tip using the quick-connect collar and tug-check its retention. Reopen the supply after the change. Test the GFCI before use: green indication, TEST removes it, RESET restores readiness. A failed test means do not operate.
Use the tank and nozzles as a planned sequence
Before opening or filling the detergent tank, switch off, unplug, close the water supply and discharge residual pressure. Have the required rinse tip ready before applying detergent. Use pressure-washer detergent prepared according to its label, and use the soap nozzle for the tank’s low-pressure application mode. High-pressure tips are not interchangeable with the soap tip for drawing detergent.
For a small vertical washable section, protect adjacent areas and begin with a material-compatible test patch. Apply detergent in a controlled section rather than coating an entire surface that cannot be rinsed in time. The manual describes applying from the bottom upward to reduce streaking; the detergent label still controls dwell time and whether the material is suitable.
When it is time to rinse, shut down, isolate electricity and water and release pressure before changing tips. A 40° fan, 15° fan and turbo nozzle do not merely represent three labels for the same jet. Begin with the appropriate less aggressive action and stop if the surface roughens, coating lifts or joints erode.
Move without stressing the connections
The 10-inch wheels and wand-storage system help transport, but the hose is not a tow rope. Stop the motor, close water, disconnect electricity and release residual pressure before moving. Secure the wand and loose hose so they cannot catch on the route. Lift or roll using the frame rather than pulling at the pump inlet.
For example, if a hose snags behind a planter, pulling harder can move the washer or load a fitting. Shut down, free the route and relocate the unit. More maximum pressure would not solve this handling problem.
Finish clean and stop at the repair boundary
After shutdown, drain the pressure hose, wand, nozzles and soap system as directed. Clean away detergent residue and arrange the cord and hose without tight bends. Store indoors and dry, never below 4°C; the manual also prohibits operation below 4°C. Do not leave a water-filled unit in an exposed shed.
User checks include supply, accessible inlet filtration, nozzle debris and damaged external parts. Clear a nozzle only after the machine is isolated and pressure is gone. A worn pressure hose, failed trigger lock, repeated electrical trip or abnormal pump behavior after basic checks is a reason to stop and seek service. The frame’s easy assembly does not imply the motor or pump is an owner-repair module.
Models referenced