
The bottle belongs below the handle
Two alternative front assemblies with the soap bottle below the barrel and a crossed-out stacked wand-plus-bottle arrangement.
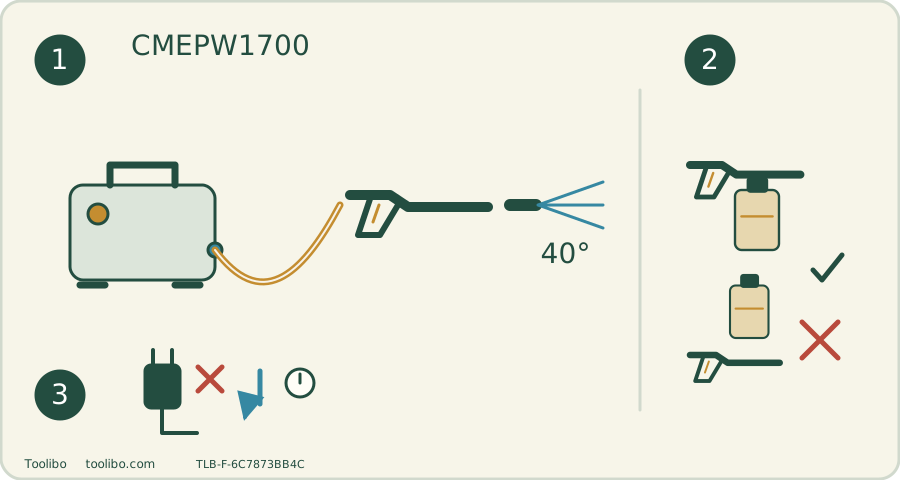
Rinse
Assembled wand plus appropriate tip.
Soap
Bottle replaces wand and hangs below barrel.
Check
Retained fitting and correct orientation before water and power return.
Change attachments only after shutdown, isolation and pressure release.
Know the exact US configuration
CMEPW1700 is corded, not battery powered. Its matched manual gives 120 V AC, 60 Hz, 13 A, a minimum 15 A source, 1700 PSI maximum pressure and 1.2 GPM rated flow. The manufacturer’s product footnote conditions its 1700 PSI/1.2 GPM presentation on the 40° nozzle. Do not assume the turbo tip produces the same measured working condition.
The package includes a 20 ft high-pressure hose, 35 ft power cord, 40° and turbo nozzles, and an external soap bottle. The small carry layout is useful for short tasks near a suitable supply, but a nominal hose length is not permission to drag the machine around furniture.
Prepare two routes and a stable resting place
Keep the machine switched off and unplugged while connecting the spray assembly and pressure hose. Align hose threads by hand before tightening. If a connection jams immediately, stop and realign it rather than using extra force. Inspect for hose cuts, bulges or coupling damage before pressurizing.
The manual specifies cold tap water at 20–100 PSI. Flush the garden hose for 30 seconds before attaching it to clear debris, then connect it by hand at the inlet. Keep electrical connections dry and away from the water route. A 20 ft hose is about 6.1 m; allowing it to pass around an object without tension matters more than measuring only a straight line.
For a set of patio chairs, place the washer where each chair can be reached without pulling the inlet. If the next position cannot be reached safely, shut down and move the machine by its carry handle. Never use the pressure hose or power cord as a handle.
Purge and test before cleaning
- Open the water source with the motor still off. Assemble the spray handle and wand, aim safely, unlock the trigger and squeeze it for 30 seconds to purge air. Continue if bubbles or interruptions remain.
- Before fitting a tip, turn off, unplug, close water and release residual pressure. Lock the trigger, insert the nozzle in the quick-connect collar and verify it will not pull out after the collar returns.
- With dry hands, connect the GFCI plug to a suitable working outlet. Its indicator should be green. Press TEST: the green indication should disappear. Press RESET to restore readiness. If that test fails, do not use the washer.
- Restore water after a nozzle change, hold the spray handle with both hands and start only when the water supply is established. Test a hidden patch before cleaning a visible face.
If the motor-off purge cannot produce steady water, check the tap, supply hose and inlet connection rather than diagnosing the pump under power. Recurrent GFCI tripping or a damaged electrical lead is a stop-and-service condition; protection must never be bypassed.
Use the two nozzles for different effects
The 40° tip spreads the spray more broadly than the turbo’s rotating concentrated action. That makes the broad tip a different tool, not a blanket guarantee for every paint finish or delicate material. Check the object’s cleaning instructions, test cautiously and keep the jet moving.
Stop if coating lifts, wood roughens or water enters a vulnerable joint. A turbo nozzle is not a remedy for damage or a substitute for a suitable detergent and dwell time. It also does not make the compact machine suitable for every large-area accessory sold with a similar connector.
Change from wand to soap bottle safely
The manual states that the wand and soap bottle cannot be installed at the same time. The bottle fits at the spray handle and must hang below its barrel, not above it where liquid can drip onto the handle.
Before changing assemblies, switch off, disconnect electricity, shut water, release pressure and lock the trigger. Remove the wand, seat the bottle attachment using the matching fitting’s locking action and check that it is retained. Do not force a different brand’s bayonet into place. Prepare a pressure-washer detergent using its own dilution and surface directions.
Apply a manageable section, then repeat the complete isolation procedure before reinstalling the wand and suitable rinse tip. Have the rinse assembly ready before applying detergent so the product does not dry while you search for parts. If the bottle hangs incorrectly or will not lock, stop; orientation is part of correct assembly, not a cosmetic choice.
Empty before carrying or storing
Switch off and unplug, close the tap and squeeze the trigger until remaining pressure is discharged. Lock the trigger, disconnect and drain the hoses and spray parts. Rinse and empty the soap bottle rather than storing it with residue. Store indoors and dry, at a temperature that does not fall below 4°C. The manual also prohibits operation below 4°C.
The manual provides onboard locations for the two nozzles and other accessories. Secure them before carrying the machine so nothing falls against a wet electrical lead or damages a coupling. If a pressure hose is worn, a trigger lock fails or a connection leaks after proper depressurized reseating, replace the defective approved part or seek service. Do not tape a pressure leak or open the electrical housing.
Models referenced