
Grip the plain shank, then judge the screw seat
Jaws contact the plain shank; lower sections compare a seated head and an overdriven head.
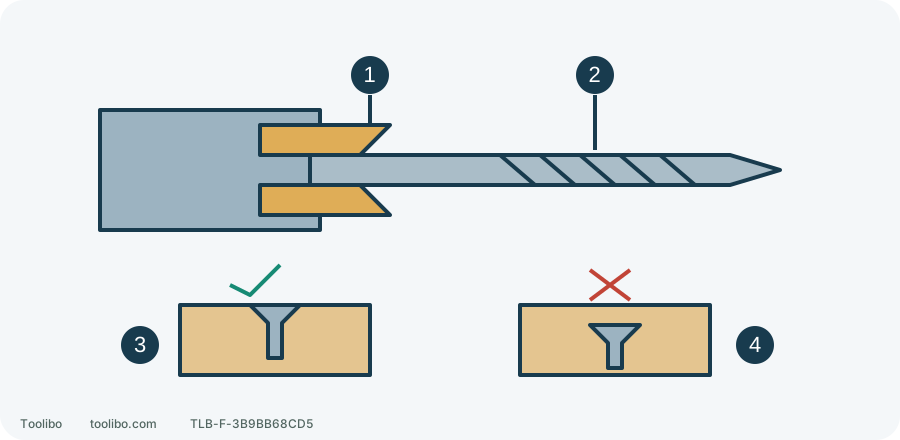
1. Gripping area
Even jaw contact on a sound plain shank.
2. Cutting flutes
Do not substitute this area for the gripping shank.
3. Intended seat
Stop and inspect before repeating the setting.
4. Overdriven
Stop; more clutch force is not the correction.
Illustrative countersunk screw in timber, not a universal required head position. Choose the intended seat for the actual fitting.
Identify the holder and accessory
GSR12V-300 has a 3/8-inch three-jaw keyless chuck. That rating concerns the gripping shank, not permission for every cutting diameter. A reduced-shank hole saw does not become suitable merely because the chuck accepts it.
Check that the housing says GSR12V-300, not a GSB hammer model, HX hex holder or FC interchangeable-head tool. Match the accessory’s material, shank, condition and operating method. Retire bent, cracked, badly marked or chipped accessories rather than disguising damage with tighter clamping.
Fit without power and inspect the grip
This uses the model’s 12/2018 fitting procedure. Release, wait for a full stop, select centre OFF and remove the battery, then select the drill symbol. That position supports normal hand fitting; it does not mean leaving drill mode selected for subsequent screwdriving.
- Looking from the chuck nose toward the housing, turn the sleeve counterclockwise to open approximately to the shank diameter. Establish this viewpoint only with power disconnected.
- Insert the clean, sound bit along the axis. Seat a small bit up to the start of its flutes, or a larger bit as far as it normally enters. Grip the intended shank, not cutting edges or flutes.
- From the same nose viewpoint, turn clockwise and tighten securely by hand. Never power the chuck while holding its sleeve.
- Still disconnected, inspect from the side for a tilted bit or unequal jaw engagement and gently check for obvious looseness. Refit a bit gripped on flutes, at only a tiny shank end or off-axis.
Stop if correct refitting cannot secure it or one jaw moves abnormally. Do not transfer a particular Milwaukee chuck’s bottom-and-withdraw instruction to this chuck.
Return to a numbered setting for screws
Numbers 1–20 progressively raise the screwdriving limit; the drill symbol locks the clutch for appropriate drilling. Numbers are not torque units or fixed screw sizes.
Clamp matching scrap of similar thickness and use the actual screw, bit, pilot and countersink preparation. After isolated fitting, select low mechanical range, a low clutch number and the correct direction. Check full slider engagement and clear work/exit paths, then reinstall a compatible battery with your finger off the trigger and verify retention.
Seat the bit fully and keep it aligned. Start slowly, releasing when the clutch operates or the head reaches its intended seat. Wait to inspect. Disconnect again for adjustment, changing the clutch alone rather than bit, pilot and pressure together.
Judge the result, not just clutch noise
Swipe or scroll horizontally to see all columns.
| Result | Next step |
|---|---|
| Head proud, material and recess sound, no abnormal resistance | Stop and disconnect, then increase incrementally |
| Intended seat without crushed material or cam-out | Release; confirm on matching scrap before adopting as a starting setting |
| Overdriven head, split wood, damaged recess or spinning screw | Stop and review fastener, pilot and bit; a lower setting cannot repair damage |
| Twisting housing, binding or repeated shutdown | Stop immediately, resolve load/accessory issues and seek service if abnormal behaviour persists |
This is ordinary non-load-bearing assembly. Specified-torque, structural and safety-critical connections require their own procedure and measuring equipment, not a clutch-number acceptance value.
Confirm the version before larger work
Two documents list different capacities for the same model; do not automatically take the larger figure.
Swipe or scroll horizontally to see all columns.
| Document version | Wood drilling entry | Screw-size entry |
|---|---|---|
| 2610051568, 12/2018 | 3/4 inch | 9/32 inch |
| 2610056578, 04/2020, GSR12V-300 entry | 1-1/4 inch (32 mm) | 5/16 inch (8 mm) |
These entries show a version difference, not permission to expand your tool’s capacity. Before a large wood bit, hole saw or near-limit fastener, have Bosch reconcile the complete tool identifier, document version and accessory specifications. Do not proceed using the larger figure before confirmation or substitute shank fit for capacity.
Models referenced