
Locate the collar, sleeve and handgrip
A simplified auxiliary handle surrounds the drill nose with separate sleeve and grip below.
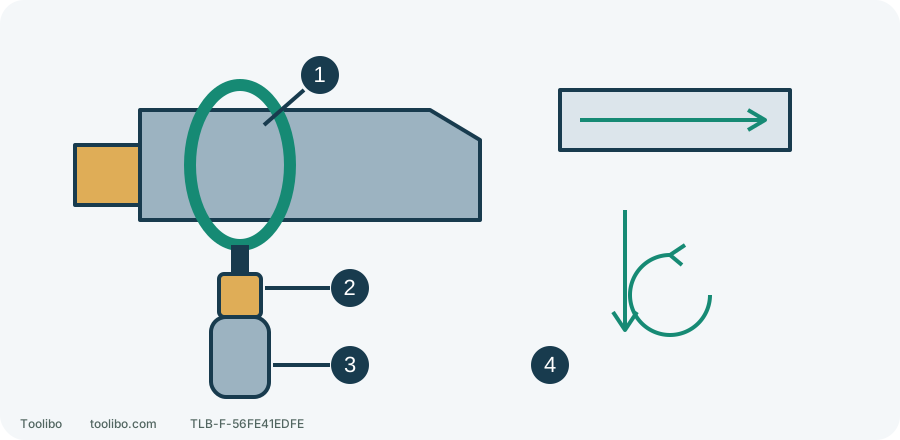
1. Collar
Seats around the specified front housing location.
2. Sleeve
Part of the auxiliary handle, not the main housing.
3. Handgrip
Loosen for fitting, then tighten to secure.
4. Installation sequence
Follow the body steps for sliding, positioning and final tightening.
Parts identification, not a replacement-part dimension drawing. Use the matched handle and verify it cannot slip before restoring power.
Understand the easily missed limitation
GSB18V-975C KickBack Control responds to a sudden bind and reaction, but is not a guarantee at every speed or grip position. The applicable 03/2021 instructions state that activation is only possible while the tool runs at maximum speed.
That is not an instruction to pull full trigger for protection. When an accessory, material or task calls for low speed, use the appropriate speed without assuming electronic shutdown will absorb the reaction. Speeding up for protection can make a controlled low-speed task harder to manage.
Without GCY42, the setting remains the default Later. Earlier, Middle and Later adjust activation delay, not working capacity. Handle, grip and workholding come first regardless of connectivity.
Identify the correct auxiliary handle
This tool uses a collar fitted around its mounting area and secured by tightening the hand grip; the assembly includes grip, sleeve and collar. A similar-looking handle is not compatible merely because its ring fits around something.
For a bare tool, used tool or split kit, check the actual handle is present. A photograph does not establish package contents, and an omitted packing-list entry does not waive the operating requirement. The tool must be supported with the auxiliary handle during use; obtain the correct assembly before starting.
For a replacement, give Bosch the complete model and ten-digit tool identifier. If a parts page shows a different model, do not infer compatibility from the picture or shim an unsuitable collar.
Install with the battery removed
Release the trigger, wait for the accessory to stop and remove the battery. This is normal handle assembly, not housing or chuck disassembly.
- Loosen the auxiliary hand grip so the collar can be fitted.
- Pull the assembly’s sleeve and slide the collar onto its intended tool mounting area, not the chuck sleeve, plastic grip or an improvised location.
- Swivel the handle into a position that permits stable two-handed support. Check wrist posture, the approach to the work and surrounding obstructions.
- Tighten the hand grip. While still disconnected, check by hand for obvious rotation or sliding; movement means installation is not complete.
- Recheck accessory retention, clamped work and stance. Only with a secure handle and clear approach should you reinstall a compatible battery, finger off the trigger, and verify retention.
Stop if the tightened assembly still slips or its collar, sleeve or grip is cracked or distorted. Do not use a leverage extension or expect electronics to compensate for a loose handle.
Stop before interpreting the lights
If the bit binds, housing begins to twist or tool stops, release the trigger immediately while maintaining stable support. Do not increase pressure or brace it against your leg or body waiting for recovery.
Once stopped and safe to handle, remove the battery. Check movement of the work, accessory damage, chip blockage and task suitability. If the bit remains trapped, do not lever it out with the housing or repeatedly power forward/reverse to test protection. Stop the task and obtain suitable help if release cannot be managed safely.
Flashing after a protection event can help describe it. Do not deliberately jam the tool to verify the feature; record what already happened instead.
Restart depends on conditions, not a reset
Consider normal preparation and resumption only after the cause is resolved, tool, accessory and handle have no visible damage, work is secured and grip is reliable. An extinguished light or reinserted battery does not establish those conditions.
Recurring abnormal shutdown, unreliable controls, a handle that cannot be secured, abnormal noise or damage calls for service. Understanding electronic limits should improve preparation, not provide a reason to loosen your grip.
Models referenced