
Flat support versus edge concentration
A belt contact rests flat on the board, a tilted example contacts the edge, and a rounded corner is compared with its original square outline.
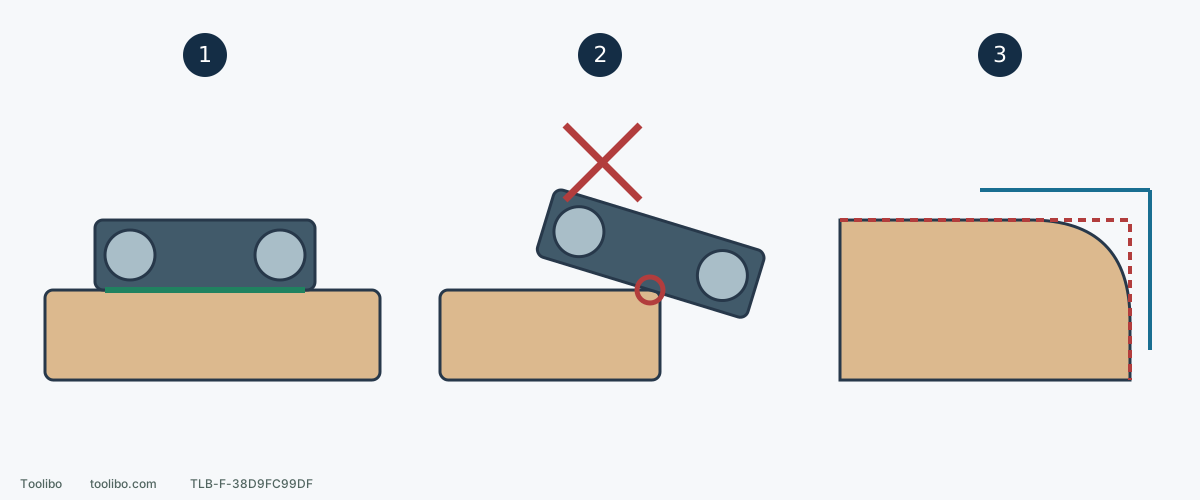
1. Keep flat contact in the planned working zone
Rehearse with power isolated, including clamps, bag, cord and lift space. If support cannot be maintained, reduce the powered zone or change the method.
2. Do not tilt to chase the last edge
The red circle shows concentrated edge contact, not an acceptable operating position. Stop the powered pass and use a suitable controlled hand method for the remaining area.
3. Compare against the original corner
After complete stop and isolation, check edge line, squareness, width and actual fit. A smooth new curve is a defect when the design calls for a square corner; do not round the other side to match.
Conceptual sections, not exact machine geometry or safe overhang/tilt values. The red dashed corner is the original reference; the blue square is an inspection reference, not a sanding guide attached to running work.
Define the shape to preserve
A shelf edge for banding, a square box joint and a designed chamfer/radius have different targets. “Not sharp to touch” is not universal acceptance. Do not casually round an edge and rename it a designed chamfer.
This example uses Makita 9403 on known, allowed wide flat solid wood, not shaping small narrow strips. Assess unknown coatings or hazardous dust first. Veneer and unknown remaining face thickness are not solid-wood removal jobs. Establish material, belt and collection before the reference.
Preserve the original reference before sanding
Photograph the edge line and end profile. Check obvious highs/lows with a straightedge, face-to-edge angle with a square and fit with the actual mating part. Record width, critical edge location and existing gaps. Keep reference marks outside the sanding area; fingertips do not replace a straight reference.
Distinguish existing eased corners and cutting defects from a newly created curve. Large original errors need a machining/repair decision, not extra belt pressure at the edge. The aim is preserving geometry, not promising to square any crooked board by sanding.
Compare every inspection with this original record, not merely the previous pass. Several apparently small changes can cumulatively move an edge a long way.
Rehearse a flat-supported route without power
Switch off, wait for complete belt stop and unplug. Secure the work and check support, clamps, bag and cable. With both hands on the actual tool rehearse start, outward/return travel, end and lift clearance. The belt must stay flat during the working section.
Do not place the endpoint where most of the belt overhangs and wrist force is needed to recover it. There is no universal safe overhang in millimeters. Board width, posture and cord/bag pull change control. Reduce the powered zone or alter support/clamping if flat contact cannot be maintained.
Reclamping requires the model’s shutdown, complete stop and unplugging first. Do not loosen a clamp with one hand while holding a running belt sander in the other. Treat the clamped edge later as a separate zone.
The 9403 sample contact sequence
- Use wide flat matching scrap with the same edge target and correct belt/collection. Unplugged, verify trigger return to OFF; reconnect only switched off.
- Hold with both hands, start clear and wait for full speed before lowering gently. Do not let the front roller peck into the edge.
- Keep the belt flat and move steadily back/forth along the grain. Let tool weight work without added force. Do not dwell at the edge or tilt into a narrow contact strip.
- Lift clear while still in control, then release the trigger. From lock-on, fully pull then release. Hold until completely stopped, set down and unplug before inspection.
If the sample requires tilting, chasing the edge or a sudden recovery pull, the route is unsuitable. Practicing that movement is not the remedy: change zone and support.
Finish the remaining narrow area separately
Stop powered sanding where flat support cannot be maintained; do not use the last belt corner to chase the remainder. For solid wood suitable for hand preparation, secure it and use a flat-preserving block with compatible abrasive, treating face and edge separately with light removal of minor roughness.
To retain a square corner, do not wrap the block back and forth across the arris. A designed chamfer needs a defined size, location and method as a separate operation. Hand work can also round edges, so keep comparing with the original line.
A hollow or failed bond is not repaired by lowering surrounding material. Exposed veneer backing, delamination or uncertain construction stops this solid-wood method.
Accept edge line, squareness and fit separately
Compare photographs from the same angle/light; place straightedge/square against the same reference and retry the actual mating part. Look for an inward-moving edge, a square corner becoming an arc, a new banding gap or width/joint position outside requirements.
Smoother but geometrically worse is not finished. Stop removing material and decide whether the design can be restored. Do not sand the opposite side to make an accidental radius “consistent.” A successful sample still requires the same checkpoints on the project.
Abnormal vibration, loss of control and cord/switch problems require shutdown and correction too. Edge protection means stopping while shape and control are intact, not seeking a remedy after rounding.
Models referenced