
Rehearse start, middle, end and return with power isolated
One sander is shown in three positions on a wide board, with clamps outside the work zone and alternative cord positions routed clear of them.
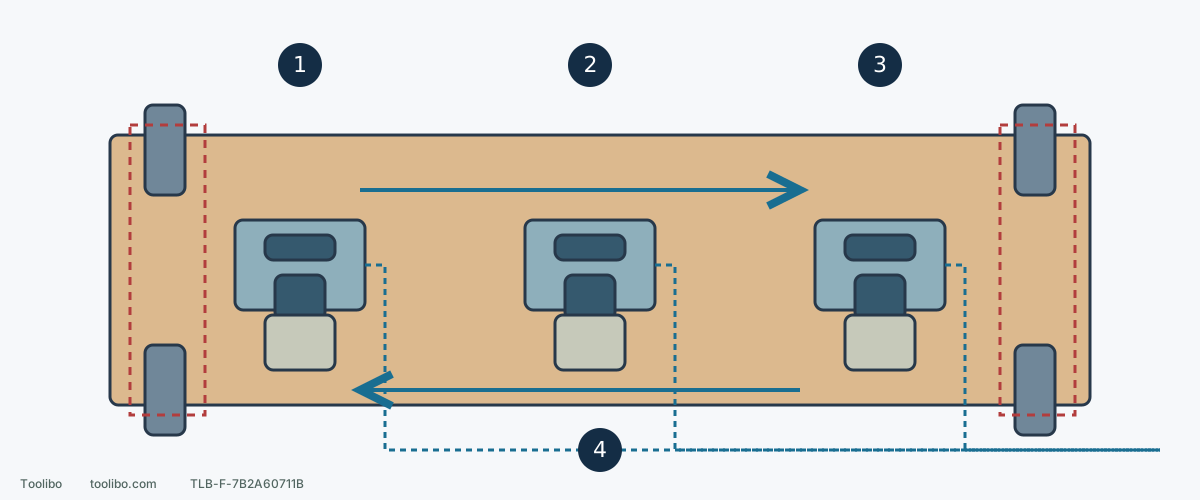
1–3. Test the whole envelope, not only the belt
Unplugged and held by both grips, check body, hands, bag and cord throughout. Preserve flat support and space to lift at the end; relocate clamps only after shutdown, stop and isolation.
4. Verify the return route and cord slack
Cord routing must avoid the belt, clamps, sharp edges and feet without pulling the machine. Passing the outward check alone is not enough; rearrange offline if anything snags.
Conceptual plan view, not exact 9403 body, bag or cord-exit geometry. Dashed blue paths are alternatives, not three cords. Red zones are clamp exclusion examples, not measured clearances.
Choose a fully supported work zone
This layout concerns normal Makita 9403 sanding on allowed wide, flat work. It is not an inverted bench-sander setup or a method for holding a small strip against a running belt. Assess unknown coatings and suspect hazardous dust before preparing a trial; identify material, abrasive and dust control first.
The work must not slide, lift or rock under forward/backward travel. Support the planned area and clamp the board to a suitable bench/support instead of holding it with one hand. Both hands control the tool; neither is available to steady the board, move the cord or hold the bag.
Wide-board example: clamps outside the full envelope
Separate the current sanding zone from the clamping zone. Clamps may occupy an end or side not currently being worked, but verify with the actual tool. Include body, front/rear grip positions, bag and cord exit, not just the belt footprint. A clamp clear of the belt can still obstruct the hand or bag.
Plan the outward and return route and the final lift location. Do not finish in a narrow gap beside a clamp or reach an edge where the belt can no longer remain flat. The illustration is a layout concept, not a universal distance for every board, clamp or operator.
To reach a clamped area, split the job: complete the accessible zone, shut down safely, wait for the belt to stop completely and unplug, then reposition clamps for the remaining section. Do not loosen a clamp while sanding or leave it loose for convenience.
Unplug and check start, middle, end and return
- Start: switched off and unplugged, check normal belt, collection and external condition. Take both normal grips and move to the starting position. Ensure lowering would not hit a clamp or introduce the cord into the belt route.
- Middle: rehearse with the intended posture. Check for bag contact with clamp bars, a cord looped under the board, pinched cable or a snag on the bench edge. Keep slack loops away from feet.
- End: retain flat support and space for a controlled two-handed lift. The cord must not become taut and pull sideways. Decide where to set the tool after it stops before holding a moving tool and searching for space.
- Return: retrace the route. Bag and cord positions change, so an unobstructed outward pass does not prove a safe return. Resolve snags, tension and unreachable positions first.
Allow enough slack for the complete route while keeping the cord away from belt, sharp edges and foot traffic; longer is not automatically better. Check insulation, plug and strain relief. Do not tape damaged cable and continue. Choose any extension by nameplate current, length and the applicable manual, not simply connector fit.
Restore power only after the rehearsal passes
Unplugged, check that the trigger operates normally and returns to OFF when released. A sticking trigger, poor return or unclear locked state is not a reason to plug in and see what happens. Confirm OFF, secure work and correct belt/collection before connection.
The 9403 normal sequence is two-handed control, pull the trigger while the belt is clear, wait for full speed, then lower gently. Keep the belt flat and move back and forth under control. Tool weight supplies sufficient pressure; do not add downward force or tilt one side to pass an obstruction.
At completion lift the belt clear, then release the trigger. If lock-on was used, fully pull the trigger and release it; merely taking the finger away does not switch off a locked tool. Keep control until the belt stops completely before setting down. Unplug before inspection or reclamping. Do not brake the belt with a hand or the work, or leave the tool running unattended.
Layout problem or stop-use problem?
For cord snags, bag/clamp contact or an unreachable return, shut down, wait for complete stop, unplug and rearrange, then rehearse again without power. Do not free a hand to pull a cord while running. Resume only with the cause corrected and no danger signs or unresolved abnormality.
If the work cannot be secured, the belt tracks into the frame, control is lost, the switch fails, the cord is damaged or abnormal heat/smell occurs, stop and address that issue. More clamp force or hand pressure does not disguise it safely. Tracking has its own model procedure, not an improvised knob adjustment here.
A sound setup lets you control the tool with both hands throughout: the board stays put, the cable does not pull and the bag clears. Needing a third hand midway usually means the preparation is unfinished.
Models referenced