
Grain direction, cross-grain marks and separate frame zones
A flat block follows horizontal grain; a second board has perpendicular scratches; a frame has horizontal rail grain and vertical side grain.
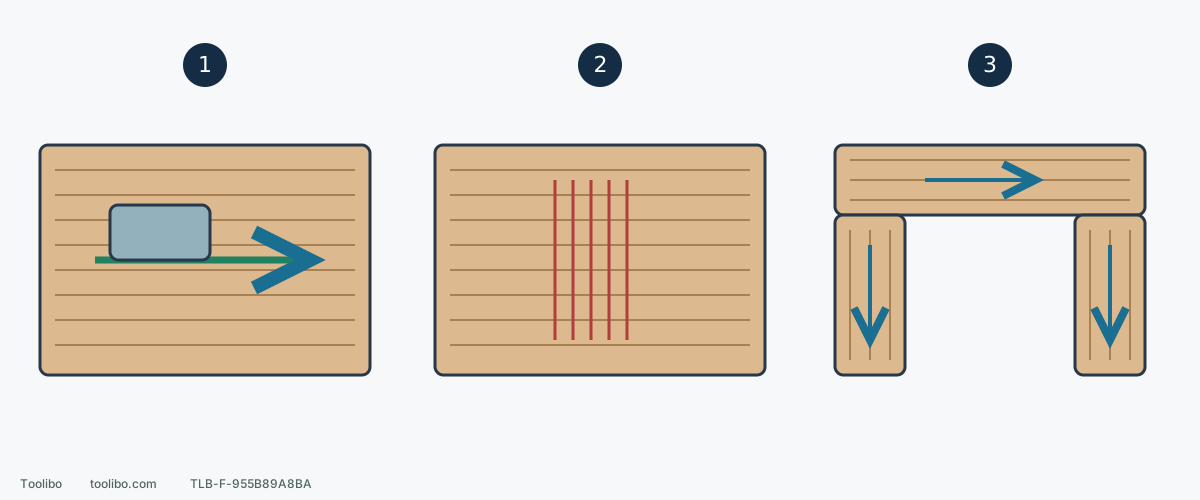
1. Establish a with-grain sample
Use known suitable solid wood, compatible abrasive and stable support. Keep a flat moving contact; exact power-tool startup and shutdown remain model-specific.
2. Inspect existing cross-grain scratches before finishing
Across-grain lines may become more visible under a finish. Do not press locally or sand a thin face deeper to blend them; inspect and choose a suitable repair boundary first.
3. Change direction between different components
A pass following the top rail can cross the side member grain. Divide work zones and use a tool or hand block that fits each area without sacrificing support or edges.
Conceptual direction comparison, not measured scratch depth or a cross-grain trial instruction. Frame arrows identify grain zones; they do not show a belt sander fitting narrow rails.
More than a question of cutting speed
Across-grain travel may seem a quick way to remove a raised area or old scratch from a solid-wood tabletop awaiting stain. But marks crossing the grain may become more obvious under color or a clear finish. Norton’s portable-belt guidance calls for with-grain travel, both hands and continuous movement; its wood guidance warns that finishing can emphasize cross-grain scratches.
This article concerns known, suitable bare solid-wood visible faces, with Makita 9403 as the operating example. Assess unknown coatings and suspect hazardous dust first. Veneer, overlays, unknown remaining faces and valuable old objects are not candidates for “a few more passes.”
Identify grain and sanding marks separately
With power isolated, clean for inspection and examine in direct and grazing light. Grain belongs to the wood; abrasive marks often form finer, straighter or more regular lines. Photograph or mark directions outside the finishing area rather than drawing difficult-to-remove lines across it.
Lines crossing natural grain need scratch assessment, not an immediate diagnosis of defective timber. Fine with-grain marks also need inspection for depth, uniformity and finish requirements. Grooves, burns, cracks and depressions are different problems that direction alone cannot solve.
Framed or joined assemblies may contain different grain directions. A pass following one board can cross the adjacent rail’s grain. Divide the surface into zones instead of spanning every direction with one long pass.
Do not transfer a floor-machine diagonal technique
Diagonal or cross-grain leveling in some floor tutorials may concern a large drum machine, specific flooring and a professional process. It does not authorize two passes at that angle with a handheld 9403 on a thin face, tabletop or cabinet door.
No universal cross-grain angle, pass count or removal depth is supplied here, nor a mandatory coarse-belt start. A nearly prepared surface may gain new scratches from unnecessary coarse work. First decide whether the task is light preparation, a geometry issue needing another process or a thin layer that cannot lose more material.
Establish a with-grain sample, not a cross-grain experiment on the job
- Choose similar solid-wood scrap and surface condition with suitable abrasive, collection and workholding. Continue the existing preparation and intended finish requirements when selecting grit. Do not deliberately cross-sand the actual project to prove the risk.
- Switched off and unplugged, check belt, collection, clamps and full return path. Verify trigger return to OFF; reconnect only with the switch off.
- For 9403, hold with both hands, start clear, wait for full speed and lower gently flat. Travel steadily back and forth with the sample’s grain. Do not dwell, force downward or tilt to chase one mark.
- Lift clear before switching off. Release the ordinary trigger; from lock-on, fully pull then release. Wait for complete belt stop and unplug before inspection.
- Remove dust and use the same lighting to compare old marks, new cross-grain scratches, depressions and edge distortion. Record abrasive, direction and outcome. Consider the actual work only after a suitable repeatable result.
This does not promise removal of every deep line. If appropriate light preparation fails and further work threatens thickness or dimensions, stop for a different repair plan.
What if cross-grain marks already exist?
Shut down, stop completely and isolate before examining, never feel a mark beside a moving belt. Record position/direction and compare untouched areas. Only after confirming solid wood that can accept preparation without thin-face or dimensional risk should you test compatible abrasive and a with-grain block or suitable tool on representative scrap.
Do not press locally on a single line: a scratch can become a hollow visible in grazing light. Inspect after short sections. Do not move to finer paper or heavier coating merely to seal unresolved coarse marks into the surface.
Veneer, exposed core, deep hollows, burns or unknown old coatings stop this correction path. Do not use the belt to discover remaining thickness. Establish an appropriate repair, refacing or machining plan first where needed.
Final check before finishing the real piece
Apply the intended stain/finish to the sample according to its instructions and inspect after the specified conditions. Compare grain, cross-grain visibility and color under the same light. Marks temporarily hidden by a wet surface are not a final result. Stop and verify appearance on the sample before committing the whole piece.
The real face should have no unacceptable cross-grain marks while retaining intended dimensions and edges. Dust control and tool condition must also remain sound. Abnormal vibration, loss of control, odor or switch failure requires stopping and addressing equipment, not continuing in another direction.
Models referenced