
Four leak zones, four different observations
A complete washer drawing marks the low-pressure inlet, high-pressure hose, gun assembly and machine base; a dotted trail shows water can travel before dripping.
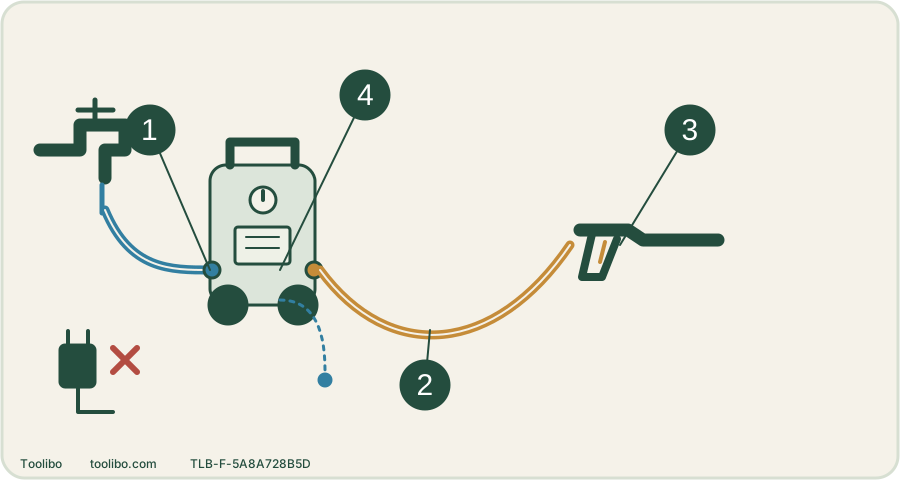
Inlet joint
Inspect the supply connector and filter-adapter seal.
Pressure hose
Damage requires replacement, not a patch.
Gun or lance
Separate an external joint from leakage through the handle.
Machine body
Uncertain internal leakage requires service assessment.
Identify the origin after isolation, not only the puddle. Never use a hand to locate a pressurized leak. Conceptual schematic, not a product image or scale drawing.
Stop before tracing the wet patch
A fine spray, jet from a hose, bulge, loose coupling or water near electrics calls for immediate shutdown. Keep people away and follow the machine’s safe isolation and depressurization process. If a wet or damaged electrical connection cannot safely be handled, do not touch it; get qualified help to isolate the supply.
Do not slide a hand along a running hose to locate a pinhole. A leak that looks like mist may still be under high pressure. After isolation and cooling, wipe exterior water away with a cloth so an old wet trail does not confuse the inspection.
Sort the location into four areas
- Inlet union: where the ordinary supply hose meets the machine. Check the supply connector, seal and filter adapter.
- High-pressure hose: inspect the complete hose, both ends and the protective sleeves without peeling or cutting them back.
- Gun or lance joint: distinguish an external connection from water emerging through the handle or a cracked housing.
- Machine body: water appearing from beneath the casing is not automatically an inlet seal fault. Do not remove the casing to follow it.
A photograph taken after isolation can record the location. Do not deliberately recreate a dangerous leak merely to film it for service.
Check an accessible connection once
For a connection the manufacturer permits users to detach, inspect its matching parts and original sealing ring. Remove grit, confirm correct seating and reconnect without cross-threading. Replace a user-replaceable damaged seal only with the specified item. An O-ring’s apparent diameter alone does not establish material or pressure suitability.
If a correct, undamaged connection still leaks after reassembly, stop overtightening and arrange the appropriate replacement or service. Tape, glue and extra clamps can hide the symptom without restoring a high-pressure joint’s design.
Know which leaks end user troubleshooting
A cut or bulging pressure hose requires approved replacement. Water from a gun body, a cracked coupling or the machine casing belongs to service or replacement of the permitted assembly, not patching. Water close to electrical components is an immediate stop condition regardless of amount.
Both the Bosch UniversalAquatak 135 and Kärcher K4 Power Control Flex manuals note that a slight device leak can occur, while excessive leakage requires service. Neither statement gives a universal “safe drops per minute” allowance. Do not use it to excuse a new stream, a spraying hose or an electrical hazard. If the amount or origin is uncertain, stop and ask the manufacturer.
Make the final check proportionate
Only after correcting a minor permitted external connection and confirming there is no damaged pressure part should you perform a short normal test. Observe from the operating position; keep hands away from joints. If leakage returns, shut down and provide the exact model, leak location and whether it occurs with the tap alone or only during pumping.
That distinction helps separate the supply side from the pressurized side. It does not justify opening the pump to confirm a seal failure. The next step should follow the observed location and the manufacturer’s service boundary, not the cheapest-looking patch.
Distinguish a wet machine after cleaning from water that repeatedly returns at one joint. Once isolated, note the direction of the old water trail and any visible crack or displaced seal. Keep these observations separate from assumptions about the pump so service can decide which assembly needs inspection.