
Two ports create two different air paths
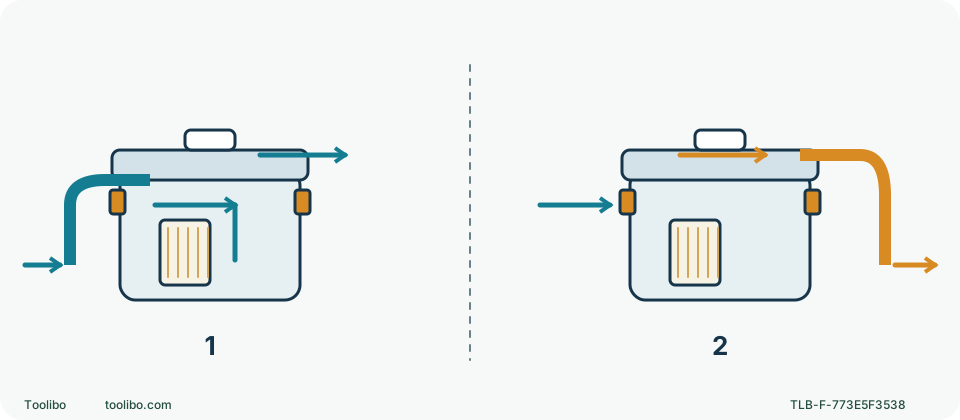
Original airflow diagram shows one hose at an intake collecting into a tank and a separate hose at the blower outlet sending air outward, with an unobstructed exhaust.
Identify
Find the documented intake and blower outlet.
Connect
Change the hose only with power isolated.
Escalate
Persistent abnormal behavior needs further service assessment.
Trace the connection while isolated; the arrows show flow direction, not instructions to alter the motor or block an opening.
Describe the symptom precisely
Air coming out of the free nozzle is different from a nozzle that draws weakly or not at all. On these compact wet/dry vacuums, the hose can be attached to an intake for collection or a blower outlet for an intended blowing task. A hose placed on the wrong port can therefore imitate a failed vacuum without requiring any internal fault.
Stop the machine before investigating. Remove its battery and, for DCV581H, also unplug the mains lead. Never put the nozzle against your skin, eyes or ears to judge the airflow. Do not let children perform a “paper test” at the outlet, and do not scatter powder to reveal the air direction. The labels and documented hose route are the useful evidence.
Follow the hose from the body to the nozzle
Find the intake and blower-port labels in the matched manual and on the actual body. Trace the fitted hose physically rather than assuming that a convenient side opening must be the intake. The selected Milwaukee instructions show a tab-and-notch connection secured with a twist; the DEWALT instructions describe transferring the hose to the side exhaust for blower use. Follow the actual fitting, not a guessed universal turning direction.
With power isolated, reconnect the hose to the intended intake and check the coupling sits normally. Inspect for a split, kink or obstruction you can safely reach using the prescribed owner procedure. Do not push sharp wire through the hose, drill the port or force a nearly fitting connector. If a coupling is damaged or cannot lock properly, obtain the correct replacement.
Separate wrong-port airflow from lost suction
Swipe or scroll horizontally to see all columns.
| What you observed before stopping | Useful external check | Wrong response to avoid |
|---|---|---|
| Nozzle blows outward | Trace hose to intake versus blower port | Reverse electrical connections |
| Motor runs, pickup weak | Check tank, filter, hose and nozzle while isolated | Remove required filter to increase flow |
| Wet pickup abruptly stops with a pitch change | Follow full-tank/float shutdown procedure | Hold float open or keep running |
| Dust exits the machine | Inspect correct collection setup and damage | Cover exhaust vents with tape |
An exhaust opening is part of the intended air path, not a leak to plug. Covering it cannot convert an incorrectly connected hose into a proper suction arrangement. It may instead impair operation. Likewise, High on 0970-20 is an operating mode, not a reversal switch; it cannot correct a hose on the wrong port.
Decide whether blowing is actually the right task
The DEWALT manuals give examples such as moving leaves or grass clippings from an outside walk. That limited use does not justify blowing unknown indoor renovation dust, soot, combustible powder or contaminated material around a room. If the goal is containment, blowing can work against the goal. Choose a permitted collection method instead.
Before an authorized blower task, follow the exact changeover and emptying instructions with the power isolated. Keep the filter and other required components in the specified arrangement. Use the prescribed eye protection and keep people away from the discharge direction. Never aim at a person, animal, battery opening or electrical equipment, and do not treat the vacuum as a compressed-air cleaning gun.
Restore the collection configuration deliberately
After the blowing task, switch off and isolate power before moving the hose back. Trace the route again from the intake to the nozzle. Check the tank and correct filter configuration for the next material rather than assuming that a clean exterior means it is ready. A wet configuration must not be carried over into dry pickup without the required changeover.
A small label or kit card identifying the inlet and the intended hose connection can help shared users, provided it does not cover the manufacturer’s labels, vents or controls. Keep the instruction specific to the exact model; do not place the same arrow on every case just because the vacuums are stored together.
Stop when the simple explanation does not fit
If the hose is on the documented intake and the external path is sound but operation remains abnormal, stop and record the model, configuration and symptom. A burning smell, liquid escape, repeated protective stop or damaged motor housing is a service matter. Do not open the head to swap wires or defeat internal protection.
The point of this check is to catch an understandable connection error early, not to prove that every loss of suction is harmless. Clear observations save time: “hose was on blower outlet and was corrected while isolated” is different from “correct intake, still weak after safe external checks.” Keep that distinction in the handover.
Models referenced