
A cabinet pull stays loose: check screw engagement before enlarging holes decision map
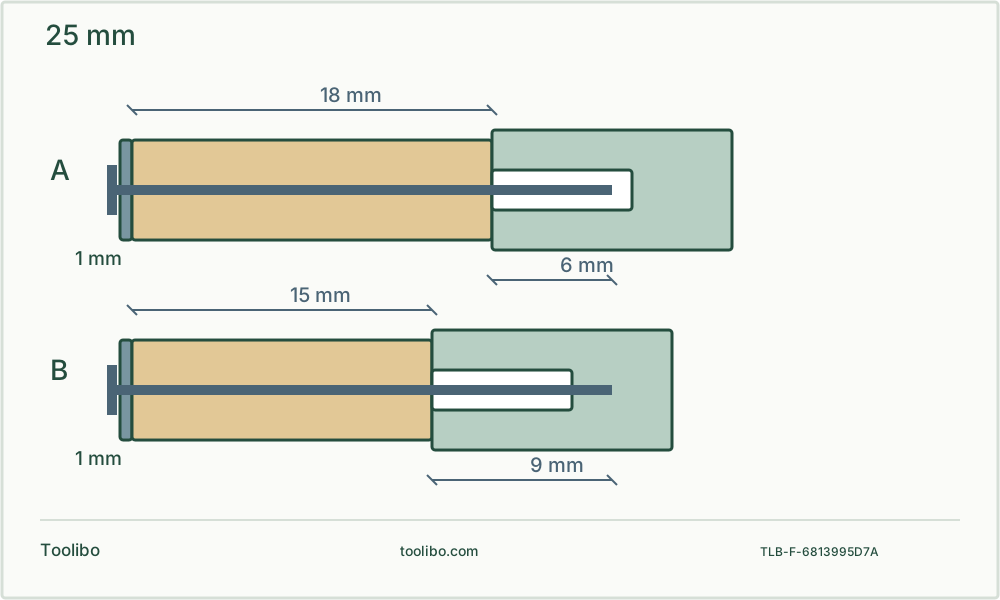
Two screw-stack sections compare a 25 mm screw and 1 mm washer through 18 mm and 15 mm fronts, leaving illustrative 6 mm and 9 mm projections into a blind boss.
Symptom
Separate misalignment, clearance, bottoming-out and damaged threads.
Stack
Measure the actual front and specified washer before choosing screw length.
Fit
Start both screws by hand and reject forced alignment.
Original section contrasts a 25 mm screw through 18 mm plus 1 mm stack leaving 6 mm, and through 15 mm plus 1 mm leaving 9 mm; a blind boss shows why extra projection may bottom out. Example is not a specified thread engagement.
Limit the job to accessible, ordinary cabinet hardware
This guide concerns a removable wooden drawer or door front with a through-screw pull mounted into its threaded bosses. It does not cover structural fasteners, safety handles, appliance doors, electrical enclosures or an unknown proprietary fitting. Keep the actual handle maker’s screw, washer and tightening instructions. A wood screw into the front is a different fastening system.
Remove the front where practical and support it so both faces can be inspected. Do not work around a hidden drawer slide, stored objects or a finished surface you cannot protect. Photograph or sketch the original hardware stack before removing anything. Mark which face is visible and keep the matching screws with the handle rather than mixing them in a box of similar-looking hardware.
Separate four different symptoms
A drill is not the first tool to use when a pull feels loose. First establish what moves and when the screw begins to resist. With the handle supported and without forcing, check whether both screws align, pass through the front and start into the correct threads by hand. Stop if the thread feels crossed or the head begins damaging the surface.
Swipe or scroll horizontally to see all columns.
| Symptom | First question |
|---|---|
| One screw misses its threaded boss | Are the mounting centres and hole axes aligned? |
| Screw binds while passing through the front | Is the clearance hole appropriate and clean? |
| Screw turns into the handle but stops while the pull stays loose | Is it reaching the bottom of a blind boss? |
| Screw keeps spinning without holding | Is the thread or hardware damaged? |
These symptoms are not proof of a particular fault, but they identify different checks. Enlarging a hole cannot repair a stripped internal thread, and a longer screw can make bottoming-out worse.
Understand the stack with a numerical example
The screw must pass through the front and any specified washer or spacer before its remaining length engages the handle. Consider an illustration: a 25 mm screw under its head passes through an 18 mm front and a specified 1 mm washer, leaving 6 mm nominal projection beyond the front stack. That projection must be compatible with the actual handle’s required engagement and available threaded depth.
If a different front is only 15 mm thick, the same screw and washer project 9 mm. That is a calculation, not a recommended engagement. A blind boss accepting the first arrangement may bottom out in the second. Do not infer adequate engagement or strength merely from the absence of a visible gap. The hardware maker’s requirements remain controlling.
Inspect without cutting or forcing
Remove the screw gently and examine the thread and its tip. Check for packed debris, a missing specified washer, a damaged head or a screw from another handle. Compare diameter, pitch and length to the supplied specification. Similar diameter alone does not make metric and inch threads interchangeable.
Inspect the clearance holes with the drill disconnected and the front supported. Remove loose debris appropriately, without driving a rotating bit sideways to make a slot. Offer the handle back to the front and verify both mounting axes together. Do not use one tightened screw as a pivot while forcing the second into place.
Correct the confirmed cause, not the appearance
If the manufacturer supplies alternative screw lengths for different front thicknesses, select the specified suitable one. Do not add an arbitrary stack of washers to hide a length mismatch, cut screws without a suitable controlled method, or use power to force a screw past resistance. Obtain the correct hardware when the thread or required length is uncertain.
If the hole layout is wrong, stop and plan an appropriate repair or hardware change. A larger clearance hole may be acceptable only under the actual fitting requirements, not as a universal cure. Keep the front restrained and protect both faces if an authorized drilling correction is later made, with the proper bit and ordinary rotary mode.
Verify the complete pair and stop at damage
Start both correct screws by hand, support the pull square to the front and tighten according to its instructions. Check that the handle seats without rocking and the front is not crushed. Operate the empty drawer or door gently to confirm clearance; do not hang body weight on the pull as a test. Recheck for movement without repeatedly over-tightening.
If the screw continues spinning, the boss cracks, the finish distorts or the handle will not seat with verified hardware, stop and replace or seek support for the damaged component. Record the front thickness, washer stack and screw identity for future replacement. Successful troubleshooting means identifying the fastening problem, not making progressively bigger holes until the defect is hidden.