
Check the working state
Dry: Additional textile filter covers cage; paper dirt bag at inlet.; Wet: Dry filter and bag removed; supplied foam covers cage.; Stop and care: At liquid limit or foam: off, unplug, empty; wash foam and air-dry.
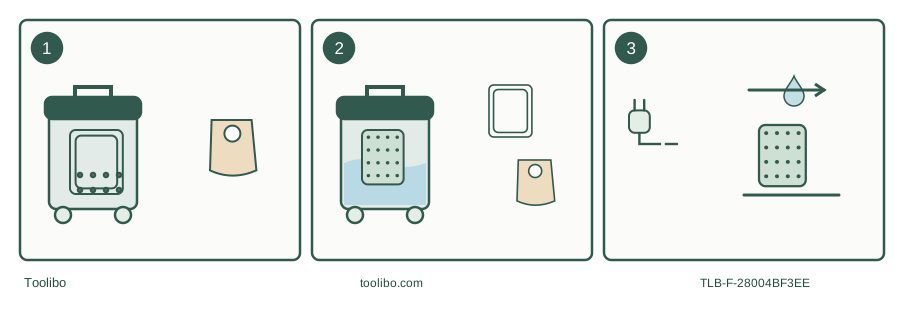
Dry
Additional textile filter covers cage; paper dirt bag at inlet.
Wet
Dry filter and bag removed; supplied foam covers cage.
Stop and care
At liquid limit or foam: off, unplug, empty; wash foam and air-dry.
An original decision aid. Isolate power before opening, changing filters or emptying.
Identify the article and manual revision
This guide concerns TC-VC 1815 S, UK article 2342390. The linked manual identifies article 23.423.90 and I.-Nr. 11016. Keep the article number and the identification number from your own label when ordering parts; a similarly named 15-litre Einhell is not automatically the same revision. The UK listing describes a 15-litre stainless-steel container, 1.5 m hose and 2.5 m cable.
Its stated 1,250 W is electrical input. The “suction power” value of 180 mbar is a pressure figure, not airflow and not a measured collection speed. The manufacturer explicitly lists the dust protection class as not classified. Steel construction, a workshop appearance and a high input wattage do not turn it into a certified hazardous-dust extractor.
Sort the supplied filtering parts first
Lay the filtering items out with the machine unplugged. The paper dirt bag fits onto the container inlet and collects dry debris. The additional textile or synthetic filter belongs over the filter cage for dry operation. The supplied foam filter is the wet-use piece. Calling all three a “bag” makes changeovers unnecessarily confusing.
For dry pickup, fit the additional filter so incoming air cannot pass through the cage unfiltered, and fit the correct dirt bag. Check the filter seating before refitting the head and closing its retaining hooks. Keep the bag away from the rim so it cannot prevent a seal. Never operate without a filter, even for a short test of the motor or hose.
Make a short-hose setup work safely
Connect the hose to the suction connection, not the blow outlet. Assemble the extension tubes and correct adapter/nozzle combination as supplied. The crevice nozzle reaches edges; the combination floor nozzle serves wider areas. If access is poor, move the unpowered machine closer instead of stretching the hose and pulling the bucket over a threshold.
Inspect the lead and plug, match the local supply to the nameplate, and keep connections dry. Place the bucket upright with a clear route for yourself and the cable. Four castors make it mobile, but mobility is not stability on a slope or stair. Do not leave a partly filled bucket where a passing person can catch the hose.
Replace the dry arrangement before liquids
Switch off, unplug and open the head. Remove the dry dirt bag and additional dry filter, empty the container and fit only the supplied foam filter over the basket for wet vacuuming. Ensure the foam is secure and sound before closing the head. Do not copy cartridge-retained instructions from another vacuum: this model’s specified wet setup uses foam.
Collect only suitable non-flammable liquid while the machine stays upright and under observation. The 15-litre tank label is not a promise of a 15-litre usable water load. If pickup changes at the liquid limit, stop manually, unplug and empty. The manual describes a floating safety switch, but its action is not electrical isolation for opening or maintenance. Never defeat it to extend the run.
If liquid or foam comes out with exhaust air, switch off immediately. An incompletely filled tank can still produce foam. Do not continue just because you can see spare volume. If contamination prevents the float from moving normally or the foam is damaged, resolve that problem before the next use rather than relying on a reset.
Clean foam without wetting the motor
With power disconnected, clean the non-electrical container as appropriate and wipe the head with a damp cloth and mild soap. Do not immerse or hose down the electrical head. The manual permits washing the foam with a little mild soap under running water, followed by air drying. Check it for splits, distortion or an insecure fit before reuse.
Keep the dry filter arrangement and new paper bags away from damp residue. Before returning to dry work, the relevant parts must be dry and correctly reassembled. Store the emptied machine in a dry, frost-protected place. Packing accessories on the machine is useful only when they cannot fall out or drag the cable during carrying.
Know when this is the wrong cleanup method
Do not collect harmful dust, combustible, explosive or corrosive material, flammable liquids, hot ash, burning matches or cigarette ends. This guide does not authorize flour, cement, asbestos, lead or unknown powder cleanup. Fine-dust bag advice applies only to material already permitted by the manual, not to every substance with small particles.
If suction declines, unplug and inspect the nozzle, tube, hose, bag fullness and filter seating. Replace consumables that are torn or blocked beyond normal cleaning. A damaged lead, persistent fault, burning smell or leakage into the head calls for authorized service. Do not open the motor, alter thermal protection or convert the blower connection into an improvised pump.
Models referenced