
Identify the two connections
This guide covers the supplied SKIL SR211601 canister. One connection joins it to the rear tool outlet using a slot and rib. The other joins the housing to the filter and opens for cleaning. The filter is not disposable packing, and the housing alone is not a complete collection assembly.
Switch off, wait for the pad to stop completely and unplug. Secure the work and tool, then prepare collection appropriate to the dust. Unknown old-coating dust needs material identification and a disposal plan rather than treatment as ordinary bare-wood waste.
Step one: align and push, not twist
- Locate the tool’s rib and the matching slot in the canister inlet. Remove loose dust obstructing the fit and check cracked or distorted plastic.
- Align them and push the canister onto the tool until it locks. Do not force it diagonally or treat twisting harder as its installation method.
- With power isolated, gently check stability and normal mating of the parts. Do not lift the tool by the canister or repeatedly slam it in to obtain a sound.
- If correct alignment still will not seat, inspect debris, part identity and damage. Do not work with an unlocked canister or tape over a broken connection.
Step two: inspect the dust path
A fitted canister does not prove the whole path is clear. Check compatible paper, aligned extraction holes, lifted edges and heavy loading. Particles trapped between paper and pad can disrupt attachment and produce deep scratches. Keep the plug out during these checks.
Hold the normal grip and rehearse the planned route with power disconnected. Check that the canister will not strike clamps, the board edge or your body. Change workholding or route if it tilts the tool; do not remove collection simply to gain room. Capturing some dust does not remove the need for suitable ventilation and protection.
Step three: pull off the assembly, then separate it
Again stop, wait and unplug before cleaning. Hold the canister and pull it away from the tool, then shake dust into appropriate collection without raising a cloud into your breathing zone.
For more thorough cleaning, separate the housing from the filter, holding the two parts as shown rather than prying through the filtration area. Shake out accumulated dust and use a soft brush if needed. Shaking and soft brushing are the routine described here, not automatic washing, solvent soaking or high-pressure blowing. Some remaining dust may not prevent sanding but can reduce collection efficiency, so continued cutting is not a reason to ignore cleaning.
Step four: reassemble and check integrity
Inspect filter damage, cracks in the housing mating edges and trapped particles. Refit housing and filter in their original relationship to make a complete canister, then align the slot and rib and push onto the tool until locked. If the housing does not join normally, check orientation and debris instead of adding force.
Once paper, connection, canister and route are sound, confirm the switch is off before plugging in. Follow the applicable model’s operating requirements for actual sanding and lift/stop order. This guide covers isolated collection setup, not an inferred machine-starting sequence.
Two symptoms need different checks
Loose canister: inspect slot/rib alignment, dust in the joint and damaged plastic. Do not repeatedly force it or operate with the canister loose.
Stable canister but declining collection: empty and clean housing and filter first, then check upstream holes, loaded paper and the visible outlet. Persistent trouble calls for stopped inspection or service, not reaching into the housing or modifying airflow. The supplied canister’s fit proves nothing about an arbitrary hose or adapter.
Dispose of dust with care
Fine particles can burn, especially when mixed with finishing materials and exposed to sparks, static discharge or heat. Never throw sanding dust onto a fire or store it indefinitely in a full canister. Follow the material, finish product and local disposal requirements. Clean according to buildup and efficiency, not only after complete blockage.
Match the rib and slot, then separate housing from filter for cleaning
The upper drawing shows a tool outlet rib, matching canister slot, inward fitting and outward removal; below are separate filter, housing and soft brush.
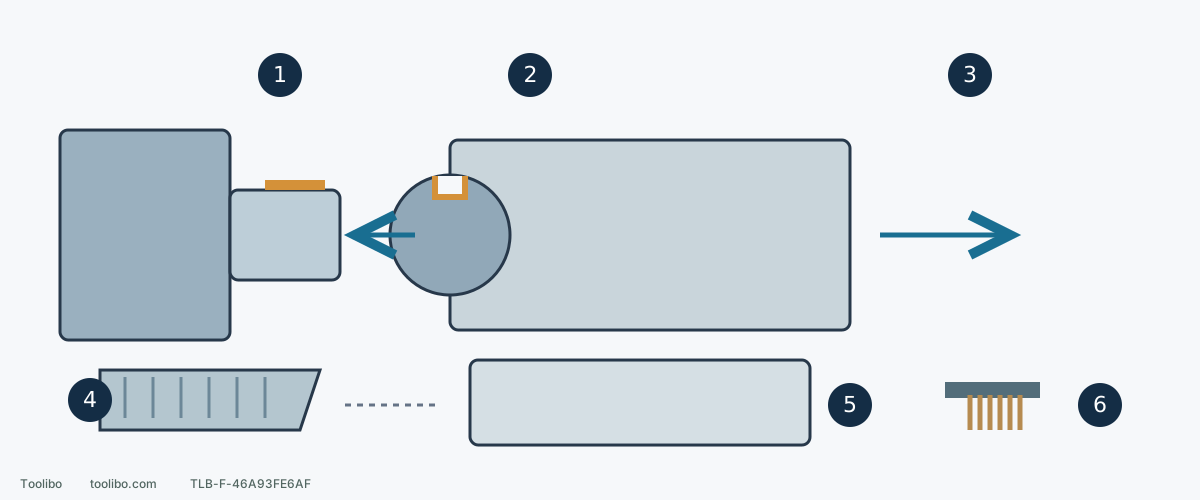
1. Tool rib
Clear obstructing dust and inspect the outlet before alignment.
2. Canister slot and fitting
Align the slot with the rib and push toward the tool until locked; do not force it diagonally.
3. Remove the complete canister
Hold it and pull away from the tool after stopping and unplugging.
4. Filter
Separate it from the housing for cleaning; inspect damage before reassembly.
5. Housing
Shake out dust and refit to the filter as a complete assembly; housing alone is not sufficient.
6. Soft brush
Use gentle dry brushing for remaining dust; do not replace this method with unverified washing or solvent soaking.
Simplified relationships based on the supplied canister, not exact part shapes or hose dimensions. All handling shown requires the plug removed.
Models referenced