
End geometry first, dry sample comparison second
Long grain and end-grain rings meet at a squared end; A/B preparation labels differ only at the end; a clock precedes matched dry sample comparison.
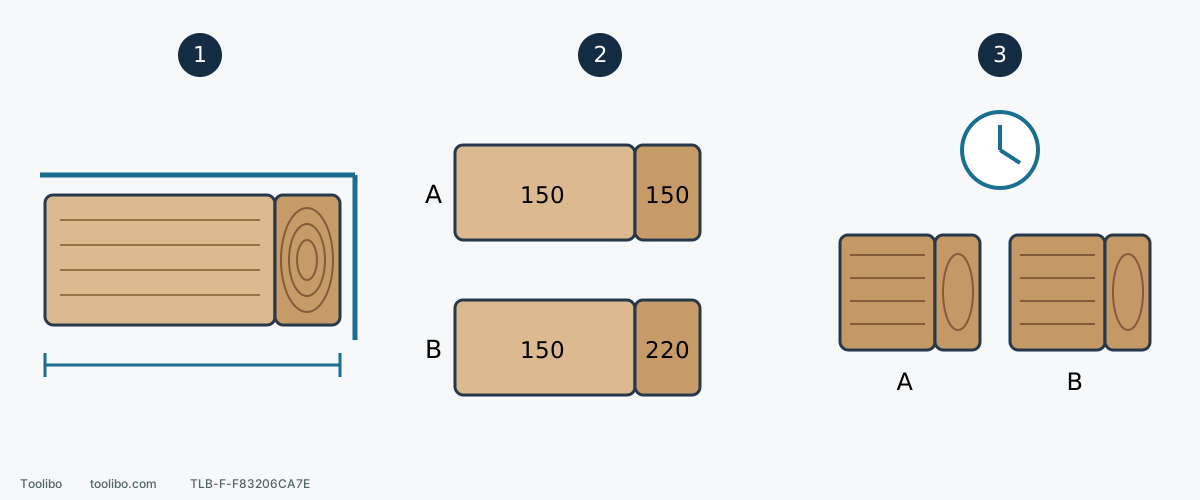
1. Record length and squareness
Use the original intact face and edge, not the previous sanding pass, as references. Hold a small sample securely and preserve the required end shape.
2. Change only the final end preparation
After appropriate 120 preparation, both faces finish at 150; A end at 150 and B end at 220. Compare actual results without promising that B becomes lighter.
3. Compare both dry stages and geometry
Use identical stain and clear-coat methods, compare after stain drying and after the clear finish is safe to inspect. Equal drawing colors do not predict equal real colors; drying is not full cure.
Symbolic grain and color, not a wood-species diagram or measured stain result. Numbers are the limited GF Water-Based Wood Stain sample choices, not a rule for all end grain.
Separate geometry from color
Long grain runs along the board; end grain exposes cut fibers and may absorb more stain. The same color on one piece need not look identical on both surfaces. Smoother does not guarantee lighter, and darker does not by itself prove a sanding defect.
This hand-work example uses known, dry bare solid wood suitable for interior finishing, not veneer, plywood edges, MDF, old coatings or structural repair. Assess material/coating hazards before dust and arrange appropriate collection, cleanup and protection. Switch nearby power tools off, wait for all movement to stop and isolate them; do not present a small end to a running sander.
Step one: retain the original geometry reference
Use intact long edges and faces to record total length and end squareness to face and edge. Check both sides and the middle with the same ruler/square and photograph the original end line. Mark away from finishing areas. A designed bevel or roundover must retain its design, not be arbitrarily made square.
A badly skewed, split or already short part needs a machining/repair decision, not continual sanding of the other side. Keep bonding ends bare and clean for the adhesive; the staining example is not for concealed glue joints.
Clamp the sample firmly with its end accessible. A flat hand block should remain supported rather than rock over edges; keep fingers out of its path. After short work intervals clean and recheck length, squareness and edge lines. There is no universal removal allowance; new rounding or loss of square stops work before color becomes relevant.
Step two: matched samples, not the finished piece
Use General Finishes Water-Based Wood Stain followed by High Performance water-based clear topcoat. This example does not transfer to oil gel stains or other brands. Select neighboring prepared offcuts A and B from the same board, each with comparable long-grain and end-grain faces, and photograph their initial color differences.
The named stain specifies 120 followed by 150 or 220 for raw wood. Here both long-grain faces finish at 150; A’s end finishes at 150 and B’s at 220. Complete suitable 120 preparation first, then the selected final stage, checking that obvious previous scratches are removed. This compares two permitted final options; it is not a manufacturer guarantee that 220 makes every end lighter.
Use sound paper from the same abrasive series, support each face and clean without changing geometry. Record “A: face 150/end 150; B: face 150/end 220,” wood, abrasive and actual length. Do not keep sanding a completed face merely to equalize stroke counts or polish the end shiny.
Step three: identical stain application and a dry comparison
Work with ventilation and the label’s skin, eye and workspace precautions. Stir thoroughly and maintain uniformity during use. Use the same color, batch and method on both samples without simultaneously adding conditioner, thinner or another color coat.
Apply enough stain with a suitable synthetic or foam brush to keep a small section workable, then remove excess evenly with absorbent terry cloth or paper towel. Wipe long grain along its grain and remove end-face excess evenly without puddles at corners. Cotton T-shirts push this stain rather than absorb it adequately. Keep application rhythm comparable and inspect missed spots/laps before changing faces.
Before a water-based topcoat, this stain needs 2+ hours in ideal conditions around 70°F and 50% relative humidity; cool/damp conditions, thick application or incomplete drying require longer. A clock reaching two hours is not proof of readiness. Compare dry face/end color in the same light and viewing angle, recording darkness, blotching, scratches and retained geometry. Wet appearance is not acceptance.
Step four: include the clear finish
Stain is not a standalone durable protective layer. Continue the sample with three coats of the same High Performance sheen. Do not sand the new stained surface before the first coat. Stir and apply evenly with an appropriate brush without pressure or repeated back-brushing, treating both samples alike.
High Performance also needs 2+ hours between coats under ideal 70°F/21°C and 50% humidity. Light sanding should produce powder, not tackiness, smearing or clogged paper; wait longer if uncertain. Lightly use a 220–320 pad between coats and remove dust, without steel wool or cutting through edges to the color. Address raised grain after the first topcoat dries, not by sanding the newly stained wood.
Compare again once the last coat is dry enough for safe inspection under the applicable conditions. Visual acceptance is not full cure or permission for immediate service. Do not transfer this clear-coat schedule to white or light paint.
Step five: use results to choose, not shorten
Record “A dry end versus face: __; B: __; difference after clear coat: __; length/square change: __; acceptable: __.” Fill actual results, not a predicted win for B.
If both retain geometry but color is unsuitable, investigate another compatible stain approach on fresh samples rather than grinding the finished end shorter. A rounded or skewed sample is not a valid process even if its color is preferred. Transfer the preparation only when geometry, surface and dry appearance all meet the goal.