
Protect the stained wood before removing raised grain
Colored raised fibers first have no protective film; a first clear coat surrounds the roughness; light hand sanding leaves the color and clear film continuous.
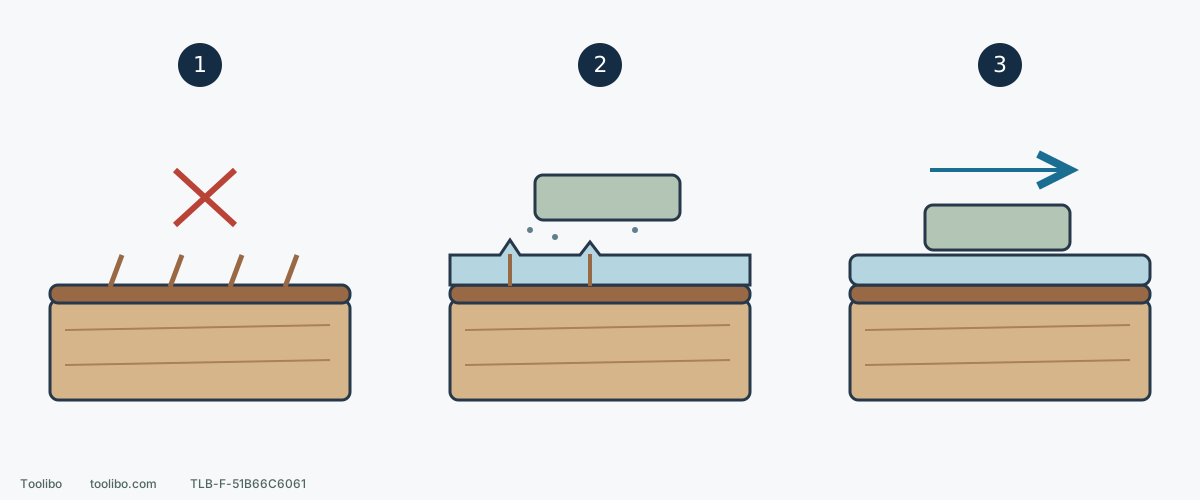
1. Do not sand fresh stain
Let the GF Water Based Wood Stain dry as required and apply the compatible first High Performance coat before this raised-grain procedure.
2. Wait for sandable topcoat
High Performance uses a 2+ hour ideal-condition guide and a powder-producing test; gumminess means wait longer. The lifted pad shows inspection after a light test.
3. Light 220 hand smoothing
Work along the grain on one plane, remove dust and preserve color/film. Stop for breakthrough or water-damage signs instead of leveling them away.
Layers and fibers are exaggerated for explanation, not thickness measurements. The brown band identifies color in the wood, not a specified standalone paint film.
Identify which moisture-related roughness you have
Pre-wetted bare wood, freshly water-stained wood and long-term water-swollen material are different tasks. Bare preparation follows its finish system; unprotected color must not be casually sanded away. Raised joints, lifting veneer, delamination or soft areas require water-damage and structural assessment.
This example uses correctly prepared solid-wood scrap with General Finishes Water Based Wood Stain and its recommended High Performance Water Based Polyurethane Topcoat. It is not for every water-based coating, white paint or unknown existing finish. Ongoing leakage, damp deformation or peeling stops this workflow.
Put the work after the first dry topcoat
The stain system places raised-grain smoothing after the first topcoat dries, using a 220 sanding pad. Let stain dry as required, then apply the compatible first topcoat correctly; do not sand the fresh stain itself. High Performance’s new-stained-surface instructions also say to coat directly without sanding.
The protective film allows light roughness reduction above color, not reflattening wood. If only stain is present, complete the appropriate coating stage before using this 220 method. Verify compatibility and waiting requirements instead of mixing products blindly.
This is hand-pad work. Keep powered sanders isolated. “Water-based” does not authorize adding water to a dry-use sander or operating it on wet film.
First: test the topcoat, not just the clock
High Performance gives two hours or more in ideal 70°F/21°C and 50% relative humidity. Cold, humidity and thick film extend waiting. Do not borrow another sealer’s one-hour figure or equate touch dryness with complete cure.
Lightly test a clean pad on a small flat area of a same-session sample. Sandable film produces powder. Sticky drag, gummy clumps or smeared film means stop and wait. Solvent, coarse abrasive, pressure or a heat gun is not a substitute.
Test scrap before the finished piece. Record exact stain/topcoat, application time, conditions and response. Touch alone cannot certify every area or thicker patch.
Second: lightly hand-smooth with 220
Secure the sample and move a clean 220 pad lightly along the grain. High Performance’s general intercoat range is 220–320; this example selects the stain instructions’ specific 220 raised-grain method, not a universal starting grit.
- Start on a central flat area with distributed light pressure, not a fingertip poking individual fibers.
- Work a short area, remove visible powder and inspect under angled light. Reduced roughness with intact film means move on rather than chase ever-greater slipperiness.
- Keep the pad on one plane at edges. Reposition and secure for another face instead of wrapping and pulling across a corner.
- Hard debris, new deep scratches or gumminess means stop; use clean appropriate abrasive or return to the drying check.
Reduce the prickly raised-fiber feel, not restore the deep wet color or gloss by sanding. A slight haze alone does not establish color damage, but a pale patch, bare wood or suspected color-layer disruption requires stopping without enlarging the patch to blend it.
Third: remove dust before recoating decisions
Vacuum with suitable equipment, avoiding hard-nozzle scratches. Do not use steel wool, which High Performance excludes, or oily furniture-care cloths to conceal roughness. Isolate the extractor before maintenance.
After dust removal, compare with an undamaged sample area: less raised-fiber feel, continuous film, no localized color breakthrough and unchanged edges. Sticky film, extensive hard protrusions, deep scratches or exposed substrate are not blindly buried under the next coat. Diagnose drying, contamination or coating repair; swelling and delamination are not solved by more sanding.
After a pass, follow High Performance’s recoating requirements in the same system, complete the sample’s later coats and inspect dry results before repeating on the real work. Removing raised grain does not mean a single coat has completed durable protection.
If you are at a different stage
Pre-wetted bare wood follows the selected finish’s raw-wood preparation, not this after-topcoat sequence. Water-damaged unknown old finish is not automatically normal grain raise. Confirm uncertain protective film, veneer construction or continuing moisture first; preserving color, layers and dimensions matters more than flattening every rough spot.