
Separate the wet working area from electrical connections
Plan view shows dry socket and machine area, separate hoses, wet paving and a clear exit.
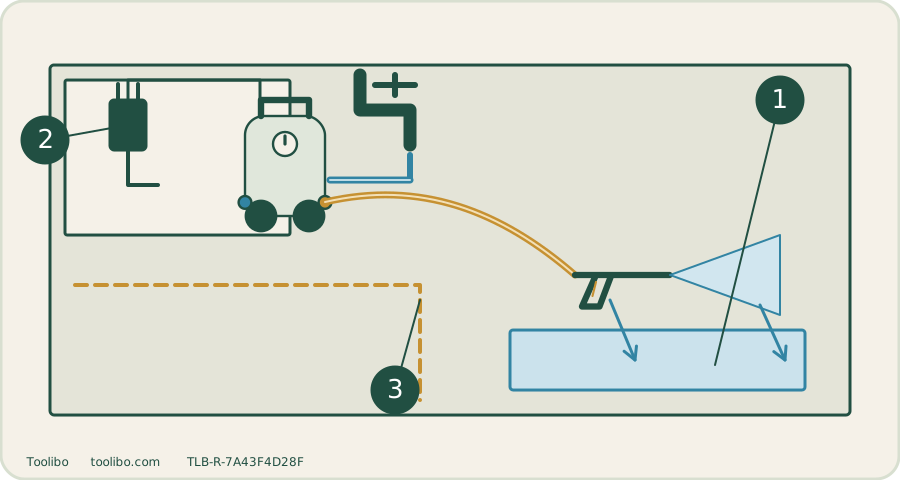
Water
Follow slope and rebound spray.
Power
Use only the exact model’s permitted arrangement.
Route
Walk the dry setup before energizing.
The drawing is a planning aid, not certification of wiring or protection.
Draw the wet area first
Start at the surface you intend to clean and follow its fall toward drains or low spots. Include water bouncing from walls and wheels, not just the main jet. Mark doorways, outdoor sockets, extension connections if permitted, and routes used by children, pets or other residents. Keep people out of the work area; a hose across the only exit is not an acceptable layout.
Locate a firm, level machine position outside the wet working area. Keep its ventilation clear. Route the supply hose to the inlet and the high-pressure hose toward the job without taut bends, sharp edges or vehicle traffic. These routes must allow you to move while holding the gun with both hands, without pulling the machine over.
Decide whether the power route is actually permitted
Read the exact regional manual, not a generic extension-lead table. The US STIHL RE 80, for example, forbids extension cords and power strips. A longer cable is therefore not a solution for that model. A different machine may permit a specified outdoor extension arrangement, but its requirements cannot be transferred to the RE 80.
Check the machine’s voltage and supply requirements, cable condition and specified protective-device checks before connection. Do not tape over damage, remove an earth pin or use a plug converter to solve an incompatible supply. If the socket or protection is uncertain, ask a qualified electrician instead of testing it with the washer.
Walk through a failed layout
Imagine a patio sloping toward the back door. The socket is beside the door, and a cable coupling is lying on the patio below it. Initially dry, it sits exactly where rinse water will collect. Raising the coupling a little does not make a spray-exposed connection safe, and wrapping it in a plastic bag is not a substitute for a compliant connection.
Redraw the plan so electrical connections remain in a genuinely dry location away from runoff and overspray, while the machine and hoses remain within their approved reach. If this cannot be done with the existing installation, stop the setup. Moving the washer farther away while stretching its cable or adding a prohibited extension merely changes the hazard.
Check the plan before and during work
- With the equipment not energized, walk the operator route. Check that neither hose nor cable becomes taut at the farthest permitted working point.
- Verify that connections are outside the expected water path and that the exclusion area does not block a necessary exit.
- Complete the machine’s prescribed supply and protective-device checks. Do not energize damaged equipment.
- During work, watch the actual runoff from your safe position. If it spreads toward power connections, release the trigger and stop; do not move or handle a wet energized connection.
- Before relocating equipment, complete its prescribed safe shutdown and pressure release. Re-plan for the next area rather than dragging a live setup behind you.
What the drawing cannot certify
A diagram cannot verify wiring, an outlet’s condition or a protective device. Repeated tripping, damaged insulation, water entering a connection or abnormal operation ends the job and calls for competent assessment. Never keep resetting protection to finish one last section. Good layout prevents foreseeable exposure; it does not make faulty equipment usable.