
Isolate, exchange, pull-check and support
A shows a separated generic pack and an evidence card, not a charging connection or proof of battery health. B shows a conceptual fully open lever and a separate old blade leaving the clamp. C combines neutral uncounted original seating, the closed lever and an outward isolated pull-check cue. D is a plan-view cut corridor with retained clamp, independent waste support and two grip reminders kept separate from the wood.
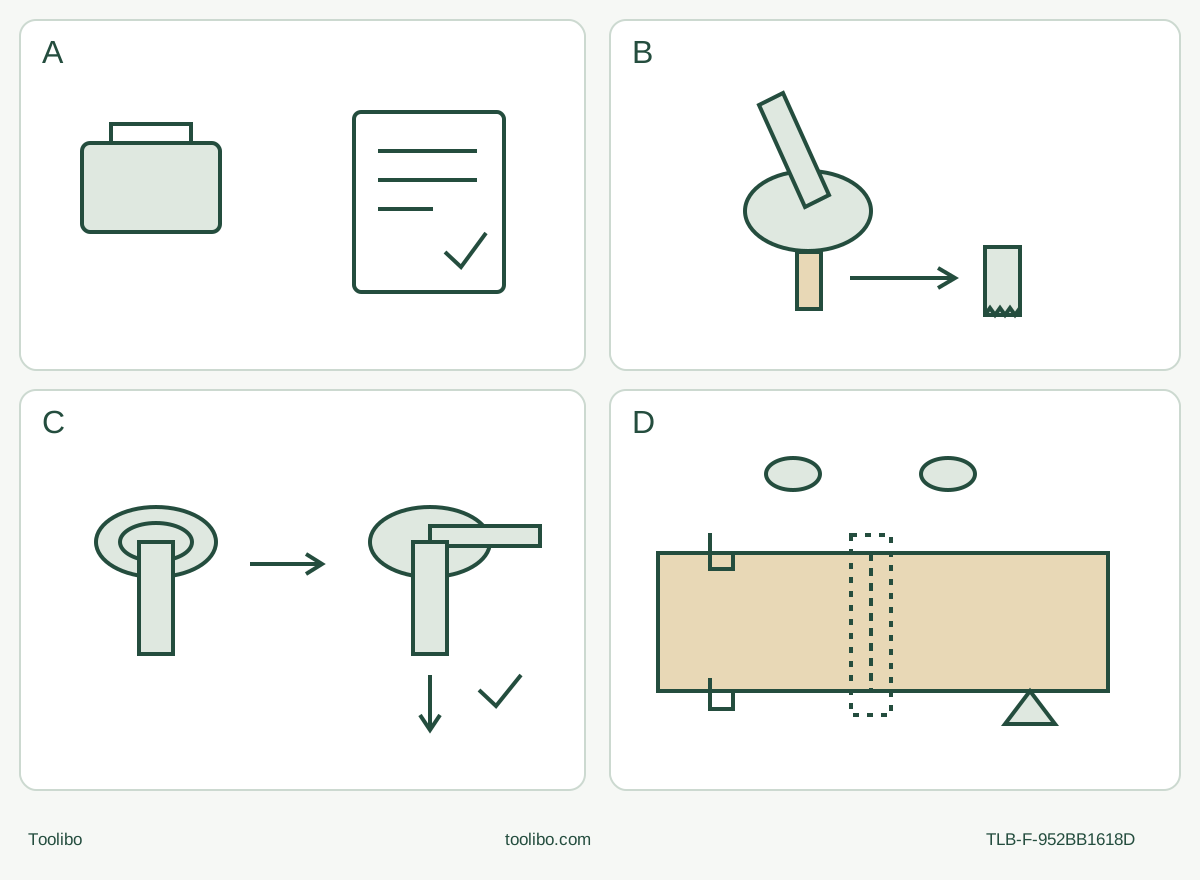
A · Qualify the existing system
Apply personal and power-history gates, identify original 20202 / 20200C and their own instructions, then OFF/full stop/battery out. A gauge or picture does not prove healthy cells.
B · Fully open and remove the old blade
Let the old accessory cool and protect sharp edges. Fully open the native lever, then remove the old blade; do not dismantle or add clamp parts.
C · Close and check while isolated
Align original blade holes with clamp notches, close the lever and carefully pull-check. Repeated movement or uncertain seating is a service hold, not a powered fit test.
D · Finish a controlled sample
Clamp stock and independently support waste. Maintain both insulated grips, actual dust protection and complete clearance; use light source-guided movement, then full stop, battery removal and acceptance.
Original schematic, not scale or full assembly geometry. No battery latch location, pin count, torque, blade capacity or native capture port is inferred. B requires old-accessory removal before the replacement. C is battery-out retention only, never an energized test. D requires actual both-hand insulated grips and complete underside clearance; boost is automatic, not a drawn control.
Keep this an original-system wood project
This guide covers the actual US WEN 20936 matching instruction manual V.2025.12.03. The 20936BT packaging is not a second mechanical model. Start with the original wood blade pictured and identified in the packing list, not an unidentified blade that resembles it. The document lists several accessory-set numbers, but does not assign one of them to this particular supplied blade; this guide does not guess a replacement SKU, thickness capacity or minimum accessory rating.
Confirm actual manufacturer-approved blade identity, wood suitability, condition, mounting geometry and adequate usable reach for the selected job. A missing original, damaged mounting slot, doubtful rating or unknown substitute stops the project before power. This clamp does not accept Starlock blades. Broad compatibility marketing is not a substitute for the actual approved accessory and secure native seating.
The power boundary is equally specific: an already commissioned original WEN 20202 battery and 20200C charger, with their own matching complete instructions and known condition. Both appear in this exact tool manual. This is not first charging, a new pairing or permission to use every battery carrying a WEN label. Retain the source’s 20V Max designation; no independently established nominal-voltage figure is supplied here. The manual’s separate 49120B compatibility caveat is not waived by general family wording.
Evidence: WEN 20936/20936BT manual V.2025.12.03 pages 2–3, 11 and 14; exact current product and its linked manual.
Apply the person and power-condition gates first
The manual requires an initial medical examination and regular medical checks for vibration risks. It says pregnant users and people with impaired hand circulation, past hand injuries, nervous-system disorders, diabetes or Raynaud’s disease should not use this tool. Pacemaker users should consult their physician before use and avoid operating alone. Tingling, numbness, or white/blue fingers require medical advice as soon as possible; stop rather than continue through symptoms. Do not smoke during use, take vibration-free breaks and use suitable gloves while maintaining safe control. An anti-vibration feature is not a waiver of these restrictions. These are source screening precautions, not a diagnosis, treatment plan or assurance of personal clearance.
Inspect the actual battery and charger history, not just their outer appearance. The manual prohibits use of either item after a sharp blow, drop, being run over or other damage. A later paragraph’s more-than-one-metre example does not cancel that earlier any-drop prohibition. Damage, deformation, hissing, gassing, abnormal heat or an uncertain adverse history requires qualified disposition, not another charge or a powered experiment.
Never use or charge a battery if you suspect more than 12 months have passed since its last charge. Stop working if battery performance noticeably falls or its protection system trips. A weakened or exhaustively discharged pack is not revived in this project; the manual also sets a replacement boundary at 80% of original capacity. A fuel-gauge light does not measure that capacity or prove healthy cells. If that condition cannot be established, seek manufacturer guidance rather than invent a load test.
Keep the pack and charger cool and dry, away from metal objects that could bridge contacts. The source’s 41–104°F range concerns charging; its prohibition on storage where temperatures may exceed 104°F concerns the battery and charger. Neither establishes a tool operating-temperature range. Actual charging, inspection and safe disposition remain governed by the exact power-item instructions and qualified service; no battery chemical handling or repair procedure is given here.
Evidence: the selected manual pages 6–10.
Choose a cut with a visible exit and real dust control
Use known dry, new, untreated, uncoated loose softwood. Inspect both faces and the intended short straight separating route for nails, screws, grit and other foreign objects. Do not substitute painted salvage, installed trim, a wall, cables or unknown cavities. Lead-paint removal is expressly prohibited by this manual, not made acceptable by changing blades.
Clamp the retained piece to a stable surface. Support the waste independently so it can separate without an uncontrolled fall, tearing the last fibres or closing the kerf. With the tool isolated, check the whole blade movement, usable reach, holder and body clearance, battery envelope, both hands, clamps, underside and exit. A nominal blade length is not a cutting-capacity guarantee. If clear access and stable support cannot both be maintained, change the work setup or hold the job.
Work in a dry, well-lit, ventilated area with stable footing and bystanders clear. Exclude flammable liquids, gases and explosive dust atmospheres. Wear eye protection, a suitable face/dust mask for the actual hazard, appropriate hearing protection and suitable gloves with secure cuffs; keep clothing and hands clear of moving components. The manual specifically calls for hearing protection during extended operation and approved dust protection capable of filtering microscopic particles. A small sample does not remove the exposure requirement.
Where dust collection facilities are provided, connect and use them correctly. This source does not establish a native saw-blade hood or a universal suction requirement. Qualify the actual task, exposure and equipment before work; an unavailable or unknown required control means hold, not a nearby-hose improvisation. Switch OFF, wait for full stop and remove the tool battery, and isolate any extractor under its own instructions before connections or adjustments. Operate/check the qualified dust equipment under its instructions before cutting, with the hose clear of the blade and grip area.
Open fully, exchange the blade, close and pull-check
Push the power switch backward to OFF and wait for complete standstill. Remove the battery using the actual release latch established by the matching pack instructions. Page 13 calls the latch “rear” during installation and “front” during removal; that is not evidence of two separate latches. If you cannot positively identify the actual latch and secure-seat procedure, stop for clarification instead of probing the pack or forcing it.
Before the change, inspect the isolated housing, grips, switch, lever, clamp and accessible hardware. Cracks, binding, missing parts, unreliable control, unexplained rattling or damage require qualified correction. Let the fitted blade cool, protect against sharp edges and keep the tool supported.
- Release the original quick-release lever and open it fully.
- Carefully remove the old accessory from the clamp. Do not stack a new blade on top of it.
- Place the positively identified original wood blade on the clamp, aligning all corresponding accessory holes with the clamp’s notches. Keep the mounting surfaces clear of obstructing debris and retain the actual original mechanism.
- Close the lever to secure the blade. Carefully pull on the accessory while the battery remains out to confirm retention.
There is no removable-flange, locking-rod, hex-key or hand-threading step in this native procedure. Do not dismantle the clamp using the exploded parts diagram, add washers or invent a tightening torque. If the blade is loose, the documented isolated correction is to reinstall with the holes properly aligned to the notches. Repeated looseness, damage or uncertain seating is a service hold, never an energized fitting test.
Evidence: the selected manual pages 13–14 and 17; actual Figures 1–2.
Understand the dial and automatic boost before cutting
The specification table and current product give 5,000–19,000 OPM. The speed paragraph mixes “5000 RPM” with “19000 OPM”; do not turn that inconsistent label into a conversion or a different capacity. The dial has six settings: right increases toward 6, left decreases toward 1. No numbered wood recipe is given. Select a suitable setting for the actual original blade and known material while stopped and isolated, and qualify a securely supported scrap before the intended sample. A later adjustment requires the same stop and isolation, not a reach toward a running tool.
Boost is automatic: load can make the motor speed up, and removing load lets it slow down. It is not a separate button, a fault-restart timer or permission to push harder. Higher settings may trigger it more frequently and consume more battery power. Let the tool do the work; do not confuse a normal documented load response with unexplained vibration, binding or an insecure blade.
Reconfirm OFF, the isolated pull-check, cleared adjustment tools, stock/support stability and dust readiness. Install the qualified battery and verify the actual release latch snaps into place and the pack is secure, using its matched instructions. Do not force a mismatched or unreliable latch. Keep both hands on the tool’s insulated gripping surfaces, vents clear and all fingers outside the cutting and underside envelope. Do not use a free hand to support or catch the work.
Start with the blade clear, push the switch forward to ON and establish the selected running speed before contact. Guide the original wood blade on the visible line using the source’s slight pendulum motion back and forth. Apply controlled light pressure without forcing, levering or twisting the blade to make a curve. Maintain both grips and clearance throughout separation. Stop immediately for abnormal vibration, shifting work, binding or movement of the attachment; do not reproduce the event as a diagnostic test.
For this project, slide the switch backward to OFF, hold control until full standstill, then withdraw along the clear path and set down securely. Stopping before withdrawal is this project’s conservative sequence, not a special OEM quotation. The manual explicitly requires complete stop before setdown and battery removal after operation. The LED follows ON/OFF; its darkness does not itself prove standstill or isolation. Remove the battery before inspection.
Accept the sample and close the system
Allow the blade and work to cool and avoid teeth and splinters. Inspect both faces for the intended cut location and complete separation, without a hidden bridge, uncontrolled tear-out, scorching or evidence of shifted clamps/support. No numerical tolerance or finish ranking is invented. Reject an unacceptable sample and correct an established isolated setup issue before another cut; unexplained tool or power behaviour requires qualified help.
With the switch OFF and battery out, wipe exterior surfaces with a soft cloth and keep vents clear. Do not let water enter or use solvents that damage plastic. If a charger is involved in cleaning or maintenance, unplug it under its own instructions. This project does not blow compressed air into the motor, replace brushes, open a pack or carry out internal repairs; servicing belongs to a qualified technician. Store the protected sharp blade, dry tool and power items safely out of children’s reach. No stock, spare-part or warranty outcome is promised.
Evidence: the selected manual pages 15–19. Sample acceptance is a project requirement, not a manufacturer performance guarantee.
Models referenced