
Mark, hold and inspect a complete PVC end
Three panels show a continuous cut-plane mark on an empty loose tube, separate holding zones on both sides of the cut, and an end-on whole-circumference inspection reference.
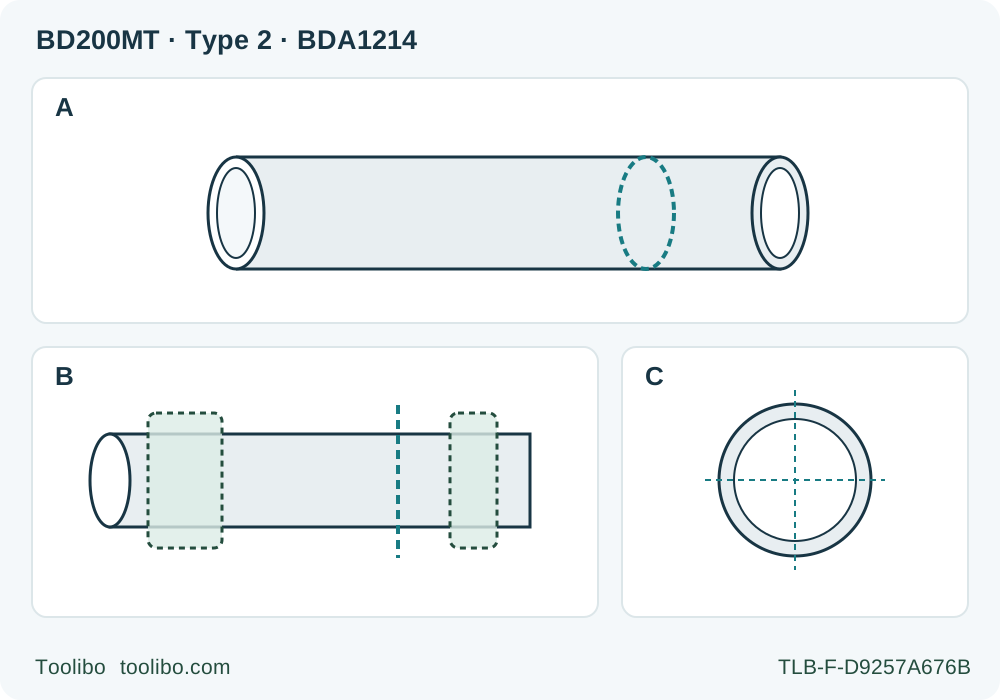
A · Establish a continuous plane
Identify known empty loose PVC, reject unknown residue and mark a closed square-end reference; an existing crooked end is not a datum.
B · Prevent rolling and pinching
Secure both retained and waste portions with suitable anti-roll support without crushing. Keep the blade envelope clear; stop, unplug and re-clamp before any planned new approach.
C · Inspect after isolation
After complete stop, unplugging and cooling, check the full circumference for line agreement, complete separation, steps, cracking and heat damage. Service-specific joint preparation remains separate.
Original layout schematic, not a pipe-clamp design, cutting capacity or dimensional tolerance. Shaded bands are separate holding/support zones, clear of the full blade envelope. The end view is an inspection reminder, not proof of squareness or joint suitability. The exact Type 2 native blade uses no adapter.
The outcome is a checked loose offcut, not a pipe connection
A round tube introduces two problems that a flat wood sample does not: it can roll under the blade, and a cut that looks straight from above can wander around the hidden side. This project produces a separated PVC offcut whose end can be checked against its marked plane. It does not qualify that end for a pressure connection, solvent joint, drain installation or any other service.
Use only a known, clean, dry, empty piece of PVC tube that is already completely loose. Verify its identity from reliable material information, not its colour. Reject used pipe with unknown contents, connected pipe, sealed vessels, liquid residue, coatings or contamination. Seeing one open end does not prove a connected line is safe. No part of this procedure is an installed-pipe isolation method.
The exact tool scope is the US BLACK+DECKER BD200MT physical Type 2 matching June 2014 manual 90613711, with the identifiable native BDA1214 1-inch plunge-cut blade. Its page 13 row expressly includes PVC and plastic. That is not a universal plastic-blade approval, nor does the nominal width establish a maximum tube diameter or wall thickness. Other revisions or blades need their own matched instructions. The tool’s actual nameplate controls the supply; no current kit or earlier-document amperage is assumed.
Mark a plane and prove the fixture can hold it
Choose a scrap length that leaves room to secure both the retained portion and the waste without crowding the intended cut. Draw a continuous square-end reference around the tube using a suitable square-cut marking method. Check that the mark closes on itself without a step. An existing crooked end is not a reliable datum. This layout is a project method, not a manufacturer-specified pipe fixture or tolerance.
Use a stable anti-roll support and suitable clamps that hold the round section without crushing it. Support the retained piece and the waste independently so the last wall cannot pinch the blade or let a short ring drop into it. The diagram’s shaded bands identify holding zones, not a prescribed clamp design. Hand-holding the tube, trapping it under a foot or squeezing it against the body is not an alternative.
With the tool unplugged, check the intended blade approach, exposed working reach and full oscillating envelope. Allow for the far wall, supports, clamps and cord. Do not plan to force the holder into the tube or drive the blade blindly through the opposite wall. If one orientation cannot safely complete the cut, plan separate accessible sections of the same marked plane. Every repositioning will require OFF, complete stop, unplugging, and re-clamping before restarting. If this cannot be done without loss of support, select a different suitable cutting method rather than improvising a live rotation.
Install and set up while unplugged
Move the slide fully backward to OFF, wait for complete stop, unplug and let any used blade cool. Wear protective gloves when handling or changing the sharp cutting accessory. Inspect the blade and holder: damaged, bent, dull or unidentified parts are a stop condition. Squeeze the native release lever, clean residual debris from shaft and holder, and put the blade’s working edge away from the housing. Slide its mounting end between shaft and holder, fully engage the actual locating pins and seat flush with the shaft. Release the lever and verify secure retention.
Do not add the separate adapter, an extra washer or an improvised spacer. The matched manual expressly prohibits its adapter with native BLACK+DECKER accessories. A blade that cannot seat correctly is not made acceptable by harder clamping. Sources: manual pages 6–7 and 13.
Check the independent speed dial before connecting power. The manual generally recommends the lower 1–3 range for PVC/plastics; it does not prescribe one exact dial position for all tubing. Start a trial at a low setting when unsure and increase only as appropriate within the matched material guidance. The dial’s numbers are approximate reference points, not a temperature controller. Do not borrow the 4–6 wood range merely because this blade also cuts wood.
Arrange the cord clear of the fixture and blade. Keep the switch fully OFF before plugging into the suitable nameplate-matched supply. Use a dry, well-lit, ventilated workspace, ANSI Z87.1 eye protection, the manual’s specified hearing protection and respiratory protection appropriate to the material and dust. Follow the material’s safety information as well as the tool instructions. Do not add water or solvent as an improvised coolant.
Cut without rolling or twisting the tool
Grip the tool firmly with both hands and keep hands away from the cut and underside. Start clear of the tube by sliding forward to ON, let the selected speed build, then enter the accessible section of the line with controlled pressure. Keep the blade in the planned plane. Do not twist it around the circumference, force an excessive depth or use it as a lever.
If the tube moves, distorts, binds, smears badly, produces smoke or gives an abnormal smell, stop. Those observations are reasons to investigate, not a recipe for increasing speed or pushing harder. Switch OFF, wait for complete stop, unplug and let the accessory and material cool before checking the setup. This guide does not supply a PVC melting threshold or authorize continuing through visible heat damage.
For a planned second approach, stop and isolate in the same way before releasing any clamp. Reposition the tube and supports so the next section is visible and securely held, check the complete blade envelope again, then reconnect only with the slide fully OFF. Restart clear of the work, never with the blade trapped in the cut. Complete the remaining wall without snapping the tube or catching the waste by hand. The manual’s low-speed motor-cooling hint is not permission to run a blade that is bound or overheating the material. Sources: manual pages 3–4 and 8.
Check the complete end after isolation
Switch OFF, control the tool until all movement stops, then unplug and allow the cut and blade to cool. Remove the supported offcut only after it is fully separated. Check the whole circumference against the marked plane and a suitable square reference, not just the top edge. Look for a stepped junction between approaches, remaining bridges, cracks, crushing, deep tears or heat-deformed material.
Accept the practice cut only if the end follows the intended plane around the circumference, separation is complete and the tube remains undamaged. No numerical squareness tolerance is claimed. If the end is stepped or damaged, reject it for the intended next use and correct the layout, holding or blade condition before another scrap trial. Do not shave a defect by rolling an unsecured tube against a running blade.
A passing practice cut still leaves any service-specific deburring, chamfering, dimensional and joining requirements unresolved. Use the actual pipe and fitting manufacturer’s instructions for that separate work. Clean the bench with the tool disconnected, keep sharp offcuts controlled and store the tool unplugged. The outcome here is a visible, assessed loose-stock cut—not certification of a pipe system.
Models referenced