
Blank, controlled cut, unpowered folds and actual fit
A shows a hypothetical 310 by 210 mm blank with 20 mm margins and 270 by 170 mm base. B marks a clamped straight path with support clearance. C shows unplugged scissors and folds. D shows an example 280 by 180 mm empty-box fit and removal check.
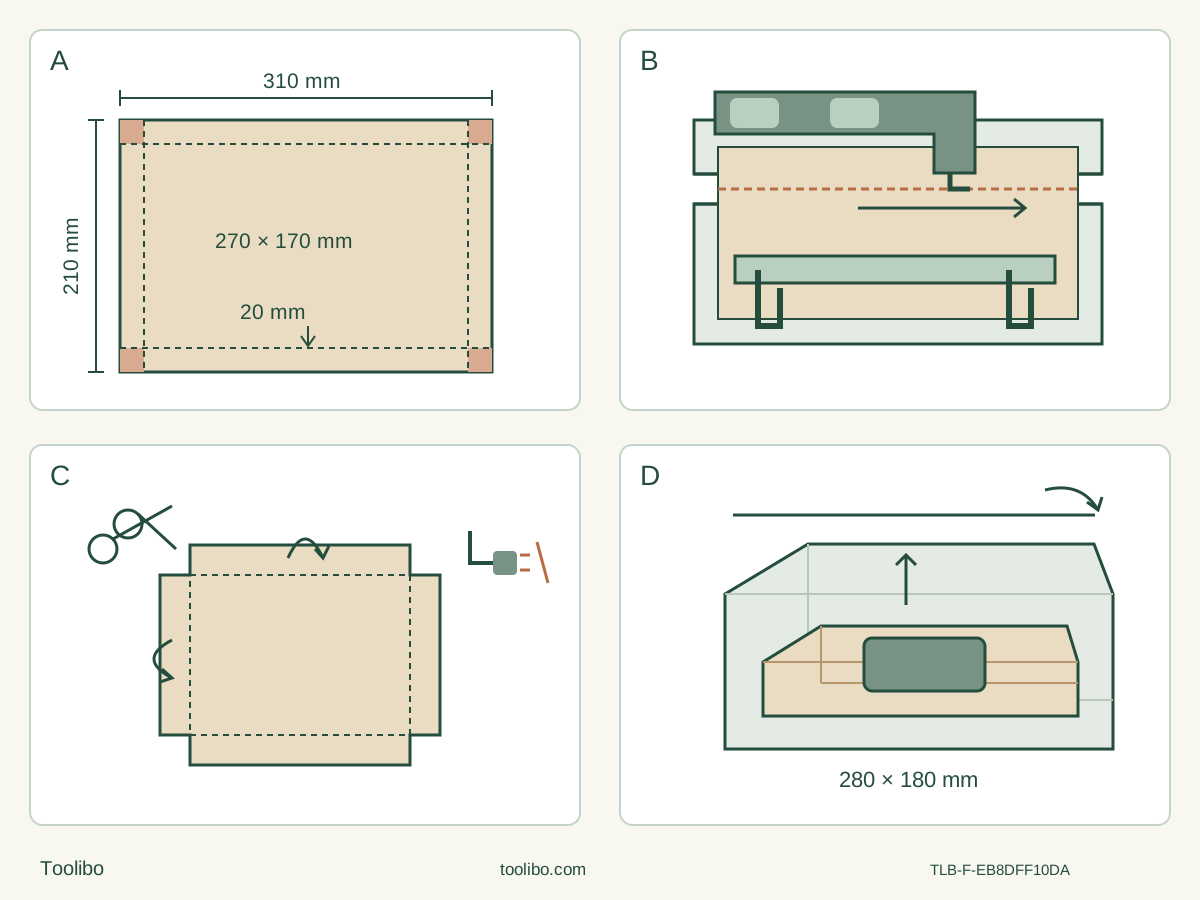
A · Measure a hypothetical net against the real box
Account for thickness, fold radius, taper and lid clearance. The example arithmetic does not prove fit.
B · Clamp and clear the straight cut
Use two hands and the appropriate push edge away from the body. Keep clamps, supports and both hands outside the entire cutting path.
C · Unplug before corners and folding
After OFF and full stop, unplug and set the sharp accessory safely aside. Use suitable scissors for corner squares and fold by hand.
D · Verify easy insertion and removal
Test in the empty box without forcing. Reject wedging, broken folds or collapse; no load or shipping protection is certified.
Original schematic, not a mounting diagram. All dimensions are hypothetical layout examples, not capacity, required clearance or exact folded dimensions. B grip patches mean both hands remain on the tool; the batten is a clamp, not a blade fence, and the line must have actual clearance beneath. C is wholly unpowered. D dummy shape illustrates intended space only, not a shipping-load test.
Make a removable cardboard tray, not a shipping guarantee
This project makes a shallow, removable cardboard insert for an empty storage box. It uses an existing US Dremel MM35 matching the August 2018 instructions and an identified MM430 Multi-Knife accessory rated at least 21,000 OPM. The powered part is limited to accessible straight outer cuts in known clean, dry cardboard held on a stable work surface. Corner trimming and folding happen after the tool has been switched off, stopped and unplugged.
The insert is an organizer, not certified cushioning, a load-bearing tray, a lifting handle or protection for shipping fragile goods. Do not use it to contain hot objects, exposed battery terminals, liquids or hazardous material. Remove the contents from the box before measuring or fitting it. Nothing is cut inside a loaded package.
The material basis is Dremel’s June 2012 US accessory release, which explicitly includes cardboard for MM430 and describes its two cutting edges. The matched MM35 manual lists MM430 on page 14 and governs the actual mounting, workholding and operation. Current MM430 product information confirms its identity and push/pull design. Its one-handed and broad compatibility marketing does not override the MM35’s two-hand grip, secured workpiece or exact accessory requirements.
Start with measured fit, not copied dimensions
Measure the empty box’s usable internal length and width at the height where the insert will sit. Check taper, folded seams, lid clearance and anything protruding inside. Choose a shallow wall height that leaves room for the lid and easy removal without wedging. Cardboard thickness, fold radius and springback affect the finished outside dimensions; arithmetic alone does not guarantee fit.
The diagram is a hypothetical planning example: a 310 × 210 mm blank with 20 mm margins leaves a nominal 270 × 170 mm base. An example box measures 280 × 180 mm internally. The nominal 10 mm difference in each direction is not a manufacturer clearance requirement or a promise that a thick folded board fits. Make and measure the actual trial before cutting a final blank. These figures describe a craft layout, not the tool’s capacity.
Draw the base rectangle, fold lines and outer boundary on the cardboard. Mark the four corner squares to be removed later with suitable scissors. Choose a simple open tray without glued joints or an integral carrying handle. If the cardboard cannot fold cleanly by hand, choose different material or a different design rather than score it with a running oscillating blade.
Use only a clean, dry sheet whose full thickness you can inspect. Reject staples, metal tape, plastic laminates, unknown coatings, contamination and concealed contents. The source’s general mention of insulation or shingles does not expand this clean-cardboard project to those materials.
Qualify the cut and workholding
The MM430 has an inside-facing edge for pulling and an outside-facing edge for pushing, as the official release describes. This project uses a controlled straight push with the appropriate outer edge, away from the body, where the entire path remains visible. It does not require a blind plunge, a hooked pull toward a hand or powered corner turning.
Before connecting power, check actual accessory reach, complete oscillating clearance and tool-body access. Support and clamp the sheet with broad pressure-distributing pieces so it cannot buckle, slide or tear loose. Secure the waste as well where it could move into the blade. Arrange a clear gap below the cutting line; the blade must not encounter the bench, a clamp or a backing board assumed to be harmless. Inspect the underside rather than reaching underneath during cutting.
The drawing’s lower clamping batten is not a fence to press the blade against. Keep all fixtures outside the full tool and accessory envelope. If secure clamping would crush the sheet, or the remaining strip cannot be retained safely, stop and use a suitable nonpowered method. Do not substitute a hand holding the material, even though accessory advertising mentions one-handed cutting.
Install the knife with the plug out
Slide the MM35 switch backward to OFF and unplug it before assembly or repositioning. Let a used accessory cool. Wear protective gloves for handling, changes and operation, keeping hands clear of the cutting edges. Inspect the actual MM430 markings, rating and condition. Reject a bent, cracked, dull or otherwise suspect knife; do not reshape the hook or alter its mounting slot.
Loosen the clamping knob counterclockwise. Press it to extend the flange enough to fit the accessory between flange and holder. Engage every holder pin and seat the accessory flush. Release the knob, then tighten it clockwise fully by hand as the manual directs, until further turning would be uncomfortable. The spring’s temporary hold is not completed clamping. No universal adapter, extra washer or powered fit check is part of this setup.
An angled mounting is acceptable only if every pin still engages, the accessory sits flush and the knob is fully tightened. The selected orientation must also permit the planned push away from the body without bringing either cutting edge near a hand or fixture. If that cannot be achieved, do not proceed. Removal is unplugged: loosen and press the knob, then lift the cooled accessory off the pins.
Establish the cut on scrap without inventing a cardboard speed
The manual’s MM430 table gives 6–10 for vinyl/carpet. It does not provide a cardboard column. Do not present that number as a cardboard instruction, transfer the wood-blade row, or turn a marketing statement into a fixed dial recipe. Use the manual’s scrap-trial method to establish a controllable setting on the actual cardboard; the ten-position dial controls speed, not depth or feed force. If a stable clean cut cannot be established without forcing the sheet or blade, stop and choose another method.
Use the matching 120 V, 60 Hz supply and an intact cord kept behind the work, clear of the cutting line. Avoid an unnecessary extension; any needed extension must follow the exact manual table. Confirm OFF before connecting power. Do not compensate for an abnormal start or supply problem by increasing the dial.
Wear eye and hearing protection, protective gloves and appropriate dust protection; work in a ventilated, clear area with stable footing. Keep both hands on the insulated gripping surfaces, away from the accessory and out from under the sheet, and leave vents clear. Start with the blade clear, slide forward to ON, and guide the appropriate edge along the visible straight line using light pressure. Do not force the knife, twist it to turn a corner, or pull a trapped sheet free while the tool runs.
If the board buckles, moves, tears unpredictably or binds the knife, switch OFF, wait for complete stop and unplug before correcting the setup. Do not keep restarting an unstable cut. Once a scrap trial is acceptable, repeat the same qualified material, clamping and controlled approach for the required straight blank edges. Reposition only after OFF, full stop and unplugging; check the entire next path again.
Finish by hand, then test the empty box
After the outer blank is cut, switch OFF, wait until all motion stops and unplug. Put the cooled sharp accessory safely aside before handling the sheet. Check that the blank follows the marked dimensions without torn corners or crushed material that would prevent folding.
Use suitable scissors for the four small marked corner squares, with fingers clear of the blades. This is an unpowered finishing step, not permission to use the MM430 for unsupported tiny scraps. Fold the four margins along the marked base lines by hand. Do not force a brittle crease or use the powered blade as a scorer. If the material cracks or the sides will not stand without stressed folds, reject the trial and change the material or layout.
Place the finished insert in the empty box. It must sit flat without forcing or bowing the box, allow the lid to close, and lift out easily without dragging or trapping the sides. Measure the actual folded outside size if fit is uncertain. Trim only after removing the insert from the box and choosing an appropriate secured or nonpowered method; never cut around stored contents.
For this hypothetical example, acceptance means a sound, removable organizer with intact folds and the desired usable base—not proof that its nominal 270 × 170 mm base or 20 mm walls are exact after folding. Reject an insert that wedges, tears, collapses under the intended ordinary contents or cannot be removed without pulling on fragile edges. Reconsider the design rather than claiming a shipping strength that has not been tested.
Clean the isolated tool without probing openings or using plastic-damaging solvents, and store it away from children. The finished result is a checked removable insert and a recorded layout you can reproduce on the same qualified material, not an assumed universal cardboard-cutting setting.
Models referenced