
Qualify, isolate, mount and recover
Four schematic panels show PCC710 Type 1 with document N555870 and a battery-charger pair, a squeezed clamp with the battery separated, backward OFF before insertion, and separate cooling or charging after an abrupt stop.
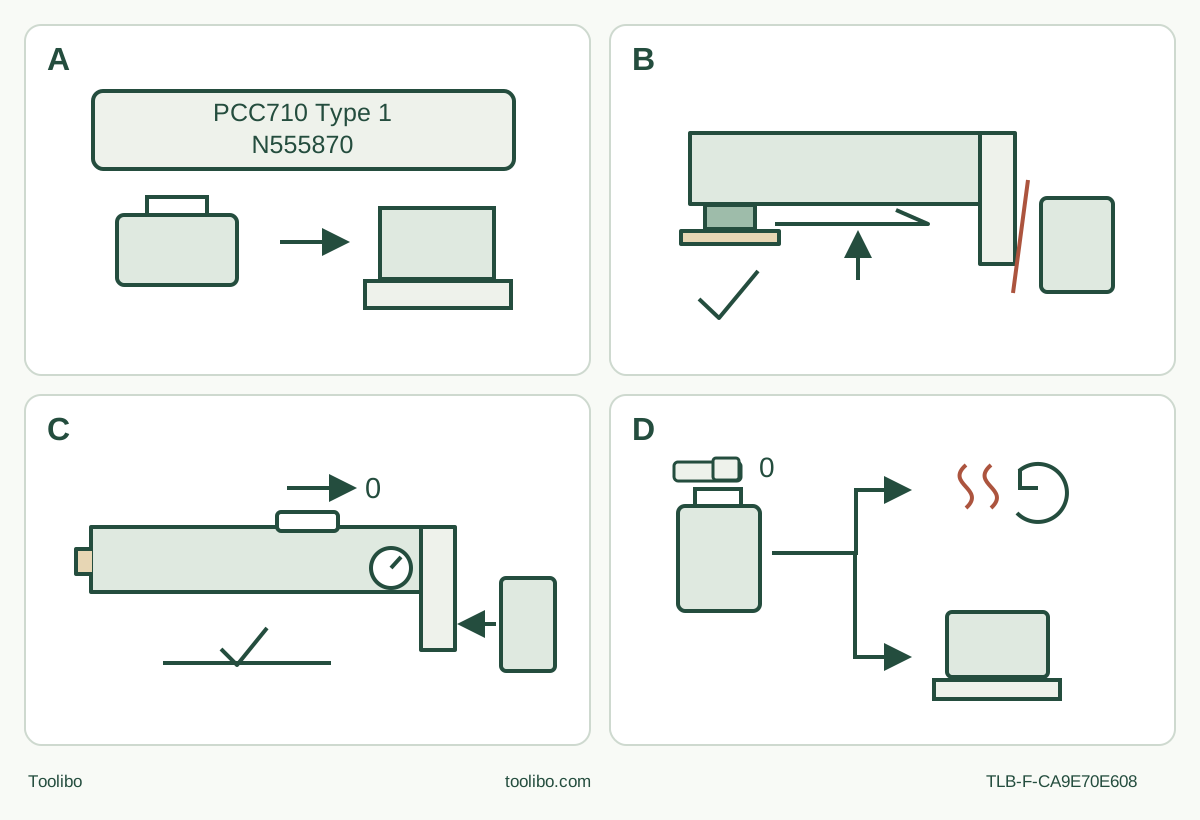
A · Match the documented system
Confirm physical Type 1 and N555870 instructions; this guide selects the listed PCC680L battery and PCC690L charger, not a promised retail bundle.
B · Remove power, then clamp
With the pack out, squeeze the lever, clean the seating surfaces, engage all locating pins flush and release the lever.
C · OFF before insertion
With the head shown at left, move the switch backward toward the rear to OFF; check the retained speed setting before installing the pack.
D · Diagnose an abrupt stop
Switch OFF and remove the pack. A hot pack needs cooling; a depleted pack needs qualified charging. Neither diagnosis authorizes repeated restart attempts.
Recovered original schematic checked against the newly written guide and actual manual figure page. It does not specify a locating-pin count, charger colour code or current kit contents.
Begin with OFF, not with the battery
The PCC710 can start immediately if its battery is inserted while the slide switch is ON. Its separate speed dial also retains the selected setting. A charged pack is therefore the last part of preparation, not the first: move the switch fully backward to OFF and remove the battery before inspecting the holder, changing an accessory or correcting a cut.
This guide is for an existing North American PCC710 Type 1 whose physical identification and controls match the official Type 1 document N555870 revision 01, August 2017. Check the actual nameplate and supplied instructions. The official document path establishes this revision’s identity; it does not establish today’s kit contents, latest supplied manual or warranty. The selected power system is the manual-listed PCC680L battery with PCC690L charger. Other similar-looking batteries, chargers and regional supplies are not substitutions authorized here.
The outcome is a controlled cut in a small, removed piece of known, untreated softwood, followed by inspection and safe storage. It is not a wall opening, painted-surface removal, live pipe cut or certification of a second-hand tool.
Qualify the complete system before charging
Read the tool, pack and charger labels together. Reject a cracked pack, damaged cord, bent or loose holder, defective switch, or any component damaged by a fall or impact. Do not open the pack or charger. Resolve missing identification or conflicting supplied instructions with authorized service rather than trying whether the parts happen to fit.
The matched charger instructions require standard 120 V household power. Do not connect it to another voltage. Place the charger on a firm surface with its upper and lower ventilation slots unobstructed, away from heat and rain. Route the cord away from feet and sharp edges; avoid an extension unless necessary and then use the manual’s appropriate wire-size requirements. Keep metal filings, foil and other conductive debris out of the charging cavity. Unplug an empty charger and unplug before cleaning it; removing a pack alone does not isolate mains power.
For charging, the manual recommends surrounding air at 18–24°C and prohibits charging below 4.5°C or above 40.5°C. The preferred band and the permitted limits are not interchangeable. Do not leave the tool or pack where temperature may reach 40°C, such as a hot shed or vehicle. A damaged or abnormally hot pack is not a candidate for a temperature workaround.
Read the charger’s actual pattern
Connect the charger to the appropriate outlet before inserting the pack. Seat the pack properly. A flashing charge indicator means charging; a continuously illuminated indicator means completion. Do not invent a colour code from another PORTER-CABLE charger: identify the diagnostic patterns on the actual charger’s label.
A bad-battery pattern means stop charging that pack and use service or the appropriate battery-collection route. A hot/cold delay suspends charging until temperature normalizes, then charging resumes automatically. A power-line pattern concerns an out-of-limits supply, including some generators or DC-to-AC sources; it is not permission to keep cycling the battery. If there is no charge, check the outlet and whether it is controlled by a wall switch, confirm seating and use the recommended ambient range. Persistent trouble belongs with the tool, pack and charger together at service.
Recharge when the pack no longer supplies sufficient power for work it previously did easily. Do not deliberately run it flat. The manual permits a completed pack to remain on the charger and describes its maintenance mode, but this guide makes no precise charging-time or runtime promise. A completed indicator does not replace inspection before installation.
Mount a recommended wood blade with the pack removed
Choose a sharp, undamaged accessory that PORTER-CABLE recommends for this tool and for the intended wood cut. The cover identifies DEWALT Universal Fitment compatibility, while the accessory warning requires PORTER-CABLE-recommended accessories. That is not a blanket approval for every open-slot blade or a reason to import the different PCE605 Type 2 restriction. If the actual accessory’s identity or approval cannot be established, leave the cut pending.
With the switch OFF and battery out, let any previously used blade cool. Handle sharp edges carefully, using protective gloves for accessory changes. Squeeze the tool-free clamping lever, clear debris from the shaft and holder, and slide the accessory between them. Engage all locating pins and seat the accessory flush with the shaft before releasing the lever. Do not count pins from a simplified diagram or accept engagement on only one side. An allowed angled position must still seat completely. Check that the attachment is securely held before restoring power; a lever that closes is not proof that a trapped or misaligned blade is seated.
The manual’s assembly paragraph says to disconnect a plug, although this is the cordless PCC710. Follow its general safety and battery instructions: the removable pack must be out. Its battery-installation figure references are also inconsistent with the actual drawing numbers; use the named release button and the physical actions, not a mistaken figure number.
Set up a visible, supported sample
Inspect both faces and the whole planned blade path for fasteners, foreign material and utilities. Use only the known removed sample here. Clamp it to a stable platform with clear space beneath the entire cutting path and support the waste so it cannot suddenly pinch the blade or fall against your hand. Keep clamps clear of the oscillating accessory. Mark a short line that can be completed without reaching under the piece or changing to an unstable grip.
Wear certified eye and hearing protection and respiratory protection appropriate to the dust. Provide ventilation and suitable dust control; the blade and light do not constitute dust extraction. Keep other people out of the work zone. Use both hands on the tool, maintain balance and take breaks to limit vibration exposure. This simple untreated-wood exercise does not transfer to lead paint, damp work or hazardous demolition.
Insert power only after the controls are ready
Move the slide switch fully backward to OFF. Keep your hands away from the accessory while inserting or removing the battery. Insert the qualified pack firmly until the latch clicks, then confirm retention without touching the blade.
The rear dial has positions 1–6, approximately spanning 8,000–18,000 oscillations per minute. Those marks are reference settings, not a calibrated measurement or six guaranteed cutting recipes. When the appropriate setting is uncertain, test at a low setting on the scrap and increase gradually to a comfortable cutting response. The tool starts at the setting already selected, so inspect the dial before switching ON.
Hold the blade clear of the cutting surface, push the switch forward and let the tool run before applying pressure. Feed slowly at the marked location, with both hands controlling the tool. Let the sharp blade remove the material rather than forcing a deeper cut. Do not jam it, twist it to correct a bad line or restart it while buried in the work. To re-enter an interrupted cut, first establish clearance, reach operating speed and re-enter carefully.
Stop, diagnose and accept the result
Push the switch backward to OFF, wait for complete motion to stop, then remove the pack before inspecting or adjusting. Check the sample’s line, unwanted breakout and the remaining material; also check the cooled attachment for damage or movement. If control was poor, improve support, confirm blade suitability and seating, and repeat on scrap rather than compensating with more pressure.
An abrupt stop can mean a depleted pack or its thermal limit. Turn OFF, remove the pack and distinguish those causes: recharge a depleted pack under the charging conditions, or allow an overheated pack to cool. Do not repeatedly restart to defeat a cutoff. Separately, the manual describes maximum-speed, no-load running for 2–3 minutes to cool an otherwise operable motor heated by prolonged low-speed work. That instruction is not an override for battery thermal shutdown, a damaged tool, smoke or an unexplained fault. Keep the accessory clear and controlled if that ordinary cooling procedure is appropriate; otherwise stop and seek service.
Keep sanding and storage deliberate
Sanding is a separate setup, not something done with the cutting blade. With the battery removed, mount the recommended platen by the same complete-pin procedure and fit the correct-sized hook-and-loop sheet with its edges aligned. The manual describes a brief run with the sheet pressed flat against a surface to establish adhesion; keep the work supported and hands on the tool, not on the platen. Sand with light pressure and continuous motion, inspect often and replace worn paper before it damages the pad. Never wet-sand; metal sparks, magnesium and painted surfaces introduce separate hazards outside this wood exercise.
Finish with OFF, a stopped accessory and the pack removed. Clean non-metallic parts with mild soap on a damp cloth, without allowing liquid inside; avoid solvents and immersion. Keep vents clear, protect the sharp accessory and store the separated system in a cool, dry place away from sunlight and heat. Protect exposed battery terminals from loose screws and other conductors. Keep the actual model, type and serial details for qualified service. Successful ownership means a controlled sample and a known safe restart sequence—not merely getting the motor to run.
Models referenced