
Three exact fuel-gauge distinctions
Three panels depict one indicator flashing four times with less-than-ten-percent label, one flashing eight times with an empty-battery symbol, and alternating gauge lights with a heat warning.
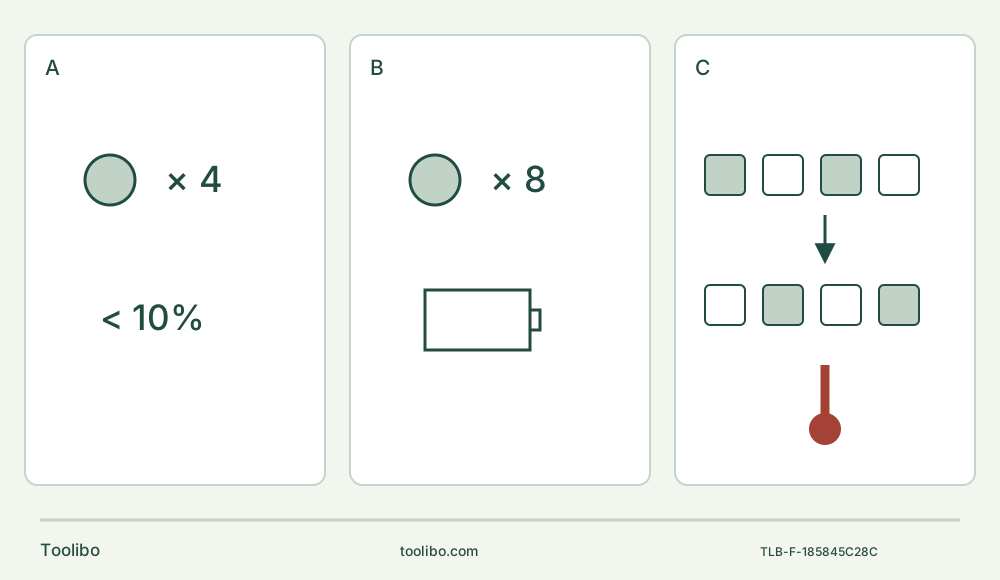
A · Four flashes: low charge
One fuel-gauge light flashing four times indicates less than 10% charge. Stop safely, isolate and use the actual approved charging instructions; this is not a remaining-runtime guarantee.
B · Eight flashes: end of charge
One light flashing eight times means end of charge and the tool will not run. It is not a borrowed overload code; unresolved no-run after properly established full charge needs the bounded care/service route.
C · Alternating: hot battery
Alternating gauge lights mean the battery is too hot and the tool will not run. Switch OFF, remove it and allow cooling under its instructions; damage or uncertainty cannot be cleared by waiting alone.
Original schematic of patterns described for the 2526 fuel gauge, not its work LED or charger. Green and red are illustration colors, not manufacturer LED-color codes. C depicts alternation conceptually, not a specified flashing timing or measurement. Do not energize a suspected damaged tool to reproduce these patterns. Stop, isolate and use the exact battery/charger instructions or service outcome.
Identify the indicator before diagnosing the stop
A Milwaukee 2526-20 that will not run is not automatically a broken motor, and a flashing light is not automatically an overload code. The matched US M12 manual distinguishes the tool’s fuel gauge from its separate work LED. This guide uses the three fuel-gauge patterns actually described on page 4: one light flashing four times, one light flashing eight times, and gauge lights flashing alternately. It does not borrow M18 2836 Auto-Load behavior, another brand’s LED colors or charger fault codes.
The outcome is a safe disposition of the whole system: use the actual approved charging instructions for a depleted pack, allow a hot pack to cool under its instructions, correct only a supported external condition, or hand the tool, pack and charger to qualified service. It is not a powered fault-finding or battery-repair tutorial. A remembered pattern is evidence to record, not proof of the internal cause of every failure.
Stop and establish an isolated baseline
Slide the switch rearward to OFF, wait for all motion to stop and remove the battery using its release buttons. Keep hands away from the blade, including the underside of the work. If the stop occurred during a cut, do not pull, twist or lever a trapped blade while power remains connected; isolate first and make the work and waste secure before resolving the obstruction. Let hot parts cool before handling, and use protective gloves for sharp accessory handling.
Do not keep switching ON to count flashes. The manual says the gauge normally lights for two to three seconds when the tool is turned on; that describes normal operation, not authorization to energize a suspected damaged tool. Use a pattern already observed during normal operation, a safely obtained earlier record or a precise written description. If the count or source is uncertain, record “uncertain,” not an invented diagnosis.
Check the exact identity: 2526-20, 12 V DC, M12 tool, and the actual approved battery and charger with their own instructions available. The tool manual names the M12 families but does not supply a specific charging recipe for every pack. This guide assumes an already commissioned matching system. An unidentified, modified or damaged pack, missing instructions or an unapproved charger blocks further owner operation. Do not use another pack or an adapter merely to provoke a different fault response.
Pattern A: one light flashes four times
Page 4 associates this with less than 10% charge remaining. It is a low-charge indication, not a calibrated capacity test and not proof that the tool can safely complete another cut. Stop at a safe point, switch OFF and remove the pack. Plan charging only through the actual approved battery/charger instructions, including their temperature and condition checks.
Do not extend the cut by pressing harder, repeatedly restarting or defeating a protection. If the stock cannot be left safely, keep the isolated setup secured and choose a safe separate means of completing or abandoning it. The indication alone does not diagnose poor battery health, authenticity, runtime or a defective motor.
Pattern B: one light flashes eight times
The same page identifies end of charge: the tool will not run and the pack needs charging. Eight flashes are not the overload pattern of another model. Turn OFF, remove the pack and use only the matching approved charging process after its safety prerequisites are satisfied.
If a supposedly fully charged, approved pack gives the same no-run result, do not simply relabel the event as “normal empty battery” and repeat the cycle indefinitely. Record what the actual charger indicated and whether that indication is confirmed in its own manual. Proceed to the bounded external check or service route below. A charger light whose meaning you have not checked cannot establish that the pack is fully charged.
Pattern C: alternating gauge lights
The manual says the battery has become too hot and the tool will not run. Switch OFF and remove the pack; allow it to cool in accordance with its own instructions. No exact waiting time or temperature inferred from hand feel is supplied here. Do not put it in water, a refrigerator or against an improvised cooling device, and do not charge it while its actual charging conditions remain unsatisfied.
This pattern is not interchangeable with four or eight flashes. The tool’s recommended operating ambient range does not override the battery or charger’s limits. If there is damage, leakage, abnormal smell, swelling or another unsafe condition, do not treat a period of cooling as clearance to reuse or charge it; obtain manufacturer or authorized service guidance. Never open or attempt to repair a battery pack.
No clear pattern, or poor operation after proper charging
Keep the tool isolated and inspect external condition without opening anything. Look for broken parts, misalignment, binding, unusual noise previously observed, an insecure attachment or debris at accessible areas. A dull or damaged blade can cause friction and binding, but it is not permission to assume that every no-start is caused by the blade. A loose or incompatible accessory remains a separate mounting problem and must not be tested under power.
The maintenance passage on page 5 gives a specific limited route: if the tool will not start or reach full power with a fully charged pack, clean the battery-pack contacts; if it still does not work properly, return the tool, battery and charger for service. This guide does not invent an electrical-contact cleaning chemical, abrasive, probe, voltage test or pin-bending method. With the pack removed and charger unplugged, follow the actual battery instructions for permitted accessible contact care. If those instructions do not establish a safe method, or contacts appear damaged, corroded or burnt, hand the system to service instead. Do not bridge terminals or allow liquid inside any component.
General exterior cleaning instructions are not a license to wet electrical contacts. Keep removed batteries away from metal objects that could join their terminals. The manual explicitly prohibits disassembling the tool, battery or charger and assigns repairs to Milwaukee service. Do not open a switch, bypass protection, replace cells or try an energized “wiggle test.”
Decide whether the next action is ordinary use or service
A return to ordinary use is conditional, not a required diagnostic test. It can be considered only when the original event is accounted for by a documented charge/temperature condition, the actual approved system has satisfied its own instructions, and no damage or unexplained abnormal behavior remains. If you cannot establish those facts, stop here and request service. Repeated or unexplained failure is not cleared merely because the light eventually disappears.
Before any later normal use, confirm OFF, an intact correctly mounted approved accessory, secure stock and waste, clear blade travel and the intended speed setting. If attachment work was needed, complete the exact 2526 battery-out lever-and-threaded-bolt procedure in the owner guide; do not substitute an M18 mounting sequence or add a general-purpose washer. Use ANSI Z87.1 eye protection, hearing protection and appropriate respiratory protection or the specified compliant dust solution. Keep hands away from cutting edges and below-work hazards. Start only with the working end clear, allow full speed before contact and stop for renewed abnormal behavior. This is the normal job’s start, not an experiment to reproduce the fault.
This no-start decision does not need a sacrificial powered test to be complete. An isolated system marked “awaiting exact charging instructions,” “cooling under pack instructions” or “service required” is a valid finished decision.
Send useful evidence with a service request
Record the tool catalog identity, battery and charger model labels, the matched manual, and whether the observation came from the fuel gauge, work LED or charger. State one-light four flashes, one-light eight flashes, alternating gauge lights, or uncertain—without assigning undocumented colors or timing. Note the task, accessory identity, stock support, whether the event followed prolonged use, the switch state, any actual charger indication and the external checks already performed while isolated.
Do not recreate an unsafe event for a video. Ask the authorized service provider how to present or transport the tool, pack and charger, especially if a battery is damaged; do not assume an unsafe pack can be mailed normally. The complete outcome is a documented safe handoff or a properly resolved owner condition, not a promise that any light pattern proves the tool healthy.
Source basis: Milwaukee 2526-20 operator’s manual, specific safety and identity on page 3, battery removal and fuel gauge/operation on page 4, and contact-care/service boundaries on page 5. Battery charging remains governed by the actual battery and charger manuals.
Models referenced