
Qualify power, lock the pin and control restart
Four panels show MT 400 Quick with disconnected power and an upstream protective device, pin insertion and a flush lever, forward ON/backward OFF with OFF after unplugging, and two-grip supported cutting with clearance below.
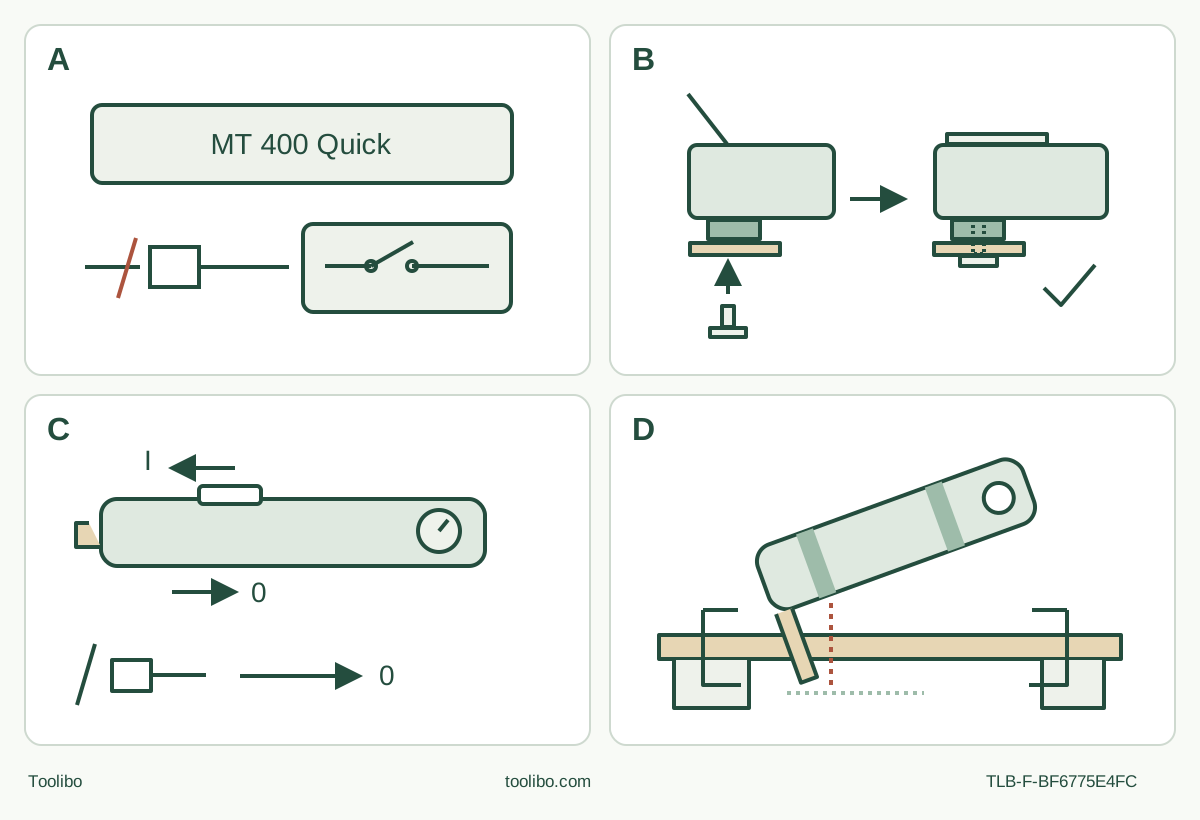
A · Confirm supply and isolate
Match actual nameplate voltage and frequency, with an upstream RCD of at most 30 mA; unplug for all adjustments.
B · Finish the complete clamp
Open to the stop, remove the pin, engage the accessory cams, insert the pin fully and close the lever until locked against the housing.
C · OFF after interrupted power
Forward is continuous ON and backward OFF. After unplugging or a power cut, move OFF rather than relying on an unclaimed restart-inhibition feature.
D · Control the whole cut
Secure and support the visible wood sample, keep both hands on insulated grips and preserve full clearance below and beyond the blade.
Recovered original schematic freshly checked against the 0122 manual. It does not certify an electrical installation or show a pin count; the below-board marking represents clearance, not a numerical cutting depth.
A closed lever must touch the housing
The MT 400 Quick uses a removable spring pin and a cammed accessory holder. After the accessory is seated and the pin inserted fully, the release lever must close to its stop and lock against the housing. Merely lowering the lever part-way is not the specified clamp. The lever can snap back and crush fingers, so this is an unplugged, deliberate operation with protective gloves, not a powered trial.
This guide is for an existing MT 400 Quick matching serial family 01406.. and official service selection 01406000. It follows operating document 170 27 4940–0122 and the currently linked 1025 general safety supplement. The service page warns that downloaded documents can differ from those supplied with an actual product. Match the owner’s nameplate, controls and all enclosed instructions rather than assuming every production date is identical. No current retail kit contents or cordless model equivalence is claimed.
The outcome is a securely mounted genuine, identified Metabo wood-cutting accessory and a short cut in known untreated softwood removed from a structure, followed by inspection and safe storage. Both faces and the entire below-surface path must be visible. The guide does not cover hidden services, unknown coatings, metal cutting or wet material removal.
Qualify the mains supply before touching the holder
The matched manual lists 400 W input, 200 W output and an idle oscillation range of 11,000–18,500 opm. The angle is 1.6° to each side, not 1.6° total. These specifications do not establish the voltage of every regional unit: check that the actual rated mains voltage and frequency match the supply.
The manual explicitly requires an upstream RCD with a maximum trip current of 30 mA. Establish that protection and an intact appropriate supply before a powered cut. Do not change the plug, improvise an adapter or treat Class II construction as an exemption. If the necessary supply cannot be confirmed, leave powered work pending.
Inspect the plug, cable, housing, grips and switch. Keep the slide switch backward at OFF and the plug disconnected for all setup. Route the cable away from the accessory, sharp edges, heat and waste, without a trip hazard or tension on the tool. Do not pull the cable to unplug or carry it. A defective mains cable requires the special original Metabo replacement through service, not a generic owner repair. Use an outdoor-suitable extension if outdoor work requires one, and do not use the tool on wet coatings or solvent-impregnated surfaces.
Choose a known attachment, not a compatibility guess
The manual requires genuine Metabo accessories meeting its specifications, with an OIS or compatible holder. The actual diagram includes OIS and Starlock interfaces and separately illustrates a supplied adapter for the depicted FEIN interface. That does not prove that StarlockPlus, StarlockMax, every FEIN variant or every aftermarket blade is acceptable.
For this sample, use an identified genuine Metabo wood blade whose interface and material instructions match the tool and the known softwood. Confirm sufficient usable reach without planning an unnecessarily deep cut. If the correct identity, approval or fitting parts are missing, stop before mounting. A similar-looking opening is not evidence of compatibility.
Inspect the blade for cracks, bending, wear and contamination. Only sharp, undamaged blades should be used; reject a distorted or suspect accessory rather than compensating with more pressure. Check the wood for nails, screws and other foreign material. The broad material list in the manual is not permission to cut metal with the selected wood blade.
Open, remove the pin, seat the cams and lock flush
With power disconnected, allow a previously used attachment to cool. Wear protective gloves for hot or sharp parts and the lever’s pinch hazard. Open the release lever all the way to its stop, then remove the spring pin. Keep the pin safe and inspect the mating areas for debris or damage.
Place the correct accessory on the holder in the intended orientation, ensuring engagement with the holder’s cams. Choose an orientation that leaves the whole cut accessible and preserves two-hand grip and clamp clearance. Partial engagement is not corrected by closing the lever harder.
Insert the spring pin fully to its stop. Carefully close the release lever to its stop and lock it so it contacts the housing, keeping fingers clear of the snapping path. Check that the accessory is firmly retained while still unplugged. If the pin cannot seat, the lever remains proud or retention is doubtful, investigate the parts and fit before any power connection. Do not run a wobble test.
The illustrated FEIN adapter route is separate and must match the actual documented accessory; this direct-fitting wood sample does not use it. Do not substitute a screw-bolt tightening routine, a magnetic temporary hold or a Bosch-style snap-in instruction. For removal or angle changes, stop, unplug, cool and repeat the lever-and-pin sequence.
Secure the sample and control dust at the source
Mark a short line and clamp the retained wood to a stable platform. Support the waste so it cannot fall onto a hand or close the cut. Inspect both faces and provide clearance under and beyond the full blade path, keeping clamps outside the moving accessory’s area. Never hold the work against your body or reach beneath it while cutting.
Wear protective goggles, hearing protection and appropriate respiratory protection, and work with ventilation and suitable source collection. The manual calls for a suitable extraction unit and preventing particles from accumulating around the work. Do not aim escaping dust or exhaust at yourself, bystanders or settled deposits. Keep others outside the area and organise rest periods to manage vibration exposure.
The dedicated collar extraction attachment is only for the triangular sanding plate. It cannot be presented as a blade hood for this cut. Arrange an appropriate dust-control method for the actual cutting operation; if that cannot be established, leave the cut pending. Vacuum cleanup is preferred to sweeping or blowing, which redistributes dust. Protective clothing should be vacuumed or washed rather than beaten, brushed or blown clean.
Start before contact and keep both hands in control
Hold the insulated handle area with both hands, stand securely and keep the vents clear. Do not inspect the LED light with optical instruments. Keep the blade away from your body, the cable behind the work and the slide switch accessible.
The slide switch moves forward for continuous ON and backward for OFF. The operating paragraph has an inconsistent numbered callout: the overview and actual figure identify the switch separately from the adapter. Use the physical slide switch and its function, not the erroneous number. The speed wheel is a separate control, not an OFF or isolation device.
Determine a suitable setting by a practical trial with the actual accessory. For cutting and sawing, the manual calls for high oscillating frequency; it does not give an exact numbered wood recipe. Respect any accessory limits. With assembly, workholding, dust control and supply checks complete, confirm OFF, plug in and start with the blade clear. Allow running speed to establish before guiding the accessory towards the mark.
Apply even controlled pressure and avoid jamming. A light tilting movement is described for plunge progress; it is not permission to twist a trapped blade sideways or lever the cut open. Let the blade do the work. Stop for workpiece movement, binding, unusual noise, loose retention or deteriorating dust control rather than pushing harder.
A power interruption requires an OFF action
If power is interrupted or the plug is removed, move the slide switch backward to OFF. Do not leave the continuous-run switch forward while waiting for supply to return. The manual requires the owner to prevent an inadvertent restart; this guide does not claim an electronic restart-inhibition feature.
For any abnormal stop, switch OFF, wait for standstill and unplug before inspecting the accessory, pin, lever, support or supply. Remove chips only when stopped; use full isolation before putting hands near the blade. Do not repeatedly cycle the switch to overcome an unknown fault or invent a thermal cooling procedure from another Metabo model.
After the cause is resolved, recheck the full clamp and work setup, start clear of the work and re-enter deliberately. At the end of the cut, switch OFF and wait for complete stop before putting the tool down. Unplug, allow the attachment to cool, then inspect the line, retained wood and accessory security. Accept the result only when the intended cut is suitable and there is no unexplained damage or movement. Improve setup or blade choice on another sample if necessary.
Treat triangular sanding as a new complete assembly
A later dry-sanding task requires the correct genuine triangular plate, suitable 93 × 93 mm abrasive and the dedicated extraction parts. With the plug out and accessory removed, fit the dust-extraction collar on the gearbox flange in the illustrated orientation. The actual figure shows the rear retaining feature engaged first, followed by the collar fitting over the front flange; seat the connection piece as shown rather than improvising a free-hanging tube. Connect a suitable extractor through the illustrated 28 mm hose connection, and refit the sanding plate with the complete pin-and-lever clamp.
Press on the hook-and-loop sheet with its holes aligned to those in the support plate. A hose that merely fits is not proof that the extractor is suitable for the material; follow its complete instructions and check the system’s operation before sanding. Do not transfer another manufacturer’s vacuum-pressure or airflow thresholds to this manual.
Find the appropriate sanding setting by a scrap trial, apply moderate pressure and move to and fro. Keep the work clamped and both hands on the tool. Unplug before replacing the paper or correcting the extraction attachment. Scraping, if separately qualified later, uses a flat accessory angle and medium-to-high frequency; that brief direction does not authorize wet coatings, solvent-treated surfaces or unknown hazardous residues.
Store isolated and hand repairs to qualified service
Finish with the switch OFF and the plug out. Keep the tool and ventilation openings clean using a method that does not send dust into the air or introduce liquid. Inspect the cable and accessory system regularly, and protect sharp edges for storage. Do not open the motor or reshape a holder to accept an incompatible accessory.
Electrical repairs belong to qualified electricians, and a damaged cable needs the specified original Metabo service part. Retain the exact type and enclosed documents for a service handoff. The complete owner skill is knowing when the spring pin is fully home, the lever is truly flush, the power-loss switch is OFF and the dust arrangement is appropriate—not merely recognizing a Quick badge.
Models referenced