
Document match, native flange and whole-cut acceptance
A shows document and isolated battery prerequisites, without inventing a release button. B separates original flange and neutral blade inventory rather than prescribing thread direction or counted pins. C shows a closed lever and forward blade orientation, not a certified hand position. D shows a clamped retained portion, independent waste support and clear cutting corridor.
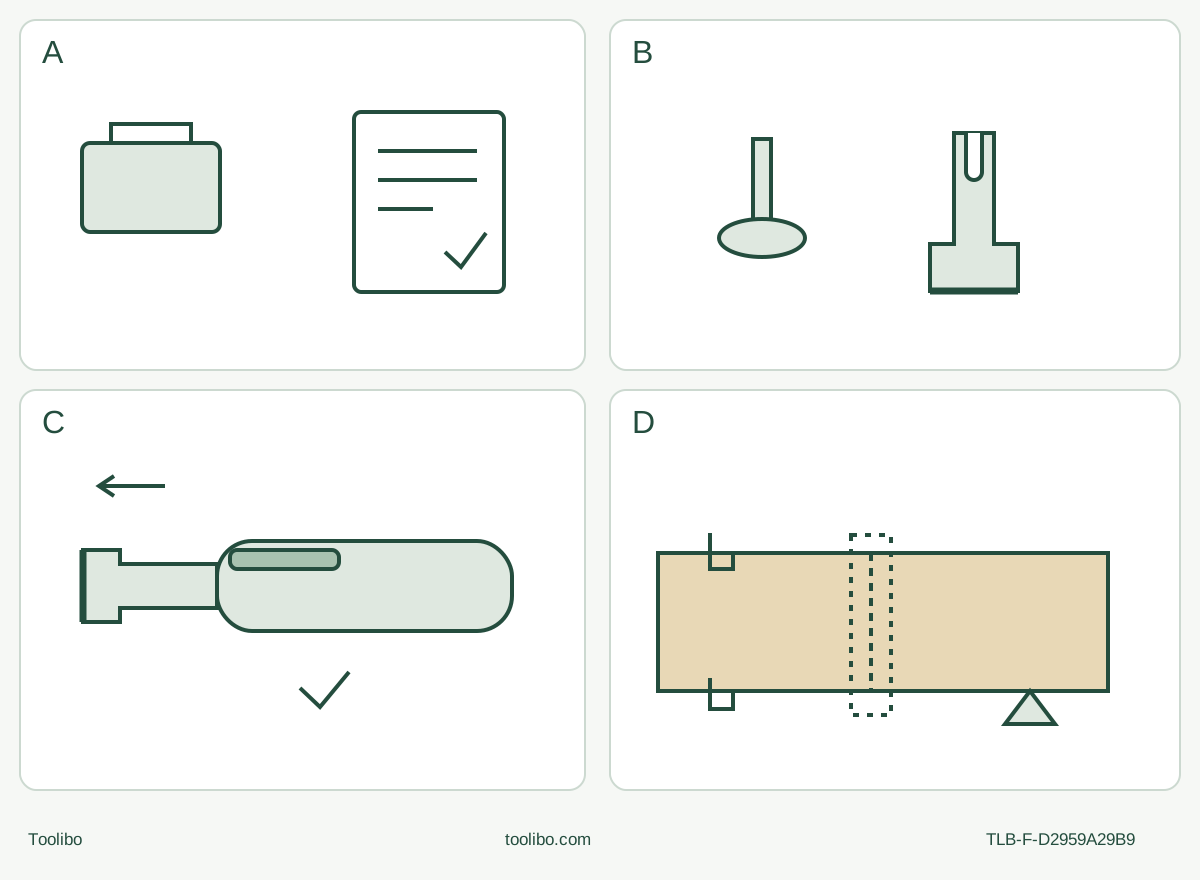
A · Resolve identity and isolate
Physical HCB43B/supplied2023document match only; HCB42B HOLD. OFF/full stop and complete pack removal under actual instructions.
B · Retain original flange
Open lever forward, remove flange/old cooled blade, align selected HA23-63 holes/pins. Replace flange and tighten snugly without guessed torque/thread direction.
C · Close and verify
Return lever fully originalCLOSED, then isolated no-movement check. Teeth straight ahead away from handle; no angled cutting or one-hand permission.
D · Complete and accept
Qualify both grips/PPE/dust and support; selected speed before contact, light cut, chosen full-stop withdrawal, battery out/cool and both-face acceptance.
Original schematic, not scale or a complete interface drawing. B requires actual holes/pins alignment and flange snug tightening before C lever closure, with battery removed. C does not approve angled cutting or one-hand operation. D provides no cut-depth, grip-clearance or capture guarantee; actual two-hand and dust arrangements must close.
This is a documented HCB43B route, not a current HCB42B guide
The current item 57319 product page names HCB42B, while its linked manual cover names HCB43B. That discrepancy is unresolved. This article applies only to an existing actual US HCB43B, item 57319, UPC 193175467546, with its matching copyright-2023 supplied instructions, native release lever/flange, slide switch and speed dial. An HCB42B-only nameplate, another UPC, missing identity or different controls means HOLD for manufacturer clarification. Similar appearance and a shared product page do not establish equivalence.
The project is one short, visible, straight edge-entry separation in clean, dry, uncoated loose softwood. It is not an installed trim cut, enclosed opening, sanding task or claim about the current product’s kit. You need the actual matching original tool and flange, a separately qualified HA23-63 blade, an already commissioned listed power system and a fixture with complete clearance before this project begins.
Qualify the actual blade and power before touching the holder
The separately obtained HERCULES HA23-63 / item 70251 product identifies softwood use, HERCULES compatibility and a maximum 20,000 OPM. It is not claimed included with item 57319. Match the actual blade markings, intended material, condition and native mounting shape; do not extend that evidence to all blades, brands, adapters or materials.
The tool’s manual gives 8,000–19,000 per minute and the product describes oscillations per minute. Its generic symbol legend uses RPM, but that is not evidence of a rotating spindle. The selected blade’s 20,000-OPM limit covers the documented tool maximum; it does not prove suitable reach or installation. The blade product’s width/depth dimensions are not a permissible stock-thickness guarantee. Confirm actual unobstructed working reach through the chosen sample, with clearance for the complete blade, head, hands and support.
Page 5 names battery 57373 and charger 56559, sold separately. This route requires a healthy actual listed pair already correctly commissioned under its own supplied instructions. It does not qualify a new pairing, newer battery alias or charging recipe. The tool manual does not identify the battery-release actuator or removal direction: the owner must already understand and be able to perform the documented removal for the actual pack. Missing instructions or uncertain removal means stop before use, not guess a button.
Before every use inspect the pack for leakage, swelling, cracks or other damage; do not use or charge a damaged pack. Do not use a damaged or modified tool or battery. Keep the pack dry and its terminals away from loose metal. The manual prohibits exposure above 140 °F; this is not a charging-range instruction. Charging, charger placement and electrical requirements remain governed by the full actual instructions, not a substituted modern charger or this cutting article. Page 5 expressly prohibits extension cords with this item’s charger; retain that restriction. Do not open, drop, puncture, short or repair the battery.
Personal suitability and the whole work area
Read the full safety instructions before using the tool. Work alert, with good lighting and secure footing, away from children, pets and bystanders. Do not work in wet conditions or explosive atmospheres. Keep loose clothing, jewellery and hair clear of moving parts.
The manual places specific limits on vibration exposure. Pregnant users and people with impaired hand circulation, past hand injuries, nervous-system disorders, diabetes or Raynaud’s disease should not use this tool. Regular or extended users should first have a medical examination and then regular checks. People with pacemakers should consult their physician before use. Stop for abnormal vibration; tingling, numbness or white/blue fingers calls for prompt medical advice, not another trial. Do not smoke during use. Include vibration-free periods and use a controlled, not unnecessarily forceful, grip. These are manufacturer precautions, not a medical clearance or treatment plan.
Wear ANSI-approved safety goggles with side shields, hearing protection, heavy-duty work gloves and NIOSH-approved breathing protection for the actual hazard. Provide suitable ventilation and dust control. If collection facilities are provided, connect and use them properly; the manual does not establish a native blade hood, port or capture rate. Any required or selected extraction must be compatible with the task, correctly connected, operating and checked under its actual instructions. Remove the tool battery and isolate the extractor before connections or adjustments. Neither hand may be reassigned to hold a hose, and no hose may enter the blade or fixture envelope. If the dust arrangement cannot be qualified, HOLD; a small sample is not an exemption.
Inspect both faces and the full cut route for nails, screws, utilities and foreign material. Exclude unknown coatings, treated or contaminated stock. Clamp the retained portion to a stable bench and independently support the waste without closing the kerf or preventing separation. Do not hand-hold the stock or catch waste. Verify all blade travel, head, two-hand grip and support clearances while isolated. If two secure native insulated gripping areas cannot be used without touching the moving/hot head, lever or vents, choose another qualified setup rather than inventing an auxiliary handle.
Install straight ahead, snug the flange, then close the lever
Slide to OFF, wait for complete standstill and remove the battery completely using the actual pack’s documented method. Let the old accessory cool and use gloves around sharp edges. The incomplete battery sentence on page 6 does not cancel the explicit removal requirements on pages 3 and 7.
Inspect the housing, dry clean grips, switch, lever, spindle, original flange and accessible hardware for damage, looseness, misalignment or binding. The switch must reliably control ON and OFF. Missing or damaged parts, unreadable identity, uncertain hardware or abnormal condition requires qualified correction; do not test a suspect holder under power.
Move the release lever forward to OPEN and remove the original flange. If changing a blade, remove the cooled old accessory before installing the new one. Align the selected blade’s mounting holes with the spindle fitting pins and seat the native interface correctly. There is no inferred pin count, adapter, added washer or cross-brand fastener here.
Install this cutting blade straight ahead only, with teeth facing away from the handle. The manual’s allowance of up to 90° left/right for other accessories is not permission to angle a cutting blade.
Replace the original flange and tighten it snugly before returning the release lever to its original closed position. No thread direction, torque, turn count or extra key is supplied by this article. With the battery still removed, verify that the accessory does not move on the spindle. If an identifiable alignment omission can be corrected, follow the same complete isolated mounting sequence and check again. Persistent movement, damaged pins or unexplained parts means service HOLD, not extra tightening or a powered seating test.
Establish a controlled cut rather than a fault test
The speed dial allows a scrap trial to find a suitable setting; the manual supplies no wood-specific numeric dial recipe. Use the same known softwood and an equally qualified clamp, waste support, reach and dust arrangement. Make adjustments while OFF, stopped and battery-out as a conservative project workflow; no automatic operating mode or reset feature is implied.
Before fitting the pack, recheck OFF, secure native assembly, fixture and dust controls. The actual pack must engage in its correct shape and lock fully under its own instructions. Do not force an uncertain battery. Establish a firm two-hand grip on native insulated gripping surfaces, keeping both hands clear of blade, head, lever and vents. Keep the blade clear of the work, slide the power switch forward to ON and allow it to reach the selected speed before contact.
Enter from the visible edge along the marked straight route with light pressure. Let the tool work, avoiding all foreign objects. Do not twist a trapped blade, force faster progress or move into an unqualified hand/fixture position. If the stock shifts, the kerf closes, the blade loosens, noise or vibration becomes abnormal, or the tool unexpectedly stops, switch OFF and isolate. Do not repeat a power-on to reproduce the fault.
After the wood is completely separated, slide to OFF and wait for standstill before withdrawing along the clear path. This stop-before-withdrawal sequence is a conservative choice for this project; the manual explicitly requires full stop before setting down. Set the tool down safely and remove the battery before handling the result. Allow the blade and workpiece to cool and avoid sharp edges.
Accept the whole result or hand off the unresolved condition
Inspect both faces for complete breakthrough, intended line and size, and an undamaged retained edge. Accept only a full separation without uncontrolled splitting, scorching, unacceptable tear-out or evidence that the support moved. A remaining bridge must not be snapped or pried with the blade. Reject an uncontrolled sample and correct the isolated setup before another attempt; no numerical accuracy or structural-strength claim is made.
Check the isolated blade and mount after the cut. Wipe external surfaces with a clean cloth and store indoors beyond children’s reach. This scope does not include blowing dust into or out of the motor, internal service, battery repair or a charging tutorial. Persistent noise, vibration, overheating, insecure attachment or unexplained stoppage requires qualified service with the exact identity and symptom record.
The troubleshooting table’s conditional reset-button wording and the word “locked” in its maintenance warning do not establish an extra control on this body. Do not invent a trigger, trigger lock or reset procedure from them. Preserve the HCB42B/HCB43B applicability conflict when seeking help.
Operating authority is the complete eight-page HCB43B manual with copyright 2023 and UPC 193175467546: identity 1/8, safety 2–4, power/controls 5, native attachment and operation 6, condition/service 7. The current product is evidence of the link and unresolved identity discrepancy, not permission to apply this route to HCB42B. The separate HA23-63 product supports only the selected blade’s material, rating and bounded fit, not proof that the reader’s assembly has been physically inspected.
Models referenced