
Straight cutting plane versus the rejected bent-blade shortcut
Two panels show the identified MM480 wood blade crossing a secured dowel above the surrounding board with a nonzero remainder Δ, and a crossed-out blade bent down toward the surface.
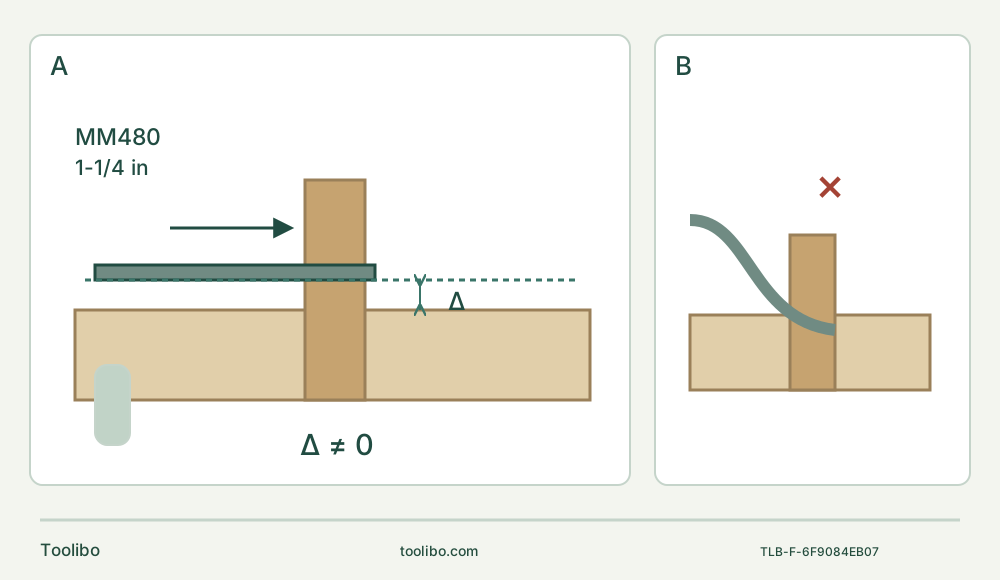
A · Preserve the surface and an honest remainder
Qualify the exact MM35/MM480, stable dowel and full blade clearance while unplugged. Protect/support the blade as the manual allows, fully hand-clamp after temporary spring retention and make controlled passes above the protected surface.
B · Reject bending and inspect the stage result
Do not flex the blade down, twist or pry. Stop and unplug before accepting complete separation, intact surrounding wood and a measured or inspected remainder; final flush finishing, if required, is a separate suitable method.
Original schematic, not to scale. A uses the manual’s nominal blade width only as identity context, not a cutting capacity. Δ must be chosen from the actual unplugged clearance and finishing plan, and may remain nonzero after this stage. The clamp symbol is conceptual: real base, dowel and offcut support must be secure and clear of the full blade path. B rejects bending or scraping-style flex of the saw blade.
“Flush-cut blade” does not promise a finished zero-height surface
The goal is to shorten a protruding wooden dowel in a loose practice assembly while preserving the surrounding wood. A successful powered cut may deliberately leave a small proud remainder for a separate finishing operation. The name “flush-cut” describes the blade’s application, not a guarantee that every tool head, protective layer and approach can cut exactly at the surface without marking it.
This project uses an existing US Dremel MM35 that matches the August 2018 instructions 1600A014GW, with the exact Dremel MM480 HCS wood flush-cut blade. It is an archived-document owner scope, not a claim that this is the latest manual, a currently supplied kit or a tested performance result. The fixture and dowel are known untreated softwood, with no metal, coating or unknown adhesive in the cutting path. The dowel must already be firmly retained in a sound, loose assembly; this article does not establish how to glue it, how long adhesive must cure or whether a repaired joint is structurally adequate.
The outcome is a controlled near-surface cut, complete separation of the unwanted projection and an isolated decision about the remaining height and surface condition. It is not permission to cut installed furniture, a structural peg or a hidden fastener because its exposed end looks wooden.
Decide whether the blade can reach without being bent
Before connecting power, examine the actual MM480, tool holder and intended approach. The manual identifies MM480 as a 1-1/4-inch-wide HCS wood flush-cut blade, but that width is not a dowel-diameter capacity, guaranteed reach or cutting-depth specification for this fixture. Use the actual blade’s usable geometry and material instructions to decide whether the whole cross-section can be reached without the holder, blade body or teeth contacting protected areas.
Mark a cutting plane that preserves the surrounding board. In the diagram, Δ is a deliberately nonzero remainder between that plane and the desired surface. It is not a measured manufacturer offset or a universal recommended allowance. Choose the real remainder from the isolated clearance check and the later finishing requirement. If a safe approach requires an unacceptable remainder, change the method rather than forcing this blade flatter.
Do not bend the blade down against the board, flex it around the dowel, twist it in a cut or press the clamp against the work to close the gap. The manual’s flexible-scraper instructions belong to a different accessory and must never be transferred to this HCS saw blade. An offset blade shape does not make it a spring or a levering tool.
If the full cross-section cannot be cut from the chosen safe approach, do not improvise a blind sweep behind the dowel. A change of approach requires OFF, complete stop, unplugging and a fresh access/support assessment. Choose a different task or tool if you cannot maintain a controlled visible cutting plane.
Clamp the assembly and plan for the released piece
Clamp the base firmly to a stable platform. Confirm, while isolated, that the dowel does not rotate, rock or pull out under the handling needed for this task. A loose dowel can be grabbed and moved by the blade; clamping only the base does not cure an insecure dowel. Reject such an assembly rather than holding the peg with your free hand.
Arrange the unwanted projection so its final separation will not make it fall into the blade, pinch the kerf or strike someone. Use stable support or a suitable workholding arrangement that remains clear of the teeth and holder; never use fingers to catch it. If the small offcut cannot be managed without placing a hand in the blade path, stop and change the workholding or method. Keep bystanders outside the work area.
The MM35 flush-cut instructions recommend scrap material supporting the blade and cardboard or masking tape to protect a delicate surface where the blade rests. Use that guidance only with a stable, clean arrangement that does not introduce a loose support into the teeth. A protective layer is sacrificial surface protection, not a depth stop, clamp or guarantee against a gouge. Its thickness can increase the remainder above the board. Inspect the actual approach with the plug removed, and include the full oscillating envelope, not just the stationary blade edge.
Keep the cord behind the tool and outside every approach and offcut path. Light the area so the cutting plane and adjacent surface are visible. Wear eye and hearing protection, appropriate dust protection and the manual’s protective gloves. Work dry, with ventilation and dust control appropriate to the known wood. Both hands control the tool on its proper gripping surfaces; neither holds the dowel or rests below the cut. Keep vents clear and avoid an overreaching stance.
Match the corded body and complete all five mounting actions
The matched US MM35 is 120 V AC, 60 Hz. Check the actual nameplate, intact plug and cord, and use a suitable dry supply. This bounded bench task uses a suitable nearby outlet rather than prescribing an unverified extension-cord setup. Do not modify the plug, substitute a different regional supply or compensate for an electrical fault by turning the speed dial up.
Set the slide switch backward to OFF and unplug before mounting, adjusting or inspecting. Inspect the exact MM480 and holder for cracks, bending, excessive wear or contamination. Use only Dremel accessories rated at least 21,000 OPM, as this manual requires. Do not silently substitute a similarly named suffix version or another brand merely because it fits the pins.
With the plug removed, loosen the clamping knob counterclockwise. Press the knob to extend the flange enough for the accessory; loosen farther if necessary. Place the blade so every pin engages and the accessory lies flush against the holder. Release pressure on the knob: spring action now holds the blade temporarily. Finish by turning the knob clockwise fully by hand, without uncomfortable force. The fourth action is not the final clamp. This 2018 procedure does not specify the MM12V’s audible-click criterion or a numerical torque.
Choose an allowed blade orientation that preserves the planned clearance and grip. Any angled installation still requires all pins engaged, flush seating and full final tightening. To remove or reorient, remain unplugged, loosen counterclockwise, press the knob and lift the accessory off the pins. Let a hot blade cool first. Mis-seating or an insecure holder is a stop for correction or service, not a reason to test retention with the motor running.
Separate material speed guidance from initial entry
The MM480 table gives dial 8–10 for softwood and 6–10 for hardwood. This project uses known softwood; a hardwood dowel would require its own material confirmation and table interpretation, not an assumption based on pale color. The overall tool range is approximately 10,000–21,000 OPM. No exact cutting rate or dwell time is promised.
The cutting section separately directs a medium initial plunge for control, with an increase possible after the initial cut. Preserve that distinction: the softwood row is not an instruction to start every entry at dial 10, and “medium” is not an invented exact dial number. Practise the approach on a similarly secured matching sample before risking the intended surface.
Check OFF before plugging in. Start with the accessory clear by sliding the switch forward, then bring it to the marked plane under control. Make smooth, light, progressive passes through the dowel while preserving the blade plane and surface clearance. Let the correct sharp blade do the work; do not force it to erase the last gap to the board. The source’s general flush-cut movement does not override its explicit prohibition on twisting the tool in the cut.
As the remaining connection becomes small, keep the setup stable and the offcut managed. Do not grab the piece, snap it off or use the saw blade to pry the final fibers. Complete the cut under control. If fibers remain after stopping, locate them while unplugged and plan another qualified pass; a hanging splinter is not a reason to pull against the retained dowel.
Stop when the geometry or behavior changes
Unexpected vibration, movement of the base or dowel, a catching blade, smoke, unusual heat or loss of surface protection means stop. Switch OFF, wait for complete standstill and unplug before checking the clamp, accessory, fixture or cord. Do not repeatedly restart into a jam or increase pressure to conceal blade wear. A damaged accessory must be replaced; persistent unexplained behavior requires qualified Dremel service.
At normal completion, cease cutting contact under control, switch backward OFF and wait until the blade has stopped before placing the tool down. Unplug before clearing the separated piece, touching the blade or measuring the result. The blade can remain hot after stopping.
Accept the protected cut—or choose another finishing method
Inspect the dowel and surrounding surface with power disconnected. The unwanted projection must be fully separated, the retained dowel must remain stable, and the intended cutting plane must not have wandered into the board. Reject a gouge, scorching, torn-out fibers below the intended surface, displaced fixture or damage to the surrounding wood. Protection that shifted or was cut through is evidence to reassess the setup, not proof that the underlying board escaped damage.
Measure or inspect the real proud remainder against the finishing plan. A small intentional remainder can be an accepted result of this powered cutting stage, but it is not a claim that the dowel is finally flush. If the final requirement is a level surface, finish the remainder with a separately suitable controlled method and inspect again. Do not bend this blade, grind the surrounding board or call an unmeasured remnant “zero.” No numerical tolerance or joint-strength approval is supplied here.
With the tool unplugged, clean the accessible holder and exterior as instructed, keep vents clear without pointed objects and avoid plastic-damaging solvents. Internal maintenance, cord repair and brush service belong with the specified service provider. Store the tool and sharp accessory safely. The accepted sample proves only that this particular visible fixture, blade and approach achieved its stated stage outcome.
Source basis: archived MM35 instructions 1600A014GW, August 2018, safety pages 2–4, US identity 8, Easy-Lock 9–10, controls 11, actual no-twist figure 12, MM480 wood/speed row 13, flush-cut support/protection 15 and maintenance 18. The dowel fixture and nonzero finishing allowance are explicit project decisions, not manufacturer ratings or structural guidance.
Models referenced