
Four checks after a pause
Four labeled checks compare FLEX five-level panel timeout and memory, Bosch six-position dial and light-only switch stage, battery removal, and controlled loose-stock support.
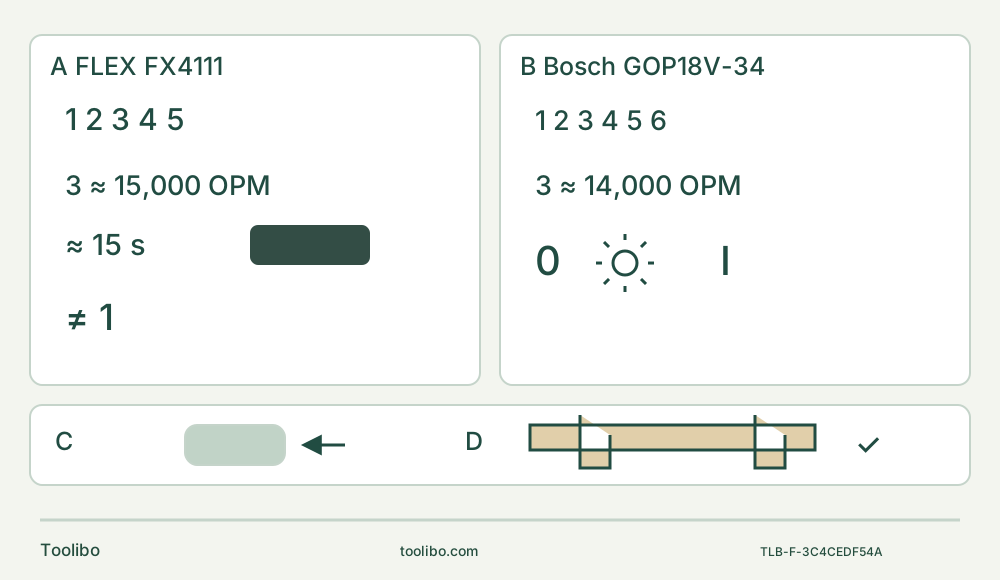
A · Check the remembered FLEX level
Wake the panel with the slide OFF; approximately 15 seconds of inactivity hides the LEDs but does not reset the last active speed. Initial plunge is documented level 3, with changes only OFF or controlled no-load.
B · Distinguish Bosch light and motor
First forward position is light only; second I powers tool and light; fully rearward 0 is OFF. The six-position dial is not the FLEX scale, and initial medium speed is not an invented mandatory dial 3.
C · Isolate for physical changes
OFF, complete stop and battery removal precede attachment work, handling or setup corrections. Each actual approved battery system remains separate; no cross-platform substitution.
D · Prove a complete supported setup
Choose the matched blade, control both stock and waste, keep the full blade path clear, and inspect the finished sample only after stopping and isolation. Missing evidence or abnormal behavior means hold or qualified service.
Original schematic. Both level-3 OPM values are approximate table entries, not equal performance or a universal plunge prescription. A’s dark rectangle means the speed panel has timed out, not that the tool is isolated or reset to 1. B’s light symbol is the first forward switch position. C represents removal/isolation only, not a shared battery shape or removal direction. D requires full clearance and independent waste control, not merely a checkmark.
Decide how the next start will be controlled
FLEX FX4111 and Bosch GOP18V-34 can both support a documented clean-wood task, but their control states are different. This decision is for an owner choosing between already qualified US systems—not selecting a bare tool from a shared “18/24 V” label. The useful outcome is a written start-and-stop plan that still works after a pause or accessory change. A dark display, a worklight or a familiar number is not that plan.
Use the exact FX4111 manual linked for this body and the March 2023 GOP18V-34 instructions. For FLEX, the actual undamaged battery and charger must be among the manual’s listed models, already commissioned under their own instructions. For Bosch, the actual Bosch or permitted AMPShare pack and charger must satisfy its exact battery/charger list and their own instructions. This article supplies no charging procedure, cross-platform adapter or promise that either battery comes in a current kit. If the power-system identity is unresolved, stop the selection there.
Case one: returning after the FLEX panel has gone dark
An owner used a higher speed, stopped, then left the tool while preparing the next sample. On FX4111, approximately 15 seconds without input turns off the speed-panel LEDs. It does not reset the selected level to 1. Pressing a speed button wakes the panel and displays the remembered setting; the next start also recalls the last active speed.
That behavior makes the pre-start setting check important. Keep the slide switch rearward in OFF while waking the panel and selecting the intended level. This is a control check on an otherwise assembled, safe system, not permission to touch an accessory with the battery installed. For assembly, positioning, adjustment of attachments, handling the blade or workholding changes, switch OFF, wait for full stop and remove the battery first.
FLEX permits speed changes only OFF or while running at no load, with a firm soft-grip hold and control of the tool. It does not authorize pressing speed buttons while the blade is engaged in a cut. For the initial plunge, its cutting instructions explicitly specify level 3, approximately 15,000 OPM; speed may be increased after the initial cut. If this project’s workflow would require repeatedly changing speed with the blade buried, change the workflow rather than choose a brand to excuse it.
Case two: a Bosch light without blade movement
The GOP18V-34 slide has three relevant states. The first forward position turns on the worklight only. The second, marked I, turns on both tool and light. All the way rearward to 0 turns both off. Do not mistake the light-only position for a failed motor, and do not move to I merely to investigate a suspicious condition. Keep the working end clear, first establish the actual switch state and stop if the behavior does not match the instructions. Do not look directly into the light.
The Bosch dial has six positions, not FLEX’s five electronic levels. Bosch setting 3 is approximately 14,000 OPM, while FLEX level 3 is approximately 15,000. These are table values, not measurements or equal performance claims. Bosch’s initial-plunge instruction says medium speed for control, then permits increasing it; it does not specify that every initial plunge must use dial 3. A note containing only “use 3” loses the tool-specific reasoning.
For this comparison’s conservative workflow, select the Bosch dial with the tool OFF and battery removed, then check it before inserting the pack. Its general adjustment-isolation instruction remains in force. The light-only position is not isolation for blade handling, nor is stopping vibration enough while a battery remains installed.
Source basis: FX4111 instructions, pages 12–14 and 17; GOP18V-34 instructions, pages 10–11 and 16. No automatic return-to-low-speed or fault-restart feature is inferred.
Neither control choice overrides the holder rules
Choose a documented blade before choosing a convenient button layout. This bounded wood example uses FLEX FA401002 HCS or Bosch OSL114 HCS, each for the matched tool, known clean softwood and actual usable reach. FLEX’s mounting warning requires FLEX accessories rated at least 20,000 OPM; this guide does not turn the manual’s broader compatibility wording into universal approval. Bosch requires its accessories rated at least 21,000 OPM and explicitly accepts OSL/OSP but excludes OSM on GOP18V-34. Similar star outlines do not erase those restrictions.
Wear protective gloves for sharp accessory changes, allow hot parts to cool, and keep batteries removed throughout installation. On FLEX, turn the release lever counterclockwise past the first click and resistance to the second click. Its jaws are now closed for the change. Place the accessory on a flat surface, align the star interfaces and turn the lever clockwise back to its original position; the jaws open and lock the accessory. Do not install it facing backward. For removal, the same two-click opening movement releases the accessory so it can fall: arrange a safe landing area rather than reaching for a hot or sharp falling part.
On Bosch, use a clean holder and correctly orient the permitted accessory with its model number facing the holder. Press the holder onto the accessory until it snaps into position; there is no need to open the release lever for installation. Check that the accessory is fully and securely seated. Its release operation is not the FLEX two-click procedure. A damaged, incompatible or incompletely retained accessory is a hold/service outcome, not a reason to run the motor to “settle” it.
Turn either choice into a complete sample plan
Suppose the next task is a short, visible open-edge cut in loose, uncoated softwood. There is no manufacturer-rated sample dimension implied: select the line only after checking blade reach, both faces, the entire cutting region and clearance behind the cut. Reject stock with unknown coatings, embedded metal or hidden contents. Do not extend this example to installed trim or a wall.
Clamp the retained material and support the waste independently so it cannot drop or pinch the blade. Keep clamps and the bench outside the full cutting envelope. Provide appropriate dust controls and the actual manuals’ eye, hearing and respiratory protection. Neither model’s worklight replaces adequate workspace lighting or a clear view of the far side. If the proposed cut cannot keep both sides controlled, change the setup before inserting a battery.
After the selected isolated installation, remove adjustment items, confirm OFF, then securely install only the qualified pack. For FLEX, wake and check the speed panel while OFF and select initial level 3. For Bosch, verify the already set appropriate medium initial speed and deliberately distinguish light-only from I. Hold the tool securely with both hands and wear protective gloves for cutting, keep vents clear and start with the blade clear of the work. Enter lightly; do not force, bend or twist the blade. Strong vibration or poor progress calls for stopping and checking the setup, not automatically increasing speed or pressure.
If a speed change is needed on FLEX, leave the engaged-cut state before adjusting: use its documented OFF or controlled no-load condition. For this Bosch sample, stop and isolate before changing the setting. Never handle or reposition the sample with a moving blade. After any interruption requiring an adjustment, treat the next start as a new check of switch, speed, accessory and support—not a continuation guaranteed by memory.
At completion, switch OFF, wait for complete stop and remove the battery before setting up inspection or clearing waste. Accept the sample only if it follows the intended line and size, fully separates and shows no uncontrolled tear-out, scorching or support movement. A failed sample means correct the documented setup before repeating; it is not a comparative test showing which machine is stronger.
Separate normal indication from a stop condition
FLEX’s speed-panel timeout is different from its worklight behavior. The worklight normally remains on for about 10 seconds after switch-off. Rapid worklight flashing indicates overload or excessive heat; slower flashing indicates low battery capacity. Switch OFF and isolate before correction. Rest or cool the tool and pack separately as instructed; charging belongs to the actual approved pack/charger instructions. A worklight that fails to illuminate at switch-on or suddenly goes out during operation needs customer service or authorized service assistance, not repeated trial starts.
Bosch may reduce speed or shut down under overload or unsuitable battery temperature. After automatic shutdown its instructions require switching OFF and allowing the battery to cool before a deliberate subsequent start. Do not treat protection as permission to keep forcing a cut or as assurance that an unexplained stop is harmless. Damage, a recurring unexplained stop, abnormal behavior or unresolved power compatibility means stop using the system and obtain qualified help.
Make the selection explicit
Choose the qualified FLEX route if its remembered setting and deliberate OFF/no-load speed changes fit the intended task and the owner will check the panel before every new start. Choose the qualified Bosch route if the six-position dial and deliberate light-only/I transition fit that workflow. If neither system has the right supported blade, power evidence and controllable workholding, choose neither yet. Record the actual tool, accessory, start setting, switch sequence and stop conditions together. A useful comparison leaves a complete operating decision—not a transferable number or an unsupported winner.
Models referenced