
Three model-specific care distinctions
Panel A pairs 2526-20 with a damp-cloth symbol. Panel B pairs SMT 6-22 with a soft brush and a separate housing cloth. Panel C distinguishes T tool-contact dry wiping from B battery-contact wiping crossed out.
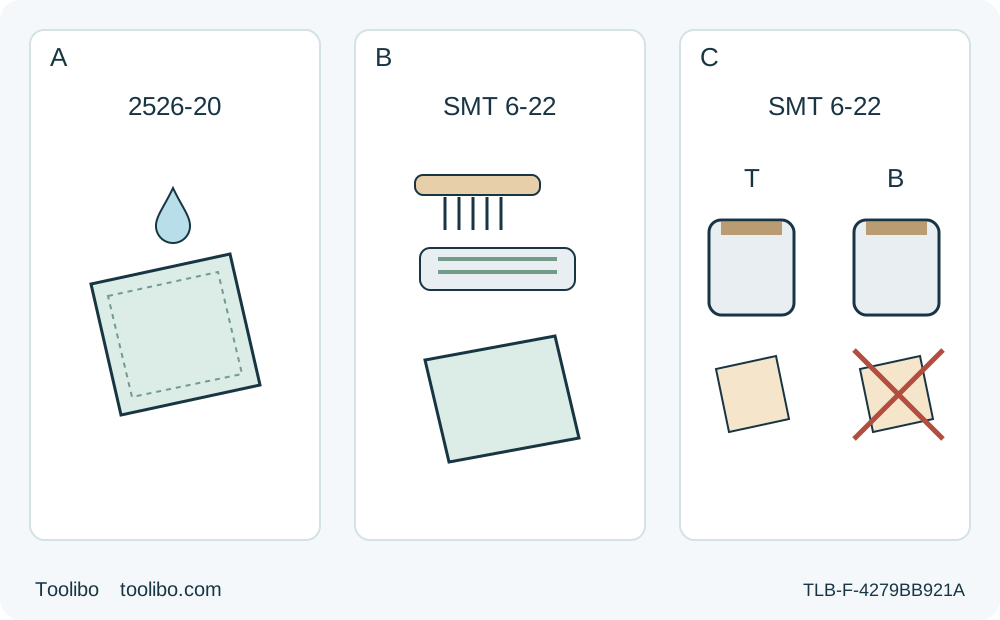
A · Milwaukee exterior
Use the specified mild soap and damp cloth without immersion or liquid entering the 2526-20.
B · Hilti housing and vents
Use a dry soft brush on SMT 6-22 vents and only a slightly damp cloth on its housing; no silicone cleaners.
C · Hilti contacts are not interchangeable
T means tool contacts cleaned with a dry clean cloth; B means battery contacts left untouched with factory grease preserved.
Conceptual surface-care symbols, not actual tool shapes, contact counts or cleaning-liquid quantities. All care is performed OFF with battery removed and cooled components. A means Milwaukee mild soap and damp cloth without ingress. B means Hilti dry soft brush for vents and only a slightly damp housing cloth. C permits a dry clean cloth on Hilti tool contacts, but forbids touching or wiping battery contacts or removing their factory grease; the crossed wipe does not itself indicate a defective battery.
Finish with a stored tool or a clearly identified hold
Post-use care is not a cosmetic wipe followed by a quick trigger test. Its useful outcome is an isolated, clean, dry and externally inspected tool, stored with a recorded disposition. This workflow covers the US Milwaukee 2526-20 under manual 58142526d2, 05/20, and the Australian Hilti SMT 6-22 generation 01 under manual 2381015, 20240813. The Hilti example retains its trained, authorized professional-user scope. Different models, markets or supplied instructions require their own care rules.
Both examples assume an already commissioned, genuine, documented battery system and routine dust from a known material whose exposure controls are understood. This is not battery servicing, internal cleaning, a charger-care procedure or a way to certify an unknown used tool. No current kit, availability, newest supplied revision or hands-on test is claimed. The manufacturer’s care passages remain model-specific even where the tools look similar.
Establish isolation and a clean working area
Finish normal shutdown, wait for complete accessory standstill and remove the battery. Leave the switch OFF. A lamp going out, an empty pack or a protection shutdown is not isolation. Let the tool and accessory cool before close handling; use appropriate protection against sharp edges when an accessory must be handled. Keep the removed pack away from loose metal that could bridge its terminals.
Work in good light on a stable surface, with ventilation and eye/respiratory protection appropriate to the known dust. Do not move dusty equipment into a clean living space and then disperse the dust there. Keep cleaning cloths separate from oily finishing rags and metal-contaminated debris. Do not use the tool’s motor to blow itself clean.
The routine exterior workflow does not require opening the housing or holder. Keep clear of any fitted sharp accessory. If an accessory obstructs safe access, first remove it using the complete matching owner procedure with power isolated, and control its hot or sharp edges; do not reach around it to save time. The two holder systems are not interchangeable, and this cleaning guide does not replace their removal instructions.
Before touching accumulated material, ask what it is. Unknown coatings, suspected asbestos or other hazardous contamination, liquid ingress, battery leakage, melted plastic or a burning smell are not routine dust. Stop the ordinary cleaning process and obtain the appropriate manufacturer or qualified contamination advice. Do not try to make such a tool acceptable by polishing its housing or energizing it to see whether it still runs.
Inspect before cleaning hides the evidence
Record the model, date, last material worked and any abnormal behavior already observed during use. Photograph a defect before wiping it away if that will help a service request. Inspect visible housing sections, handles, labels, ventilation openings, switch area, attachment interface and battery seating area without probing into openings or dismantling components.
Look for cracks, broken or loose parts, damage around the accessory holder, abnormal wear, lodged debris and visible heat damage. Distinguish external loose dust from deposits that cannot be removed without forcing or opening the tool. Note sticking or damaged controls observed during normal use; do not reconnect power to reproduce the fault. A readable identity label matters because it determines the applicable parts and service instructions.
Milwaukee’s maintenance section calls for checking undue noise, misalignment, binding and breakage, and directs repairs to its service facility. Noise here means the history from normal work, not permission for a powered diagnostic run. It also calls for service inspection after six months to one year depending on use. Keep that service interval separate from this after-use exterior check: a clean tool is not a substitute for due service.
Milwaukee 2526-20: mild soap and a damp cloth, not a wash
Remove dust and debris from the vents and keep the handles clean, dry and free from oil or grease. Page 5 specifies mild soap and a damp cloth for cleaning. Use that limited exterior method without allowing liquid to flow into the tool; never immerse the tool, battery or charger. A damp cloth is not a spray bottle, running water or permission to soak the switch and battery receptacle.
The same passage warns that plastics and insulated parts can be damaged by agents including gasoline, turpentine, lacquer thinner, paint thinner, chlorinated cleaning solvents, ammonia and household cleaners containing ammonia. Flammable or combustible solvents do not belong around the tool. Do not substitute an aggressive solvent because ordinary cleaning leaves a mark; a stubborn stain is less important than intact insulation and a sound housing.
The page’s troubleshooting paragraph mentions cleaning battery-pack contacts when the tool fails to start or deliver full power with a charged pack. That is a separate diagnostic context, not a detailed contact-cleaning method for this routine workflow. It does not turn the soap-and-cloth instruction into permission to wet contacts, scrape them, sand them or apply contact spray. This guide performs no contact restoration or powered retry. Suspect, damaged or contaminated contacts are a hold for the matching battery instructions and Milwaukee service advice, not an invitation to borrow the Hilti method below.
Hilti SMT 6-22: distinguish housing, vents and two contact sets
Hilti’s printed page 28 assigns different methods to different surfaces. Carefully remove stubborn dirt. Clean the air vents carefully with a dry, soft brush. Use only a slightly damp cloth on the housing, and do not use silicone-containing cleaning agents because they can attack the plastic. Clean the contacts on the tool itself with a dry, clean cloth. Do not transfer the damp housing cloth to those contacts.
The removed battery is a different component. Printed page 29 explicitly says not to touch its contacts and not to remove their factory-applied grease. Do not interpret “clean the product contacts” as “wipe every contact on the tool and pack.” Keep a dry tool-contact cloth separate from the battery, and do not scrape, polish or degrease the battery terminals. Nor does the factory-grease instruction authorize adding a new lubricant of your choice.
The manual allows a dry, soft brush or clean, dry cloth for routine battery exterior dirt, keeps its vents clear and prohibits silicone-containing cleaners. This article does not expand that into battery repair or terminal treatment. If the pack has been soaked, damaged or has suspect contacts, stop ordinary care and follow its specific damaged-battery and Hilti Service instructions. Do not insert it merely to check whether the tool accepts it.
After care, Hilti requires visible parts and controls to be checked for damage and correct function, and guards/protective devices to be installed and in working order. Within this isolated workflow, check only the accessible mechanical condition without force; if any required function cannot be established safely or a device is missing, retain the hold for Hilti Service. Do not replace the manufacturer’s requirement with an unsupported powered test or a housing-only inspection.
Do not generalize a cleaning method across models
The Milwaukee mild-soap allowance does not authorize soap on Hilti’s tool contacts or battery terminals. Hilti’s dry brush instruction is not a universal compressed-air specification. Neither selected care passage provides an air pressure, nozzle distance or permission to pressure-wash the tool; this routine uses no air blast, liquid spray, solvent bath or internal probe. Another manufacturer’s dry, oil-free air instruction, if applicable to another exact model, must be read in that model’s own context rather than imported here.
Work only at accessible exterior surfaces. If debris remains in a vent, switch or holder and the documented gentle method cannot remove it, stop. Do not open a motor housing, dismantle a switch, force a metal pick into a slot or lubricate an unidentified part. A cleaning problem that needs disassembly has become a service problem.
Inspect again, store, and record the disposition
After cleaning, check that the accessible vents are clear, grips are dry and not slippery, no cloth fibers or debris remain at the tool’s connection area, and visible labels, controls and protective components are intact. Do not reconnect power while any surface remains damp. Cooling and drying are conditions to verify, not a fixed waiting time invented for every tool.
Store the isolated tool in a clean, dry place protected from accidental access and damage. Keep the battery removed and its terminals protected from contact with loose metal. For Hilti, follow the stated cool, dry storage and actual tool/battery temperature limits; keep batteries away from direct sunlight, heat sources and storage behind glass, and do not store them on the charger. Keep tools and packs inaccessible to children or unauthorized users. Follow the actual battery instructions for storage rather than applying the tool’s operating temperature as a battery-storage rule.
Close the record with one of these decisions:
- Routine care complete; stored for the next pre-use check: identity and material history are known, only the applicable gentle methods were needed, exterior checks pass, the tool is dry and cool, and the removed pack has no unresolved concern. This is not an electrical-safety certificate or permission to skip the next pre-use check.
- Hold pending information or completion: contamination is uncertain, drying/cooling is incomplete, matching battery care instructions are unavailable, or a required accessible check cannot be completed. Label the reason and do not return the tool to the ready-to-use location.
- Service required; do not use: damage, malfunction, persistent blockage, suspect contacts or an unresolved abnormal-use symptom remains. Record the observation and contact Milwaukee service or Hilti Service as appropriate; do not disassemble or repeatedly restart the tool.
The source basis is Milwaukee 58142526d2, pages 2–3 and 5, and Hilti 2381015, printed pages 20–21 and 28–30, with its product overview. These support a bounded maintenance and storage decision, not a universal cleaning recipe, a battery diagnostic or proof of remaining service life.
Models referenced