
Four differences before a system decision
Four comparison rows show separate 12 V Max and 20 V Max families, MM12V mode/trigger versus MM20V dial/slide, different knob/flange actions with neutral uncounted engagement, and complete-system evidence lists.
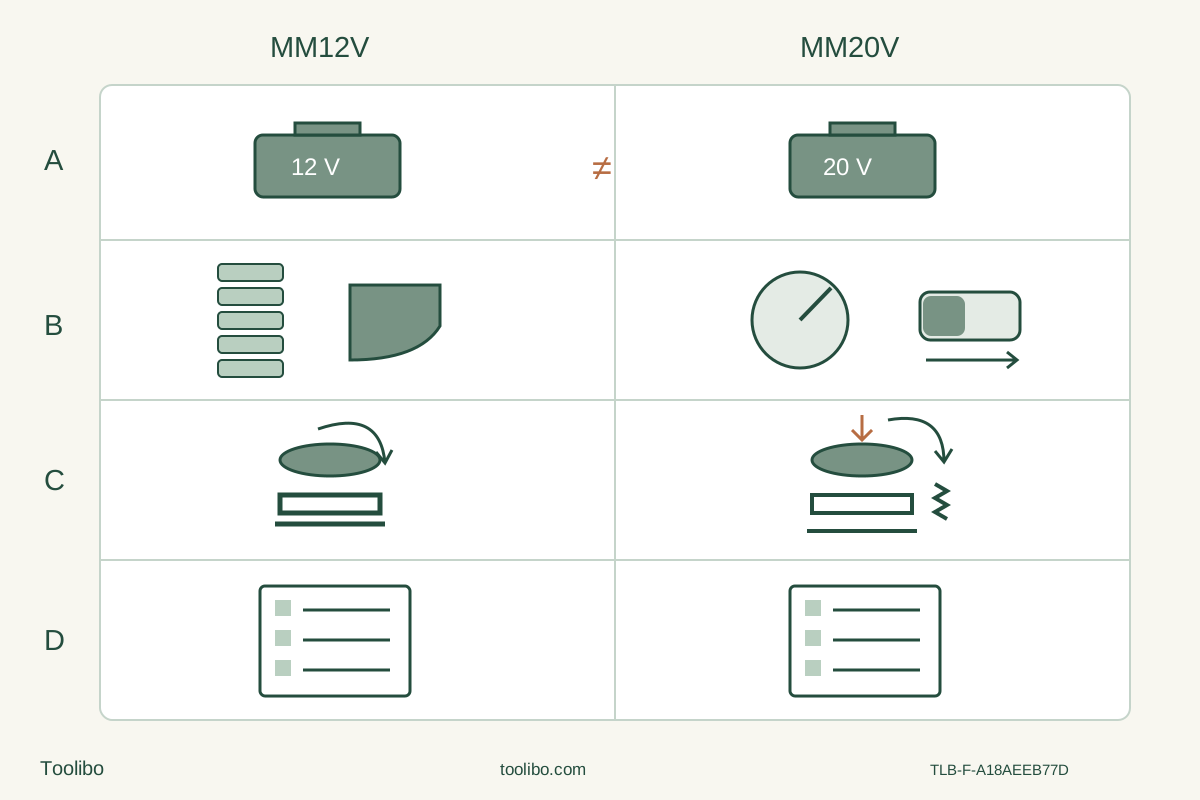
A · Keep the power systems separate
MM12V requires the owner’s exact approved list and commissioned 12 V system; the bounded MM20V example uses its documented B20V20 with actual approved charger instructions. No cross-family substitution.
B · Choose the stopping and speed workflow
MM12V changes application mode only OFF and varies speed with trigger pressure; lock-on changes how release behaves. MM20V has a retained ten-position dial and forward/backward slide.
C · Finish the correct clamp sequence
MM12V loosens to flange clearance, seats all pins, uses magnets temporarily and tightens clockwise to its documented click. MM20V loosens, presses, seats, releases temporary spring hold and then fully hand-tightens clockwise.
D · Close the whole task evidence
Confirm exact accessory/material, approved power, workholding, dust controls and actual operating instructions. Missing power evidence or a speed-dependent unresolved conflict means pause, not a presumed ready system.
Original schematic. Battery labels denote maximum-voltage family identities, not equivalent packs, nominal-voltage values or performance measurements; manuals state 10.8/12 V Max and 18/20 V Max. C does not show an actual pin count. Both sides require final clockwise hand tightening: MM12V adds the documented audible click, while MM20V’s spring is temporary retention, not the final clamp. D is evidence to obtain, not a current kit inventory.
Choose a complete control-and-power system, not the larger voltage label
MM12V and MM20V share the Dremel name and an Easy-Lock description, but their controls, temporary accessory retention and power evidence are not interchangeable. This comparison is for the exact admitted US owner documents: MM12V manual 1605A002FH, November 2024, and MM20V manual 1605A000KS, May 2021. Match the actual body and supplied instructions; no current kit or hands-on performance ranking is implied.
The practical decision is whether an owner can assemble a complete supported system and manage its particular start, stop and speed controls for a known task. A voltage label alone does not establish useful cutting force, runtime, finish or safe access. Nor does owning Dremel accessories establish that a battery or charger from the other system is suitable.
Close the power gate before comparing convenience
The MM12V manual describes 10.8 V/12 V Max and permits only Dremel 12 V series batteries, while referring the reader to a separate included battery/charger list. That separate list is not established in this evidence set. Therefore this branch requires the owner’s actual matching list, approved already commissioned combination and complete battery/charger instructions. Do not infer a named pairing from the voltage, a socket that seems to fit or a retailer’s kit photograph.
The MM20V document specifies 18 V/20 V Max and explicitly permits B20V20 or the batteries on its included list. The bounded owner example uses an already commissioned, approved B20V20 system with its actual charger instructions. That named pack does not supply a charging tutorial or prove every “20 V” pack is compatible. Neither branch permits improvised adapters between the two power systems.
There is also an unresolved MM12V speed boundary: the matched November 2024 manual specifies 7,000–20,000 OPM, while the US product information gives a 5,000 minimum. Do not promise operation at 5,000, invent mode-specific numerical bands or resolve the conflict by averaging. If a planned application depends on an exact minimum speed, obtain manufacturer clarification for the actual revision before choosing it. Sources: MM12V page 10 and its matched US product record; MM20V pages 10–11.
The two control styles answer different operator needs
On MM12V, the application selector cycles from scrape through grout, sand and cut to maximum range, then repeats. Change mode only with the tool OFF. Within the selected mode, trigger pressure varies speed between that mode’s permitted minimum and maximum. The labels are not permission to use an unsuitable scraper, abrasive or blade, and the manual’s mode display does not assign a published numerical speed band to each icon.
Its lock-off is pushed backward to unlock and forward to lock. The trigger turns the tool on when squeezed and off when released, unless lock-on has been deliberately engaged. To latch continuous operation, fully squeeze the trigger, press the lock-on button and release the trigger. Cancel by squeezing and releasing the trigger without pressing lock-on; the lock-on or application-selector button can also disengage it. Before inserting a pack, the trigger must be fully released and not locked ON. Do not confuse the lock-off with battery removal for setup.
MM20V instead has a ten-position numeric dial and a separate slide: forward ON, backward OFF. The dial setting and the slide’s running state are different choices. The exact accessory/material table supplies starting guidance; the slide is not a proportional trigger. An operator moving from one body to the other must consciously relearn how continued running ends, rather than relying on releasing a trigger that the MM20V does not have. Sources: MM12V pages 13–16; MM20V pages 15–16.
“Easy-Lock” does not mean the same installation action
For both tools, switch OFF, wait for complete stop, remove the battery, allow hot accessories to cool and wear protective gloves for cutting-accessory changes. Use only the exact Dremel-specified accessory that is undamaged, correctly rated and approved for the material. The MM20V manual expressly requires Dremel accessories rated at least 21,000 OPM. Do not turn a shared family name into universal interface compatibility.
On MM12V, turn the clamping knob anticlockwise until the flange extends far enough for the accessory. Seat it on all actual clamping pins and flush against the holder. The magnets only hold it while it is secured. Turn the knob clockwise fully, within comfortable hand force, to the manual’s audible tightening click. There is no instruction to press the knob down to create clearance on this body.
On MM20V, first loosen anticlockwise, then press the knob to extend the flange. Engage all actual pins and seat the accessory flush. Release the knob: the spring now holds it temporarily. Finish by turning clockwise fully by hand, without uncomfortable force. Releasing the spring is not the last step, and the MM12V click must not be invented as this document’s completion signal. Verify secure attachment while isolated; missing seating, damage or unexplained looseness requires correction or service, never a powered settling run. Sources: MM12V page 11; MM20V pages 11–12.
Worked choice: an owner already has a qualified wood-cut system
Suppose the job is a short cut in a clean, untreated softwood sample, clamped with visible front and back and supported waste. The owner already has a fully qualified MM20V/B20V20 system and an identified, intact MM480 blade whose actual rating and reach are suitable. The matched MM20V table places MM480 softwood work at 8–10. Its cutting instructions separately say to begin an initial plunge at medium speed for control, increasing after initial entry if appropriate. The material-table range is not an instruction to plunge immediately at the highest number.
That complete setup can be a candidate without buying MM12V merely for a different control label. Check the entire blade envelope, secure workholding, both-hand grip, required protective gloves during use, eye/hearing and dust protection, then use a secured scrap trial under the complete owner workflow. No claim is made that the two bodies would cut equally fast or that the blade’s stated size guarantees a particular stock thickness.
If the same owner instead wants a mode selector and variable trigger for ordinary short operations, MM12V can be considered only after its separate power-list gate and exact accessory approval close. Do not copy “8–10” onto a five-mode selector. Select the actual cutting mode, use the matching instructions and validate control on a supported scrap. For a short task where releasing the trigger is the intended stop action, leave lock-on unused; this is a task choice, not a claim that lock-on is defective.
Worked choice: the purchase is not yet a usable system
Now suppose a seller offers an MM12V body and a loose unlabelled pack, or an MM20V body with no confirmed charger. Neither is a complete selection just because it powers up or its gauge lights. Identify the actual parts and obtain the missing manufacturer approval and instructions before treating it as ready. A power-list gap is not solved by owning the right blade.
Likewise, a box of miscellaneous accessories does not settle material suitability or clamping. List the exact blade/pad, correct attachment procedure, approved power components and required dust/workholding equipment separately. Compare the cost and practicality of completing that verified system without assuming current package contents or publishing a price-based winner. If the information cannot be obtained, the outcome is a hold or a different fully documented system.
Record the choice and its stop conditions
The final choice should state the exact body/document, approved power evidence, accessory/material, control plan and complete task setup. Neither a mode icon nor a numeric dial replaces the blade’s own limits. Do not transfer scraper-flexing instructions to a saw blade or twist a blade to turn a corner.
For MM12V ordinary stopping, its manual says to remove the tool from the work before switching OFF; then wait for complete stop and isolate before handling or inspection. MM20V’s backward slide must be deliberately used to stop; keep control until all movement ceases and remove the pack before adjustments. If material shifts, the blade binds, mounting changes or an error appears, stop and follow the exact body’s instructions rather than borrowing a recovery signal from the other.
Accept any later practice cut only after isolation, with complete intended separation, no uncontrolled damage or shifted support, and no unresolved attachment issue. A choice that still depends on an unverified power pair, an unresolved speed requirement or unknown accessory identity is not complete. The useful winner is the system whose evidence and operating sequence fit the actual task—not the larger number on the battery drawing.
Models referenced