
Four gates for the cordless wood setup
Four panels show a separated battery, five knob-clamp actions, the MM480 softwood 8–10 range and minimum accessory rating, and clear supported stock at a marked cut.
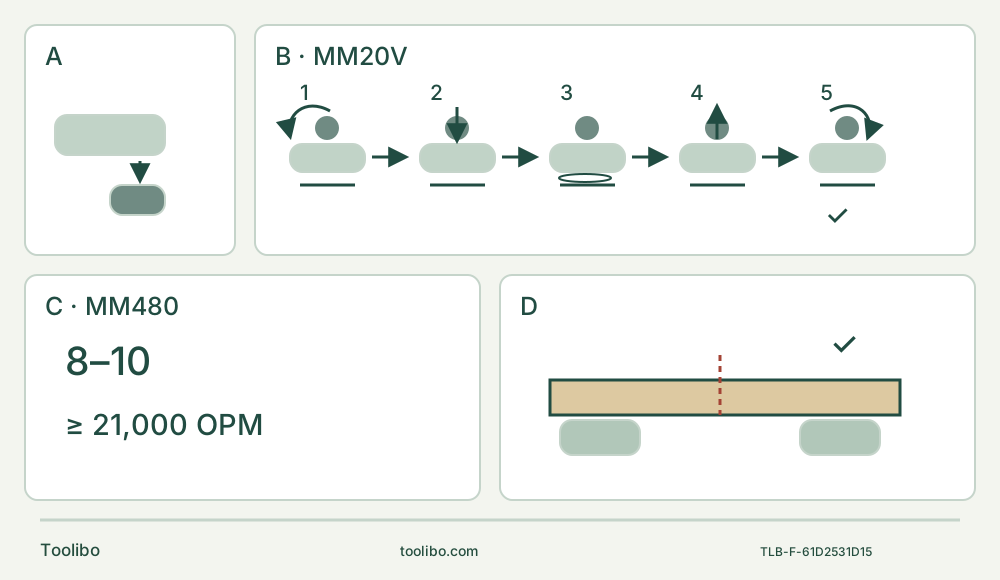
A · Isolate the qualified power system
Switch OFF and completely remove the approved B20V20 pack before assembly or inspection; a secondary latch is not permission to run with a loose battery.
B · Finish all five clamp actions
Loosen counterclockwise, press to extend the flange, seat flush on all pins, release temporary spring pressure, then fully hand-tighten clockwise.
C · Keep rating and speed separate
Use Dremel accessories rated at least 21,000 OPM. The MM480 softwood row is 8–10; any initial plunge starts at qualitative medium speed for control, not an invented dial number.
D · Support and accept the sample
Clamp retained stock, keep full blade travel clear and support waste against pinching or falling. Use light progressive cuts without twisting, then stop and remove the pack before acceptance.
Original schematic. A means battery removed, not a measured removal direction. B deliberately does not count interface pins; every actual pin must engage. C is the softwood chart range, not an initial-plunge instruction. D illustrates clearance and support only; actual clamps and secure waste support remain necessary.
Match the cordless body and its actual instructions
This project is for the US Dremel MM20V under manual 1605A000KS 05-21, with layout dated 18 May 2021, linked from the official MM20V-02 / F013CM20AB product. Match your actual nameplate and supplied instructions. The kit page establishes identity and a manual route, not what every existing owner received. This is a documentation-based workflow rather than a hands-on test.
The completed outcome is a short, visible edge-start cut in clamped, untreated softwood, using an intact identified Dremel MM480 wood blade. The manual’s chart explicitly includes this blade and material. It does not make an unmarked substitute equivalent or authorize an unseen nail. The wider manual also describes other materials and applications; those do not turn this first wood task into a metal, grout, scraping or unknown-coating procedure.
Qualify B20V20 power before assembly
The nameplate specification is 18 V / 20 V Max, with 10,000–20,000 oscillations per minute. “20 V” on an unrelated pack is not compatibility evidence. Use an intact genuine Dremel B20V20 in an already commissioned manufacturer-approved charging system, with the actual included power-system list and full pack/charger instructions available. The tool manual also refers to batteries in its included list, but this article does not invent alternative pack or charger models, charge times or indicator codes.
Set the top slide switch rearward to OFF before inserting a charged pack. Slide the pack into the housing until it locks. The secondary retaining latch is a precaution against a loose pack falling completely out, not permission to operate with incomplete engagement. If the pack does not lock normally, do not force it or continue cutting. To remove it, press its release button and slide it completely out.
Remove the battery before any assembly, adjustment, accessory change, servicing or cleaning. A rearward switch alone is not isolation. Keep separated terminals away from loose metal, and do not use damaged or altered packs or attempt battery repairs. Charge only under the actual approved instructions and their temperature limits. A substantial reduction in performance or runtime requires assessment and replacement when indicated, not repeated deep discharge to see how long it lasts.
Prepare stock, dust control and two-handed access
Inspect both faces and the complete intended cut path for foreign objects. Choose known clean softwood, not installed trim, chemically treated stock, unknown painted wood or a wall with hidden utilities. Mark a short line from an accessible edge. Clamp the retained stock to a stable platform; arrange support for the waste so it cannot close the kerf on the blade or fall dangerously. Clear the full blade approach and below-face travel of the bench, clamps, hands and cords. Do not support the piece in a hand or against your body.
Wear appropriate eye, hearing and respiratory protection for the dust. The manual also specifies protective gloves and rest periods for vibration exposure. Keep bystanders out of the work zone, ventilate and control dust. Hold this tool firmly with both hands, keeping the vents clear. A one-hand pose in an illustration does not replace the explicit two-hand instruction. Check that the chosen position lets you control the slide switch without reaching toward the blade.
For the matched dust adapter, isolate the tool, slide the adapter over the front and work it rearward until it fits snugly around the body. Secure its tab into the underside of the MM20V, then connect the hose and a vacuum appropriate to the actual material. Route the hose without pulling on the tool or crossing the cutting path. Inspect the tab and connection rather than merely resting the adapter over the nose. Extraction reduces exposure; it does not prove that an unknown finish is safe or that every vacuum is suitable for hazardous dust. This project does not substitute a different model’s sanding-only adapter.
Finish all five Easy-Lock actions
Only use Dremel accessories rated at least 21,000 OPM, even though the body’s stated maximum is 20,000 OPM. Check the actual MM480 for damage, and allow any hot accessory to cool before handling. Wear protective gloves against sharp edges. With the battery removed:
- Turn the clamping knob counterclockwise to loosen it.
- Press the knob to extend the clamping flange far enough to admit the blade. Loosen further if the required gap is not available; do not pry it open.
- Place the accessory flush against the holder with all interface pins engaged.
- Release pressure on the knob. The spring now holds the blade temporarily while you finish securing it.
- Turn the knob clockwise and fully hand-tighten as instructed, until it cannot be turned further without discomfort. Check secure attachment.
Step four is not the end of clamping. Do not use pliers, invent a numerical torque or mistake the spring hold for a locked blade. If an allowed angled orientation is used, the blade still must engage all pins and sit flush before the same complete tightening sequence. No universal adapter or Starlock snap-in method is established here.
If the accessory rocks because it is not seated, stop while isolated and correct the actual cause. Damaged pins, flange or knob need qualified service, not a powered wobble test. For removal after cooling, loosen counterclockwise, press the knob and lift the accessory clear of the pins; loosen further if necessary to provide room.
Use the chart without turning it into a universal entry speed
The variable-speed dial has ten positions. For the identified MM480 on softwood, the chart gives 8–10; for that blade on hardwood it gives 6–10. This project stays with softwood. Other blades and materials have different cells, and a blank cell is not permission to experiment on an unsupported material.
Practice on the sample and let the suitable accessory and speed do the work. The separate plunge instruction says to begin the initial entry at a qualitative medium speed for control, with an increase possible after the initial cut. It does not assign a numbered “medium” setting. Keep that entry instruction distinct from the chart’s material range; do not read 8–10 as a command to plunge at maximum speed. Our first task starts at an open edge rather than attempting an interior or blind plunge.
Cut with progressive passes, not twisting force
Recheck the clamp, fully tightened knob, dust connections, supports and clearance. Insert the approved pack only with the switch OFF. Grip with both hands, keep the blade clear of the stock and slide the switch forward to start. Bring the blade to the marked edge under control and use light pressure with progressive passes rather than trying to remove the full depth in one forced movement.
The manual’s cutting figure explicitly forbids twisting the tool because it can bind the blade. A back-and-forth cutting motion is not permission to torque the blade sideways in the kerf. Keep the cutting path aligned and support effective through breakthrough. Never reach below the stock or put a hand directly in front of the working area.
If the blade binds, the work shifts, attachment security changes or unusual vibration or heat develops, stop instead of adding pressure. Slide OFF, wait for motion to cease and remove the battery before investigating. Do not pull or twist a moving blade free, open the holder under power or keep operating a suspect pack. This guide provides no electronic-reset or jam-recovery shortcut.
After the intended cut, switch OFF and wait for the accessory to stop before setting the tool down. Remove the pack before clearing waste or handling the blade; hot parts need time to cool. Accept the sample only when the intended line and size are achieved, the required separation is complete, and there is no uncontrolled tear-out, scorching or evidence that the stock or supports moved. No numerical tolerance or finish guarantee is implied. Correct any failed condition on another sample before valuable work.
Do not silently turn the cutting setup into a sanding project
Sanding requires its own pad, correctly sized abrasive and material/speed selection. The manual’s sheet-adhesion sequence includes a brief powered seating step against a flat surface; that is a specific sanding instruction, not permission to start a cutting blade against the stock. Complete that separate procedure only under the actual sanding instructions. Remove the battery for sheet changes or pad rotation.
For sanding, keep pad and paper flat, use light continuous movement and do not wet sand. A worn backing pad that cannot retain the sheet needs replacement. Unknown paint or contaminated material requires a separate hazard assessment; the clean-softwood cutting outcome does not validate it. Likewise, the manual’s wider scraping and metal passages are not a basis for assuming this wood blade or technique suits those tasks.
Clean and store the isolated system
Keep vents and switch levers free of debris without inserting pointed objects. Avoid cleaning agents that attack plastics, including gasoline and ammonia-containing products. Do not disassemble the housing: the manual specifies no user-serviceable internal parts and directs service to a Dremel service centre.
Remove the battery for storage. The manual specifies a clean, dry, dust-free and preferably noncombustible surface at 16–29°C, without surrounding clutter. Follow any additional actual power-system instructions. After approved charging is complete, remove the pack from the charger and unplug the charger as instructed; do not treat it as permanent storage. Keep the blade protected, the knob and flange identifiable and the matched instructions available for the next isolated inspection.
Models referenced