
Keep face quality and dimensions in the same record
Good face oriented down, a sample dimension check, magnified edge damage and a retained trial record.
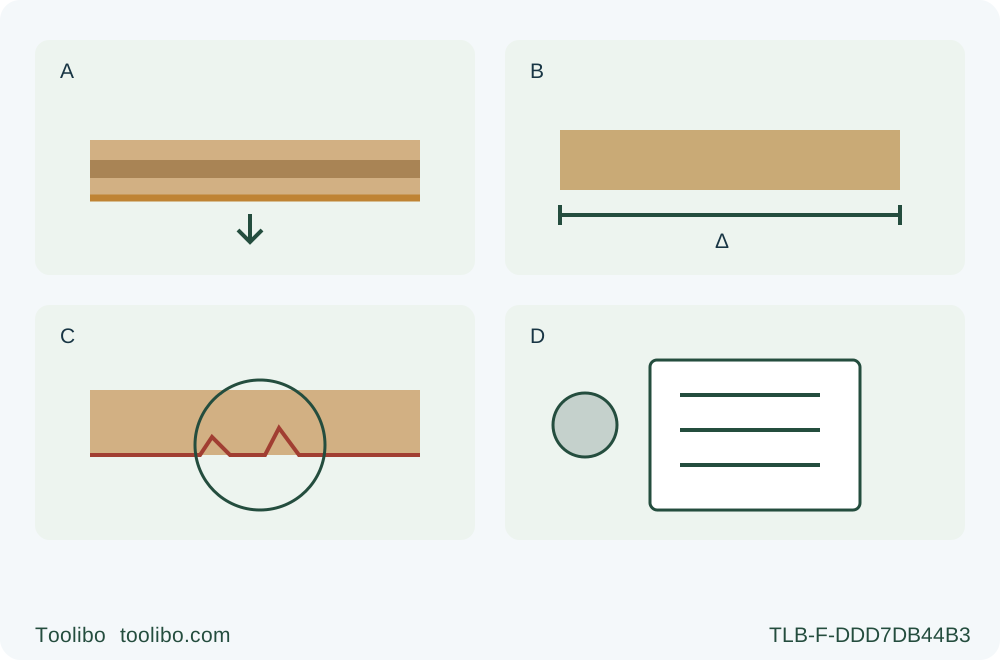
A · Mark the good face
Use representative known plywood and mark face, entry and exit; put the intended good face down as the exact manual directs.
B · Preserve the dimensions
After standstill, guard closure and battery removal, check retained size and straightness as well as appearance.
C · Inspect the complete edge
Observe both faces, corners, loose veneer and layer separation without sliding fingers along the edge; compare pre-existing damage notes.
D · Repeat or hold
Repeat an accepted, safe setup on comparable sample material. If either trial fails, hold valuable work and resolve the identified condition before another trial.
Conceptual sample inspection, not a running-cut diagram. A follows the P507 good-face-down instruction without guaranteeing a flawless underside. B represents the actual project dimension check, not a factory tolerance. C illustrates possible defects that must be inspected on both faces and at entry/exit. D records the setup and repeat result; it is not a blade test or quality certification.
A plywood edge can be straight and the correct length yet still be unsuitable for the visible part of a project. Torn face veneer, a damaged exit corner and loose layers are different observations. A useful trial records them separately, so that “the saw cut through” does not become the acceptance standard.
This workflow qualifies the finish of a normal square, edge-start cut on a manageable sample of known plywood. It uses the documented US RYOBI P507 under manual 990000975 REV:05, dated 5-6-20, with its correctly installed original wood-cutting assembly and an already commissioned, actually approved power system. The manual explicitly includes plywood and advises putting the good face down. That advice is a starting condition, not a guarantee that both faces will be flawless.
The result is a sample and a finish record for one panel batch and setup. It is not a shelf design, structural panel approval, blade replacement tutorial or promise of furniture-quality edges. Keep the full matching tool and actual battery/charger instructions, including the required 987000-432 battery/charger correlation information, available. Unknown blade assembly or power-system compatibility stops this trial before any cutting.
Define what the finished piece needs
Identify which face will be visible, which edge will remain exposed and which edges will later be hidden by the actual project design. Mark these on a sketch, not on a running tool. Do not assume that a future coating, edge strip or sanding pass will conceal every defect. Those later processes are outside this cutting trial.
Write acceptance criteria in ordinary observable terms before making the sample: for example, no loose veneer at the intended visible edge, no damaged exit corner in the retained area, and the required dimensions still present. If your project has a specified tolerance, use that actual requirement. This article supplies no universal chipout depth, cosmetic grade or structural limit.
Both faces may matter. In that case inspect both after the trial rather than declaring the hidden face irrelevant because the manual says good side down. A result that meets a one-visible-face requirement might fail a two-visible-face requirement. That is a difference in the task, not proof that the same cut changed quality.
Choose representative sample material
Use a manageable offcut from the same known plywood batch, with enough retained area for the base, guide and clamps. Keep the intended face orientation and cutting direction relative to the face grain comparable to the planned work. A test across one veneer direction does not establish the result for every orientation, thickness or panel construction.
Inspect both faces, edges and the intended cut path before setup. Record pre-existing chips, crushed corners, loose layers or surface damage so they are not later attributed to the cut. Unknown coatings, hidden fasteners, wet or warped stock and uncertain material are outside this trial. The P507 instructions exclude dangerous practices such as cutting into knots or nails, forcing cuts and using dull or improperly set blades.
Do not choose such a narrow scrap that its only possible support puts a hand near the blade or leaves the foot unstable. Small material is not automatically a safer sample. If the sample cannot be clamped and independently supported through separation with clear blade travel, choose a different piece or hold the task.
Set up the original qualified saw and the supported sample
Remove the battery before inspection, measurement or adjustment. Confirm that the original blade is suitable and serviceable for this plywood, the guard moves freely and closes properly, with no guard contact against the blade or other parts at all angles and depths of cut, and the controls and base are sound. A damaged or sticky guard, unexplained blade wobble or uncertain washers is not a finish variable to experiment with. Resolve the tool condition first under the complete instructions and qualified service where needed.
Keep zero bevel and set depth to satisfy both manual conditions: less than a full tooth visible below the work and no more than 1/4 in below it. The smaller permitted projection governs. Tighten the depth and bevel locks, then verify the actual result. Do not increase depth experimentally to chase a cleaner edge or borrow a scoring depth from a plunge saw.
Place the marked good face down as the manual directs. Securely clamp the retained work, support the sample near the cut and keep both portions supported outside the blade path. Waste must remain able to separate without pinching the kerf. The saw belongs on the supported retained piece, not on the offcut. The good face underneath must not be damaged by dirty or unsuitable contact surfaces before the saw even starts.
For the chosen straight rip trial, clamp a straightedge with suitable C-clamps as the P507 manual describes. Use the actual previously established guide-to-kerf relationship for this original assembly; the zero-degree notch is a reference, not a guaranteed offset. Keep the same contact side and guiding method for the repeat sample. Check clamp, guard and base clearance with power disconnected, beside or safely above the intended path with the blade guarded and no tooth contact.
Make one controlled cut, not a series of improvisations
Use the complete model-specific owner sequence. Wear eye protection with side shields marked ANSI Z87.1, together with suitable hearing and respiratory protection for the work, and maintain appropriate ventilation and dust precautions. Keep bystanders away. Do not invent an extraction adapter for this body simply because another saw accepts one.
Only when setup is complete, fit the qualified battery securely with the switch released. Keep both hands on the designated grips, the body to either side rather than in line with the blade, and no hand on or beneath the stock. Start with the blade clear, operate the lock-off and trigger, let the blade reach full speed, then guide it forward with steady even pressure. Keep the base supported and do not twist to follow a wandering mark.
Do not change depth, loosen a clamp, lift the guard, apply tape or add an improvised backing layer during this trial. Those changes either require isolation or introduce a different method not established here. This is not a reverse-feed, scoring, plunge or repeated-pass experiment. A repeatable normal cut is the object of the exercise.
If the blade binds or the saw stalls, release the trigger immediately and hold the saw motionless until fully stopped. Do not withdraw a moving blade. Remove the battery before assessment; this workflow gives no interrupted-cut restart recipe. Burning, abnormal vibration, loss of support or a moving guide ends the finish trial rather than becoming another data point to average away.
At normal completion, release the trigger and wait for complete standstill before removing the saw from the work. Confirm the lower guard has closed before setdown. Remove the battery before measuring or handling the sample.
Inspect faces, edge and dimensions separately
Label the sample’s good face, upper face, entry and exit so that later comparisons preserve orientation. Under adequate light, look at the retained edge along its full length and inspect both corners. Observe torn fibres, missing veneer, loose fragments and separation between layers. Do not slide bare fingers along a sharp or splintered edge to judge smoothness.
Check the required width and straightness as well as cosmetic condition. A visually clean edge produced on the wrong side of the mark is not a successful trial. Compare the cut with the pre-existing-condition notes; an old damaged corner cannot establish that the saw caused exit breakout. Conversely, new loose veneer should not be dismissed merely because the length is correct.
Record the actual blade identity, plywood batch and thickness, face orientation, cutting direction, zero bevel, depth, support and guide contact. Describe the observed defects rather than assigning an unsupported diagnosis. Chipout alone does not prove an electrical fault, a particular tooth-count need or a need to sharpen the blade.
Repeat an accepted setup, or hold a failed one
If the first sample meets the written requirements and no unsafe behaviour occurred, make a second comparable sample using the same qualified setup and the complete preparation and stopping sequence again. This second sample is an editorial repeatability check, not a manufacturer guarantee or a statistical quality certificate. Do not quietly change multiple variables and call the two cuts a controlled comparison.
If either result fails, hold the intended finished piece. With the battery removed, review material condition, support, guide movement, actual depth and the original blade’s suitability and condition. A safely identified setup error can be corrected under the complete owner instructions before a new trial; an uncertain tool or blade condition needs proper resolution first. This article supplies no sharpening, chemical cleaning, blade fitting or repair method.
Keep an accepted sample and its record as the reference for that particular job. A different panel batch, blade, angle, guide contact or finish requirement means checking the affected conditions again. The completed outcome is either a repeatably acceptable face-and-edge result with correct dimensions, or a documented hold before valuable material is cut. It is more useful than a single photograph of the cleanest side.
Models referenced