
Read the screw result before changing the clutch
Three conceptual countersunk screws show flush seating, an incompletely seated head and overdriving with surface damage.
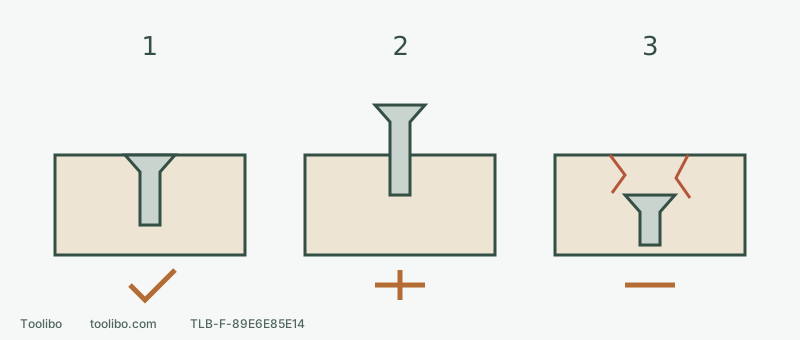
1 · Required position, no damage
Record the whole tested combination, including material, pilot hole, range 1 and clutch.
2 · Clutch releases too early
Stop, disconnect and check the bit and pilot hole before a small increase and a fresh trial.
3 · Too deep or damaged
Reduce the setting and reassess the fastener; do not switch to drill mode to force it.
Only a countersunk example intended to sit flush. Round or washer heads have different seating criteria; no universal clutch number is implied.
Separate the three controls
The top selector displays 1 for low range and 2 for high range. The collar behind the chuck selects the clutch or drilling mode; the trigger controls speed within the chosen range. Set the task and range first, then the clutch, then start smoothly. Changing one item at a time makes the result easier to interpret.
The 3403-20/3404-20 manual calls for low speed when driving screws. Low-melting-point plastics also need low speed. Wood drilling starts slowly, with speed increased according to the material and bit. Range 2 is not a default for every hole, nor a “more power” switch to move while a bit is stuck. Wait for a complete stop before every mechanical range change.
Prepare a representative trial
Use scrap of the same material and similar thickness, the intended screw and a driver of the correct size and profile. Clamp the sample securely and provide safe clearance behind it. Where thick or hard material needs a pilot hole, follow the fastener and material requirements. A clutch number cannot correct the wrong hole.
If the battery is swollen, leaking, smoking or unusually hot, do not continue approaching or handling it; stop and contact the manufacturer. With normal equipment, release the trigger, wait for a stop, centre-lock the direction switch and remove the battery before installing the driver. The jaws must grip its suitable shank securely, not just its tip. Never hold the chuck and pull the trigger to tighten it.
Start low and make one controlled attempt
With power disconnected, fully engage mechanical speed 1 and start at a low numbered clutch position. Check the driver and sample, then install and latch the specified battery with your finger off the trigger. Select the appropriate rotation.
Seat the driver fully in the screw recess and maintain axial alignment. Hold the drill securely and press the trigger gently. As the screw approaches the required position, reduce trigger travel and watch the head rather than relying only on sound. Release the trigger and wait for rotation to stop before leaving the screw or laying down the drill.
Choose the next action from the result
Swipe or scroll horizontally to see all columns.
| Result | Interpretation | Next change |
|---|---|---|
| Correct seating, intact head and undamaged material | The trial works for this combination | Record material, screw, pilot hole, speed 1 and clutch position |
| Clutch releases before the required seating position | A slightly higher setting may help, after checking the accessory and pilot hole | Stop and disconnect, increase slightly and test a fresh position |
| Head sinks too far or the surface crushes | Overdriving | Reduce the setting and check the target depth and fastener |
| Driver jumps out, screw tilts or material splits | Not simply insufficient torque | Stop and check the bit, alignment, pilot hole and material |
Correct seating depends on the fastener. A countersunk screw intended to be flush should sit flush without damaged edges. A washer-head or round-head screw should not be forced below the surface. One visual standard does not fit every screw, and the trial clutch position is not a calibrated torque specification for a structural connection.
Keep the conditions consistent on the actual work
Use the same screw, bit, pilot-hole arrangement and material combination, while watching each final seating result. Different hardness, thickness or fasteners require another trial rather than blind reuse of the first number.
Stop for a stall, slipping chuck, faulty control or unusual heat or smell. Do not keep increasing pressure or repeatedly pulse the trigger. Every adjustment or accessory change starts with a complete stop and battery removal. Before the next trial, restore and latch the battery with your finger off the trigger.
Drilling needs a deliberate mode change
Disconnect power before fitting a suitable drill bit. Align the drill symbol and choose the range for the material and accessory. In drilling mode, the previous numbered clutch setting does not limit the action as it did while driving screws; maintain control against binding and reaction torque. 3403-20 is the drill/driver. Hammer instructions in its shared manual concern 3404-20, not this model.
Models referenced